
[DIY Technique] How To Resurface Hardwood Floors Without Sanding
Wood floors are tough, but years of shuffling footsteps, fast-moving kids, high heels and sliding chairs take their toll, leaving scuffs, scratches, stains, ground-in grit and a dulled surface in their wake.
But you can restore the beauty of your wood floor without the cost and mess of completely sanding off the old finish and starting over. Instead, you can often simply recoat the old finish.
How Much Does It Cost To Refinish A Hardwood Floor?
A pro would charge from $4.00 per sq. ft. for sanding and refinishing, or about $1.50 per sq. ft. for recoating. In this article, I’ll show you how to do it for much less.
Can You Redo Your Hardwood Floors Without Sanding?
A recoating job is a two-step process:
- First you lightly sand the surface of the old finish using a floor buffing machine and a special sanding screen, shown in Photo 5. (You can rent a buffing machine for half or full day.)
- Then you apply a topcoat of finish.
The process sounds easy, and it is. But it’ll work only if you’re sure that the new coat will bond to the old. You shouldn’t have any adhesion problems if your floor was finished with the polyurethane finishes commonly used after about 1970, as long as it was never waxed.
Wax is a refinisher’s nightmare. Once a floor has been waxed, a pro won’t guarantee that a new topcoat will adhere, even if you do your best to strip off the wax. In these cases, completely sand off the old finish and start over. If you’re unsure about your finish, be sure to test it as I show in the next section, “Testing for Adhesion.”
Floors finished before 1970 were sometimes finished with a hard wax coating. Although you can’t use the resurfacing process shown here for these floors, don’t despair.
If waxed floors aren’t deeply scratched or gouged, you can often simply clean, rewax and buff them to restore their beauty. A specialty wood flooring dealer will give you maintenance advice and sell you the proper floor care products.
Wax is not the only product that can keep a new topcoat from adhering. Cleaning products that leave an oily or waxy residue, grease, bug spray (for ants or termites), and such oddball things as spilled wallpaper paste can all ruin adhesion. If you suspect the presence of any of these materials or are unsure how your floor has been maintained, be sure to test your floor as I show.
Finally, don’t expect a new topcoat to solve all floor problems. Deep gouges, scratches, burns, animal stains and color variations all require special fixes, or possibly a complete floor sanding.
How Do I Test Wooden Floors For Topcoat Adhesion?
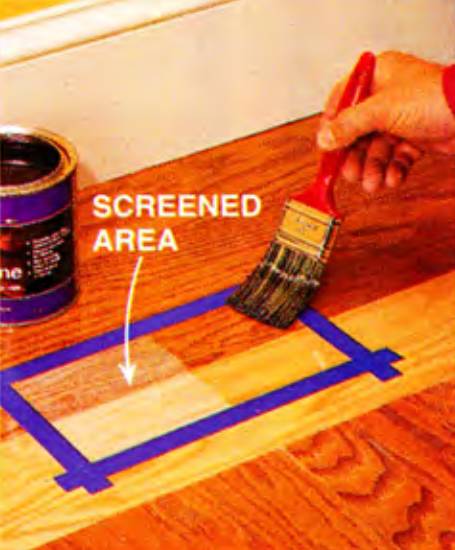
- Using a cleaner specifically formulated for wood floors, clean at least two 6-in. square sections of floor, one near a wall and the other in a high-traffic area.
- Tape off the sections and sand each lightly with a 100-grit screen or sand-paper to roughen the surface. (Like sandpaper, screens are coated with grit, but they don't clog up as easily.)
- Wipe off the dust and coat each section with oil-based (technically called oil-modified) polyurethane or a water-based urethane.
- Wait one day.
After 24 hours, check the adhesion by scratching the topcoat with a quarter or your fingernail.
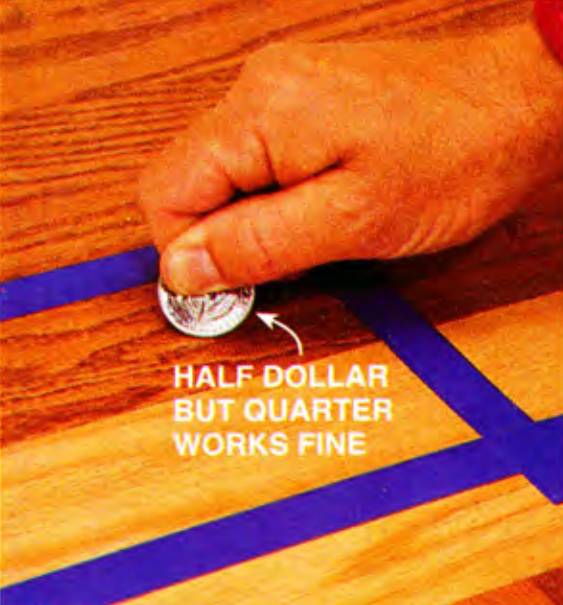
If it flakes off or separates from the old finish, you have an adhesion problem and you’ll have to completely sand off the old finish and start over.
How Do You Prepare Hardwood Flooring For A Recoat?
If you’re lucky and find that you can recoat your floor successfully, remove all the furniture and clean the floor using a cleaner specifically formulated for wood floors (Photo 1) or a mixture of 1/4 cup of white vinegar and a quart of water. If you purchase a cleaner, buy from a wood floor dealer to make sure you get the best stuff available.
Reminder: Wood and water don’t mix. Be sure to dampen the cloth, not the floor, with the cleaners.
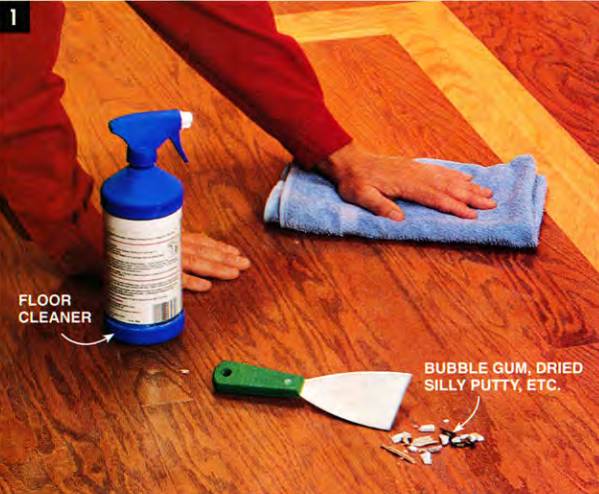
Wipe the floor with a cleaner specifically formulated for wood floors. Spray the cleaner on a cloth, not directly on the floor. Scrape up stuck-on paint or gunk with a putty knife. Keep an eye out for scratches, ridges or other mars in the wood.
While cleaning, inspect your floor for scuffs, scratches and other problems that need special attention (Photos 2 and 3).
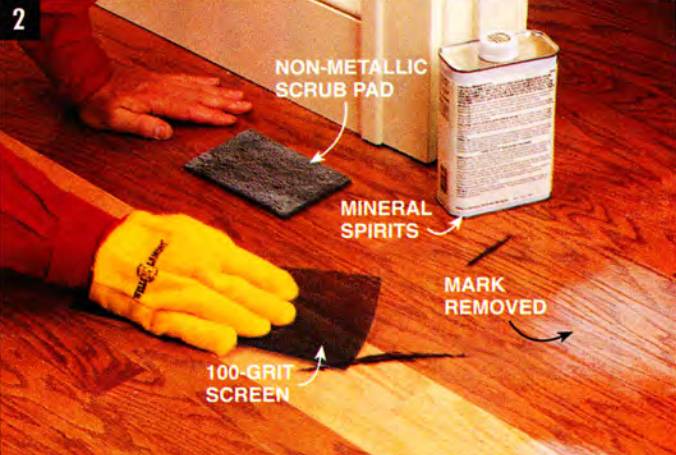
Remove stubborn stains and marks with a 100-grit screen or a nylon scrub pad and mineral spirits if necessary. Do not use water. Deep scratches can mean trouble, because they might discolor when recoated. Lightly sand and rub some new finish into the scratches to see if they’ll disappear (Photo 3).
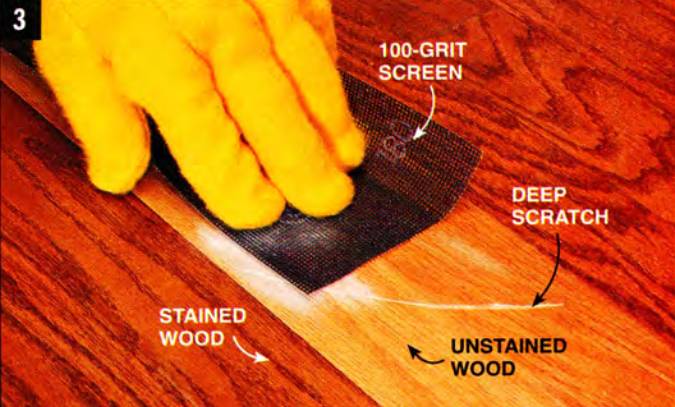
Lightly sand deep scratches in unstained floors with a screen and rub some polyurethane over the area to see if the scratches will disappear when recoated. Restain scratches in a stained floor.
If they still look bad, you’ll have to sand the entire floor to hide them.
Problem: Deep scratches in a dark-stained floor are an eyesore, and they’re difficult to hide. To match the original stain, begin with a lighter stain, because the color will probably deepen when the damaged wood absorbs it. Or call in a wood flooring pro to handle repairs.
If your floor is stained, keep a watchful eye out for uneven or warped boards when you clean it. Screening the floor with the buffing machine, like we show in Photo 5, will cut through the stain at the high points, expose the natural wood color and ruin the floor’s appearance. To prevent this, you can screen the entire stained floor by hand, which is a big job, but still simpler than resanding and starting over.
Wooden Floor Screening And Finishing
Screening the floor slightly roughens the surface of the old finish so the new finish adheres better. Roughen the edges first with 100-grit screen.
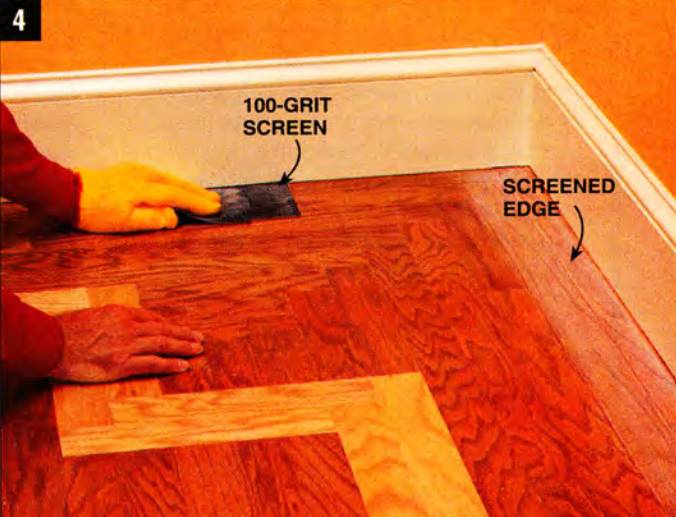
Roughen the floor edges with a 100-grit screen until the floor sur-face appears chalky or frosted. Wear gloves to protect your hands.
Then, screen the entire floor with a buffing machine and the special attachments that the rental store will supply: a drive brush, a special pad and a 100-grit disc screen.
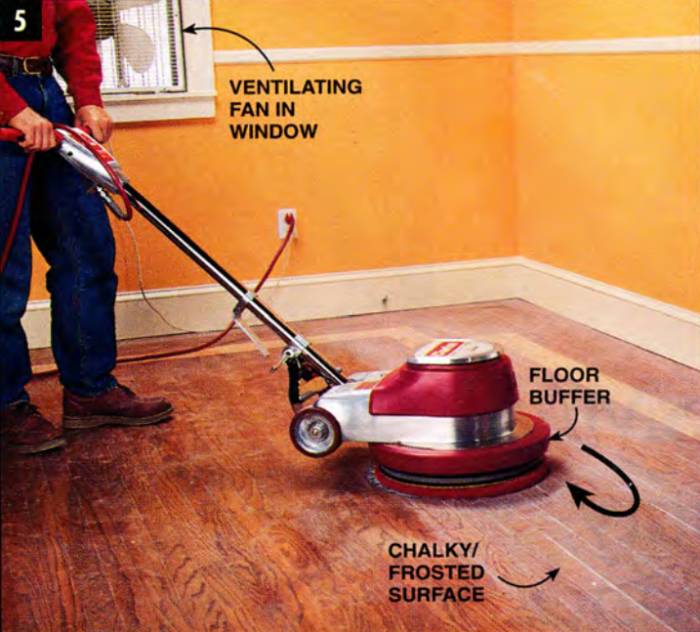
Center the buffer on a 100-grit round screen and roughen the surface of the floor finish evenly. Move the buffer back and forth in the direction of the wood strips until the finish has an evenly chalky appearance. Keep the buffer moving, so it won’t cut through the finish into the wood.
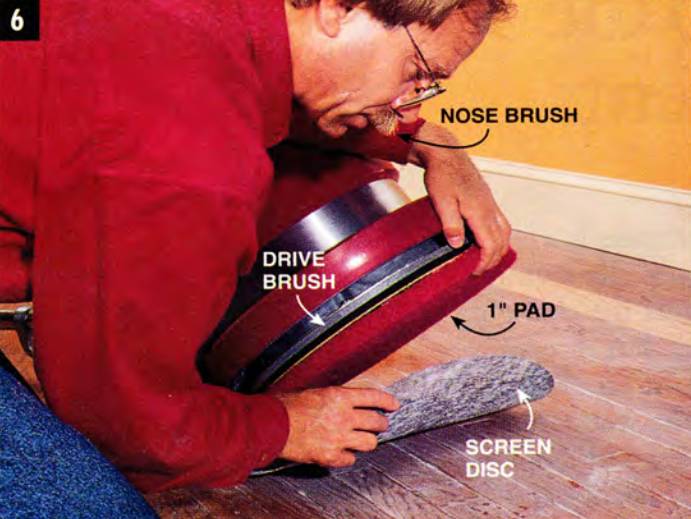
Lift the buffer and carefully check the screen every few minutes for grit. Clean off any particles you find because they’ll scratch and gouge the floor finish.
Tip: Buffing machines are heavy, awkward and powerful. If you haven’t used one before, learn to control it by attaching the drive brush and operating the machine on smooth, clean concrete. (Make sure to knock any grit out of the brush before putting it on your wood floor. Grit particles can severely scratch a wood floor.)
As you screen the floor, keep the buffer moving to keep the screen from cutting through the finish. The finish should look chalky or frosted after the disc passes over it.
Tip: Hard finishes should not gum up the screen. If the screen clogs up, you probably have wax or oil on the floor and cannot use the surface refinishing method we’re describing here.
Screens slowly wear down, so buy several and return the unused ones to the rental store when you return the buffing machine.
When finished, vacuum the floor thoroughly and wipe it clean (Photo 7), because any dust left will show up in the new finish — guaranteed! Dispose of thinner-soaked rags by letting them dry in the open air before throwing them in the open air before throwing them into the trash.
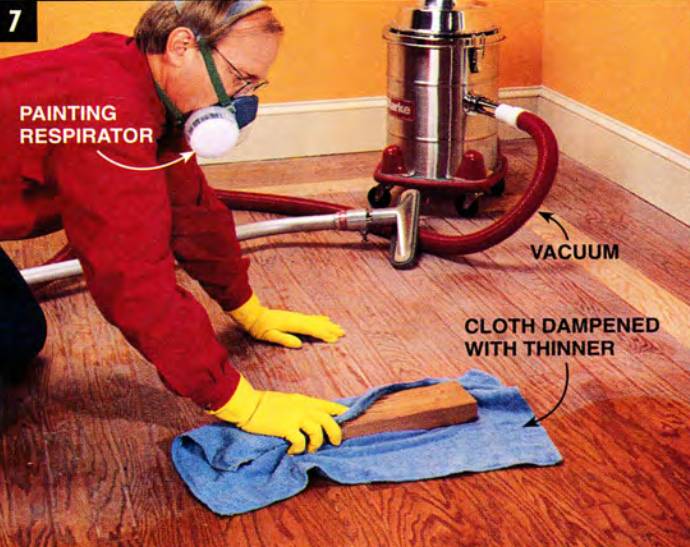
Vacuum the floor thoroughly and wipe off the dust with a cloth dampened with mineral spirits (if you’re going to recoat with oil-based polyurethane) or with water (if you’re recoating with a water-based urethane).
A Word About Floor Finishes
Oil-based polyurethane is the easiest finish to apply. It’s virtually goof-proof, but contains solvents, so wear a painting respirator that has a charcoal filter and ventilate the room well when you spread it.
Water-based urethanes contain little solvent but are more difficult to apply because they have a watery consistency and dry quickly. You have to work faster and take care not to leave ridges when you spread them. Buy special spreading pads from the flooring store where you purchase the finish.
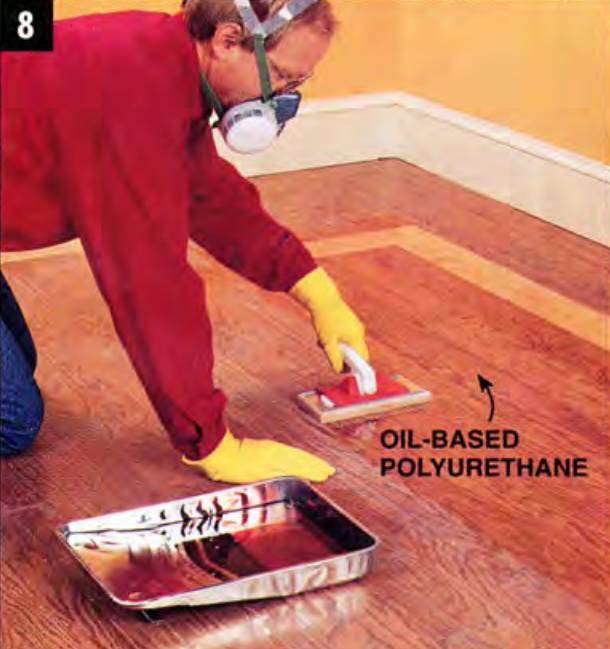
Apply one coat of oil-based polyurethane or water-based urethane. Whichever you choose, make sure it’s specifically formulated for floors.
Wood floors are tough, but years of shuffling footsteps, fast-moving kids, high heels and sliding chairs take their toll, leaving scuffs, scratches, stains, ground-in grit and a dulled surface in their wake.
But you can restore the beauty of your wood floor without the cost and mess of completely sanding off the old finish and starting over. Instead, you can often simply recoat the old finish.
How Much Does It Cost To Refinish A Hardwood Floor?
A pro would charge from $4.00 per sq. ft. for sanding and refinishing, or about $1.50 per sq. ft. for recoating. In this article, I’ll show you how to do it for much less.
Can You Redo Your Hardwood Floors Without Sanding?
A recoating job is a two-step process:
- First you lightly sand the surface of the old finish using a floor buffing machine and a special sanding screen, shown in Photo 5. (You can rent a buffing machine for half or full day.)
- Then you apply a topcoat of finish.
The process sounds easy, and it is. But it’ll work only if you’re sure that the new coat will bond to the old. You shouldn’t have any adhesion problems if your floor was finished with the polyurethane finishes commonly used after about 1970, as long as it was never waxed.
Wax is a refinisher’s nightmare. Once a floor has been waxed, a pro won’t guarantee that a new topcoat will adhere, even if you do your best to strip off the wax. In these cases, completely sand off the old finish and start over. If you’re unsure about your finish, be sure to test it as I show in the next section, “Testing for Adhesion.”
Floors finished before 1970 were sometimes finished with a hard wax coating. Although you can’t use the resurfacing process shown here for these floors, don’t despair.
If waxed floors aren’t deeply scratched or gouged, you can often simply clean, rewax and buff them to restore their beauty. A specialty wood flooring dealer will give you maintenance advice and sell you the proper floor care products.
Wax is not the only product that can keep a new topcoat from adhering. Cleaning products that leave an oily or waxy residue, grease, bug spray (for ants or termites), and such oddball things as spilled wallpaper paste can all ruin adhesion. If you suspect the presence of any of these materials or are unsure how your floor has been maintained, be sure to test your floor as I show.
Finally, don’t expect a new topcoat to solve all floor problems. Deep gouges, scratches, burns, animal stains and color variations all require special fixes, or possibly a complete floor sanding.
How Do I Test Wooden Floors For Topcoat Adhesion?
- Using a cleaner specifically formulated for wood floors, clean at least two 6-in. square sections of floor, one near a wall and the other in a high-traffic area.
- Tape off the sections and sand each lightly with a 100-grit screen or sand-paper to roughen the surface. (Like sandpaper, screens are coated with grit, but they don't clog up as easily.)
- Wipe off the dust and coat each section with oil-based (technically called oil-modified) polyurethane or a water-based urethane.
- Wait one day.
After 24 hours, check the adhesion by scratching the topcoat with a quarter or your fingernail.
If it flakes off or separates from the old finish, you have an adhesion problem and you’ll have to completely sand off the old finish and start over.
How Do You Prepare Hardwood Flooring For A Recoat?
If you’re lucky and find that you can recoat your floor successfully, remove all the furniture and clean the floor using a cleaner specifically formulated for wood floors (Photo 1) or a mixture of 1/4 cup of white vinegar and a quart of water. If you purchase a cleaner, buy from a wood floor dealer to make sure you get the best stuff available.
Reminder: Wood and water don’t mix. Be sure to dampen the cloth, not the floor, with the cleaners.
Wipe the floor with a cleaner specifically formulated for wood floors. Spray the cleaner on a cloth, not directly on the floor. Scrape up stuck-on paint or gunk with a putty knife. Keep an eye out for scratches, ridges or other mars in the wood.
While cleaning, inspect your floor for scuffs, scratches and other problems that need special attention (Photos 2 and 3).
Remove stubborn stains and marks with a 100-grit screen or a nylon scrub pad and mineral spirits if necessary. Do not use water. Deep scratches can mean trouble, because they might discolor when recoated. Lightly sand and rub some new finish into the scratches to see if they’ll disappear (Photo 3).
Lightly sand deep scratches in unstained floors with a screen and rub some polyurethane over the area to see if the scratches will disappear when recoated. Restain scratches in a stained floor.
If they still look bad, you’ll have to sand the entire floor to hide them.
Problem: Deep scratches in a dark-stained floor are an eyesore, and they’re difficult to hide. To match the original stain, begin with a lighter stain, because the color will probably deepen when the damaged wood absorbs it. Or call in a wood flooring pro to handle repairs.
If your floor is stained, keep a watchful eye out for uneven or warped boards when you clean it. Screening the floor with the buffing machine, like we show in Photo 5, will cut through the stain at the high points, expose the natural wood color and ruin the floor’s appearance. To prevent this, you can screen the entire stained floor by hand, which is a big job, but still simpler than resanding and starting over.
Wooden Floor Screening And Finishing
Screening the floor slightly roughens the surface of the old finish so the new finish adheres better. Roughen the edges first with 100-grit screen.
Roughen the floor edges with a 100-grit screen until the floor sur-face appears chalky or frosted. Wear gloves to protect your hands.
Then, screen the entire floor with a buffing machine and the special attachments that the rental store will supply: a drive brush, a special pad and a 100-grit disc screen.
Center the buffer on a 100-grit round screen and roughen the surface of the floor finish evenly. Move the buffer back and forth in the direction of the wood strips until the finish has an evenly chalky appearance. Keep the buffer moving, so it won’t cut through the finish into the wood.
Lift the buffer and carefully check the screen every few minutes for grit. Clean off any particles you find because they’ll scratch and gouge the floor finish.
Tip: Buffing machines are heavy, awkward and powerful. If you haven’t used one before, learn to control it by attaching the drive brush and operating the machine on smooth, clean concrete. (Make sure to knock any grit out of the brush before putting it on your wood floor. Grit particles can severely scratch a wood floor.)
As you screen the floor, keep the buffer moving to keep the screen from cutting through the finish. The finish should look chalky or frosted after the disc passes over it.
Tip: Hard finishes should not gum up the screen. If the screen clogs up, you probably have wax or oil on the floor and cannot use the surface refinishing method we’re describing here.
Screens slowly wear down, so buy several and return the unused ones to the rental store when you return the buffing machine.
When finished, vacuum the floor thoroughly and wipe it clean (Photo 7), because any dust left will show up in the new finish — guaranteed! Dispose of thinner-soaked rags by letting them dry in the open air before throwing them in the open air before throwing them into the trash.
Vacuum the floor thoroughly and wipe off the dust with a cloth dampened with mineral spirits (if you’re going to recoat with oil-based polyurethane) or with water (if you’re recoating with a water-based urethane).
A Word About Floor Finishes
Oil-based polyurethane is the easiest finish to apply. It’s virtually goof-proof, but contains solvents, so wear a painting respirator that has a charcoal filter and ventilate the room well when you spread it.
Water-based urethanes contain little solvent but are more difficult to apply because they have a watery consistency and dry quickly. You have to work faster and take care not to leave ridges when you spread them. Buy special spreading pads from the flooring store where you purchase the finish.
Apply one coat of oil-based polyurethane or water-based urethane. Whichever you choose, make sure it’s specifically formulated for floors.