
Beat Your Roof's Three Worst Enemies (Worn Out Shingles, Failing Flashings, Poor Ventilation)
You’ll never appreciate a leak-proof roof as much as when you don’t have one. Believe me, shuffling pans and buckets around the attic to catch drips on a stormy night can be a nightmare.
Fortunately, this nightmare doesn’t occur often. Roofs and the products we use to cover them withstand billions of raindrops, tons of snow and ice, baking and frigid temperature extremes, and sometimes natural disasters like hurricanes and tornadoes.
Eventually, however, roofs wear out.
Here I’ll explain how asphalt shingles break down and fail. I’ll limit this discussion to asphalt shingles because that’s what roofers put on about 80% of the homes in the United States and Canada.
Cedar shingles or shakes, tile or metal roofs cover the other 20 percent. However, if your roof is among these, this article should help you as well, because many of the same factors that cause leaks in asphalt roofs will cause leaks in these other materials too.
Flat, or nearly flat roofs have unique problems of their own, but sorry, I won’t talk about them here.
How A Roof Breaks Down
If it weren’t for natural disasters, which sometimes not only blows off shingles but entire roofs, asphalt shingle roofs would generally live a long and useful life. Rain, snow, ice, and cold weather hardly affect them.
But regardless of your location, all asphalt shingles have a common enemy — the sun.
The first signs of trouble might be a pile of tiny colored granules that you notice under leaves and other debris as you clean out your gutters (Fig. A).

Ultraviolet (UV) rays and heat from the sun break down asphalt shingles, causing them to turn brittle, shrink, crack, curl, cup, and lose their coating of mineral granules.
Or while up on the roof retrieving your daughter’s boomerang, you might hear the shingles crack or break underfoot. Or perhaps you’ll see some shingle edges curled upward or downward. All these signs indicate that your roof is nearing its end and you’ll probably want to replace it within the next few years.
By this time, the sun has done its damage. An asphalt shingle is basically a fiber mat soaked in hot asphalt and then cooled. Asphalt sheds water well, but it can’t shed the sun’s high-energy ultraviolet (UV) rays. These rays gradually break down the asphalt, causing shingles to lose their flexibility, become brittle, shrink and crack.
Manufacturers design shingles to resist this breakdown in two ways. First, they cover the asphalt with hard mineral granules to block the UV waves (and make our roofs colorful).
However, after a decade or so, many of these granules will have eroded off the shingle surface, leaving the asphalt more exposed and vulnerable. At that point, deterioration speeds up. Incidentally, walking on the roof, especially on hot days, can knock off the granules too, so stay off your roof as much as possible.
As a second defense, manufacturers increase the amount of asphalt in some grades of shingles. These thicker grades take longer to break down. They cost more, but can last 30 to 40 years, compared to thinner shingles that might last only 15 to 20 years. (Manufacturers rate the quality of shingles by how long they should last.)
Of course, in reality, shingle longevity depends on how much sun hits the roof. Shingles in sunny Phoenix take a greater beating than those in cloudy Seattle. For that matter, the north-facing side of your roof might last twice as long as the south-facing side, because it catches less direct sunlight.
There’s not much you can do to protect your roof from the direct rays of the sun, but you do have some control over the second factor that destroys roofs — heat. Root temperatures in the desert Southwest can hit 200 degrees F, and most roofs throughout the United States and Canada hit at least the 160-degree F mark several times each summer. This sizzling heat breaks down the asphalt by softening the shingles and drying them out, so they become more brittle when they cool.
You can reduce the heat buildup on your roof by making sure your attic is well ventilated. Vents located in the roof overhang and high near the ridge on top allow cool air to enter the low vents, flow along the underside of the hot root sheathing, cool the roof and exit as hot air through the high vents. This airflow can reduce the roof temperature as much as 20 degrees F. Attic fans, common on many homes in the South, assure an even better flow.
Good ventilation extends the life of your roof, but no one is sure how much. Manufacturers are running aging experiments on shingle roofs to find out.
But whether or not that 20-degree temperature variation extends your roof’s life, there’s no question that the shingles on your roof will eventually wear out. However, experts say this is generally not the main cause of leaks. Homeowners usually spot the worn roof and replace it before leaks occur. The real culprit is inadequate flashing.
Leaks Around The Flashing
Flashing consists of sheet metal, heavy asphalt or other flexible waterproof materials that roofers put at vulnerable spots on the roof. That includes such places as dormers, chimneys, plumbing pipes and valleys (Fig. B).
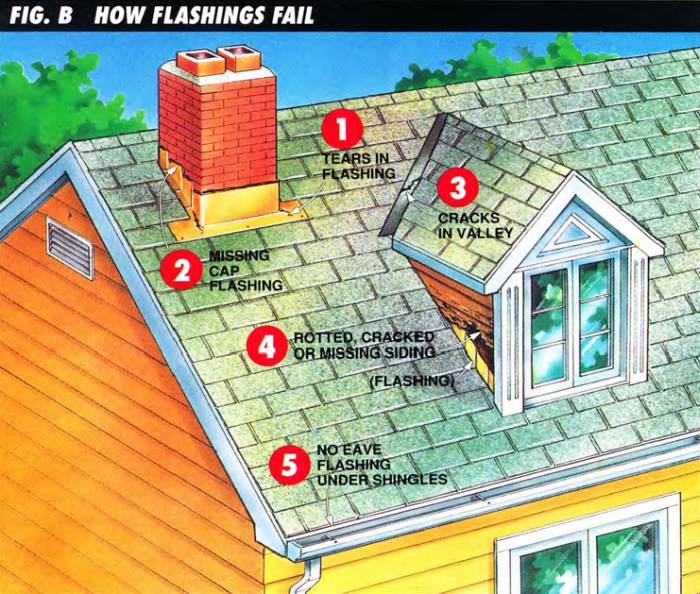
- Metal flashing can tear around chimneys or where it was re-bent during a reroofing job. Rooters sometimes drive nails through the metal too close to corners when reroofing.
- Asphalt cement, which substitutes for flashing tucked into the mortar joints in masonry chimneys, will leak after a few years.
- Valley Flashing can crack if it’s stepped on.
- Damaged siding or cracked stucco allows water to get behind the flashing and into the walls.
- Water backed up behind ice dams can seep through the roof unless cave flashing under the shingles stops it.
Chimneys cause the most problems.
Because it’s so heavy, a chimney has its own foundation, so it settles and moves independently of the house. This movement can cause flashings to stretch and tear open. Furthermore, you have to tuck chimney flashing into the mortar joints to keep water from running down behind the flashing.
Unfortunately, roofers don’t always do a good job here, especially after the original flashing wears out. Installing chimney flashing is a job for an expert. Few roofers have the skills to restore it, and often a homeowner simply doesn’t want to cough up the dough for a first-class job. The cheap, quick solution is to fill gaps with plastic roof cement. Unfortunately, this doesn’t last long. The cement will harden and crack within a few years and leaks soon begin.
Many chimneys were built without an angled “saddle.” A saddle looks like a small roof added to the back side of a chimney. It keeps rain, snow, and ice from collecting there and prematurely corroding the flashing. All chimneys should have one. (Skylights should have some type of special flashing on their backside for the same reason.)
“Valley flashing,” the covering used to protect the junction where two roof sections meet, is especially vulnerable as it ages. Unless it’s metal, it becomes brittle and will crack if you step on it when clearing a dead branch from the roof. Remind anyone who climbs up on your roof not to step in a valley.
Flashing at a roof/wall junction sometimes leaks because a roofer drove a nail through it when putting on a second layer of shingles. But more often, the siding itself has rotted or cracked, so water can penetrate the siding (wood or stucco) and run down behind the flashing.
One type of flashing, called “eave flashing,” is a strip of asphalt roofing that runs along the lower edge of your roof under the shingles to protect the roof from ice dams in regions with snowfall. An ice dam occurs when water from melting snow freezes near the edge of the roof and traps other melt water behind it. This water can run back up under the shingles and will leak into your house, unless you have eave flashing to block it. While good roof ventilation will prevent most ice dams, eave flashing helps prevent leaks even if ice dams occur.
We can point out where problems commonly occur to help you find leaks. But even so, pinpointing the exact spot isn’t always easy. Water can enter along the chimney, run down the underside of the roof, drip into the attic insulation near the outside wall, and appear only after it soaks through the drywall or plaster ceiling, nowhere near where it began. Often you’ll have to climb into the attic with a flashlight to trace the leak’s path back to its source.
The best fix is to install the flashing properly. Experts report that all too often the primary cause of flashing failure is improper installation in the first place.
Flashing is the most important part of roofing, but it easily gets shortchanged because its slow, tedious work that has to be done just so. Roofers, who are paid by how many shingles they lay, have little incentive to do it carefully, unless you insist and are willing to pay the price.
To make sure the flashing is installed properly, hire experienced roofers who will explain how they plan to do it. Before you make your final payment to the roofer, confirm with your building inspector that it was done right.
Roof Failure From The Inside
After you go through so much trouble to have a new roof installed properly, it hardly seems fair that your roof (in a cold region) can fail from the underside too.
An experienced roofing contractor friend of mine told me about the time when he was called in to investigate a leak complaint and discovered that the shingles and flashings were perfectly sound.
But in the attic he found numerous nails poking through the roof sheathing, where they had been driven when an old roof had been removed. The nails were white with frost. Whenever the roof heated up during the day, the frost melted and dripped down onto the ceilings below (Fig. C).
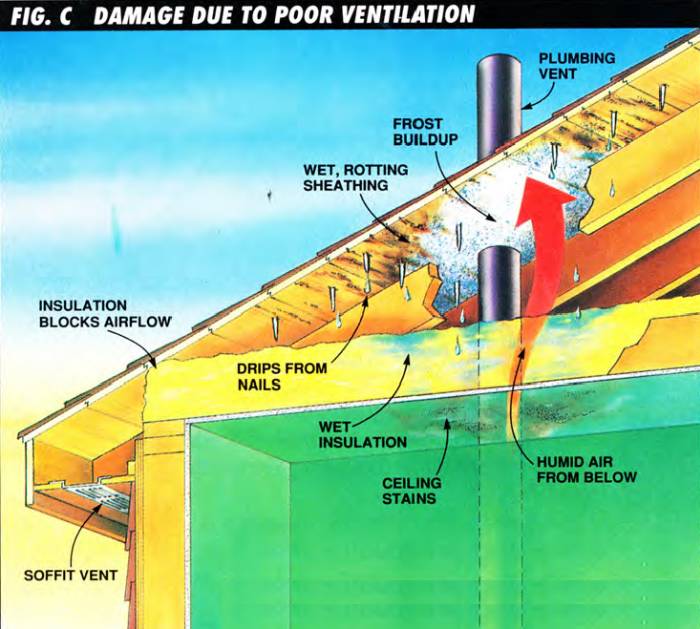
When an attic has poor ventilation, moisture carried by humid air from the house below will rise and condense on the cold roof sheathing and rafters. Wet sheathing will rot, and water dripping from nails will wet the insulation and discolor the ceiling below. Here, what normally would be good ventilation provided by a soffit vent has been blocked by insulation improperly stuffed against the roof sheathing.
Then the nails frosted up again at night. From this observation, my friend always recommends pulling all old nails from previous roofing jobs when tearing off old shingles, rather than driving them down into the wood.
Even worse, my friend has seen the roof boards in some attics completely white with frost and soaked in places. The icing was caused by warm, humid air from the house below rising up into the attic where the moisture it contained condensed on the cold underside of the root (Fig. C). The dampness caused the roof to rot from below.
Preventing this problem is a far better solution than replacing sections of rotted roof.
To begin with, you can close up a lot of those air leaks to keep moisture out of your attic. But you also must supply good attic ventilation to flush out the moisture that gets into the attic anyway. The same vents that cool your roof in the summer vent humid air in the winter.
From his experience, my friend estimates that most attics across the northern half of the United States and in Canada are notoriously underventilated, and even the building code requirement (1 sq. ft. of ventilation for every 150 to 300 sq. ft. of attic area) isn’t always enough.
Technically, of course, ventilation isn’t a roofer’s problem. But better roofing contractors will discuss ventilation with you before they work on your roof because they know how quickly poor ventilation can lead to rot. And they can spot such trouble easily if they have to replace rotten roof sheathing before they can put on new shingles.
After a contractor makes a recommendation, check the ventilation plan with your local building inspector to make sure it’ll do the job.
You’ll never appreciate a leak-proof roof as much as when you don’t have one. Believe me, shuffling pans and buckets around the attic to catch drips on a stormy night can be a nightmare.
Fortunately, this nightmare doesn’t occur often. Roofs and the products we use to cover them withstand billions of raindrops, tons of snow and ice, baking and frigid temperature extremes, and sometimes natural disasters like hurricanes and tornadoes.
Eventually, however, roofs wear out.
Here I’ll explain how asphalt shingles break down and fail. I’ll limit this discussion to asphalt shingles because that’s what roofers put on about 80% of the homes in the United States and Canada.
Cedar shingles or shakes, tile or metal roofs cover the other 20 percent. However, if your roof is among these, this article should help you as well, because many of the same factors that cause leaks in asphalt roofs will cause leaks in these other materials too.
Flat, or nearly flat roofs have unique problems of their own, but sorry, I won’t talk about them here.
How A Roof Breaks Down
If it weren’t for natural disasters, which sometimes not only blows off shingles but entire roofs, asphalt shingle roofs would generally live a long and useful life. Rain, snow, ice, and cold weather hardly affect them.
But regardless of your location, all asphalt shingles have a common enemy — the sun.
The first signs of trouble might be a pile of tiny colored granules that you notice under leaves and other debris as you clean out your gutters (Fig. A).
Ultraviolet (UV) rays and heat from the sun break down asphalt shingles, causing them to turn brittle, shrink, crack, curl, cup, and lose their coating of mineral granules.
Or while up on the roof retrieving your daughter’s boomerang, you might hear the shingles crack or break underfoot. Or perhaps you’ll see some shingle edges curled upward or downward. All these signs indicate that your roof is nearing its end and you’ll probably want to replace it within the next few years.
By this time, the sun has done its damage. An asphalt shingle is basically a fiber mat soaked in hot asphalt and then cooled. Asphalt sheds water well, but it can’t shed the sun’s high-energy ultraviolet (UV) rays. These rays gradually break down the asphalt, causing shingles to lose their flexibility, become brittle, shrink and crack.
Manufacturers design shingles to resist this breakdown in two ways. First, they cover the asphalt with hard mineral granules to block the UV waves (and make our roofs colorful).
However, after a decade or so, many of these granules will have eroded off the shingle surface, leaving the asphalt more exposed and vulnerable. At that point, deterioration speeds up. Incidentally, walking on the roof, especially on hot days, can knock off the granules too, so stay off your roof as much as possible.
As a second defense, manufacturers increase the amount of asphalt in some grades of shingles. These thicker grades take longer to break down. They cost more, but can last 30 to 40 years, compared to thinner shingles that might last only 15 to 20 years. (Manufacturers rate the quality of shingles by how long they should last.)
Of course, in reality, shingle longevity depends on how much sun hits the roof. Shingles in sunny Phoenix take a greater beating than those in cloudy Seattle. For that matter, the north-facing side of your roof might last twice as long as the south-facing side, because it catches less direct sunlight.
There’s not much you can do to protect your roof from the direct rays of the sun, but you do have some control over the second factor that destroys roofs — heat. Root temperatures in the desert Southwest can hit 200 degrees F, and most roofs throughout the United States and Canada hit at least the 160-degree F mark several times each summer. This sizzling heat breaks down the asphalt by softening the shingles and drying them out, so they become more brittle when they cool.
You can reduce the heat buildup on your roof by making sure your attic is well ventilated. Vents located in the roof overhang and high near the ridge on top allow cool air to enter the low vents, flow along the underside of the hot root sheathing, cool the roof and exit as hot air through the high vents. This airflow can reduce the roof temperature as much as 20 degrees F. Attic fans, common on many homes in the South, assure an even better flow.
Good ventilation extends the life of your roof, but no one is sure how much. Manufacturers are running aging experiments on shingle roofs to find out.
But whether or not that 20-degree temperature variation extends your roof’s life, there’s no question that the shingles on your roof will eventually wear out. However, experts say this is generally not the main cause of leaks. Homeowners usually spot the worn roof and replace it before leaks occur. The real culprit is inadequate flashing.
Leaks Around The Flashing
Flashing consists of sheet metal, heavy asphalt or other flexible waterproof materials that roofers put at vulnerable spots on the roof. That includes such places as dormers, chimneys, plumbing pipes and valleys (Fig. B).
- Metal flashing can tear around chimneys or where it was re-bent during a reroofing job. Rooters sometimes drive nails through the metal too close to corners when reroofing.
- Asphalt cement, which substitutes for flashing tucked into the mortar joints in masonry chimneys, will leak after a few years.
- Valley Flashing can crack if it’s stepped on.
- Damaged siding or cracked stucco allows water to get behind the flashing and into the walls.
- Water backed up behind ice dams can seep through the roof unless cave flashing under the shingles stops it.
Chimneys cause the most problems.
Because it’s so heavy, a chimney has its own foundation, so it settles and moves independently of the house. This movement can cause flashings to stretch and tear open. Furthermore, you have to tuck chimney flashing into the mortar joints to keep water from running down behind the flashing.
Unfortunately, roofers don’t always do a good job here, especially after the original flashing wears out. Installing chimney flashing is a job for an expert. Few roofers have the skills to restore it, and often a homeowner simply doesn’t want to cough up the dough for a first-class job. The cheap, quick solution is to fill gaps with plastic roof cement. Unfortunately, this doesn’t last long. The cement will harden and crack within a few years and leaks soon begin.
Many chimneys were built without an angled “saddle.” A saddle looks like a small roof added to the back side of a chimney. It keeps rain, snow, and ice from collecting there and prematurely corroding the flashing. All chimneys should have one. (Skylights should have some type of special flashing on their backside for the same reason.)
“Valley flashing,” the covering used to protect the junction where two roof sections meet, is especially vulnerable as it ages. Unless it’s metal, it becomes brittle and will crack if you step on it when clearing a dead branch from the roof. Remind anyone who climbs up on your roof not to step in a valley.
Flashing at a roof/wall junction sometimes leaks because a roofer drove a nail through it when putting on a second layer of shingles. But more often, the siding itself has rotted or cracked, so water can penetrate the siding (wood or stucco) and run down behind the flashing.
One type of flashing, called “eave flashing,” is a strip of asphalt roofing that runs along the lower edge of your roof under the shingles to protect the roof from ice dams in regions with snowfall. An ice dam occurs when water from melting snow freezes near the edge of the roof and traps other melt water behind it. This water can run back up under the shingles and will leak into your house, unless you have eave flashing to block it. While good roof ventilation will prevent most ice dams, eave flashing helps prevent leaks even if ice dams occur.
We can point out where problems commonly occur to help you find leaks. But even so, pinpointing the exact spot isn’t always easy. Water can enter along the chimney, run down the underside of the roof, drip into the attic insulation near the outside wall, and appear only after it soaks through the drywall or plaster ceiling, nowhere near where it began. Often you’ll have to climb into the attic with a flashlight to trace the leak’s path back to its source.
The best fix is to install the flashing properly. Experts report that all too often the primary cause of flashing failure is improper installation in the first place.
Flashing is the most important part of roofing, but it easily gets shortchanged because its slow, tedious work that has to be done just so. Roofers, who are paid by how many shingles they lay, have little incentive to do it carefully, unless you insist and are willing to pay the price.
To make sure the flashing is installed properly, hire experienced roofers who will explain how they plan to do it. Before you make your final payment to the roofer, confirm with your building inspector that it was done right.
Roof Failure From The Inside
After you go through so much trouble to have a new roof installed properly, it hardly seems fair that your roof (in a cold region) can fail from the underside too.
An experienced roofing contractor friend of mine told me about the time when he was called in to investigate a leak complaint and discovered that the shingles and flashings were perfectly sound.
But in the attic he found numerous nails poking through the roof sheathing, where they had been driven when an old roof had been removed. The nails were white with frost. Whenever the roof heated up during the day, the frost melted and dripped down onto the ceilings below (Fig. C).
When an attic has poor ventilation, moisture carried by humid air from the house below will rise and condense on the cold roof sheathing and rafters. Wet sheathing will rot, and water dripping from nails will wet the insulation and discolor the ceiling below. Here, what normally would be good ventilation provided by a soffit vent has been blocked by insulation improperly stuffed against the roof sheathing.
Then the nails frosted up again at night. From this observation, my friend always recommends pulling all old nails from previous roofing jobs when tearing off old shingles, rather than driving them down into the wood.
Even worse, my friend has seen the roof boards in some attics completely white with frost and soaked in places. The icing was caused by warm, humid air from the house below rising up into the attic where the moisture it contained condensed on the cold underside of the root (Fig. C). The dampness caused the roof to rot from below.
Preventing this problem is a far better solution than replacing sections of rotted roof.
To begin with, you can close up a lot of those air leaks to keep moisture out of your attic. But you also must supply good attic ventilation to flush out the moisture that gets into the attic anyway. The same vents that cool your roof in the summer vent humid air in the winter.
From his experience, my friend estimates that most attics across the northern half of the United States and in Canada are notoriously underventilated, and even the building code requirement (1 sq. ft. of ventilation for every 150 to 300 sq. ft. of attic area) isn’t always enough.
Technically, of course, ventilation isn’t a roofer’s problem. But better roofing contractors will discuss ventilation with you before they work on your roof because they know how quickly poor ventilation can lead to rot. And they can spot such trouble easily if they have to replace rotten roof sheathing before they can put on new shingles.
After a contractor makes a recommendation, check the ventilation plan with your local building inspector to make sure it’ll do the job.