
Simple Coat and Mitten Rack
When it was time to leave the house, my brother used to delay everyone while he searched for his misplaced jacket and baseball cap. Not anymore!
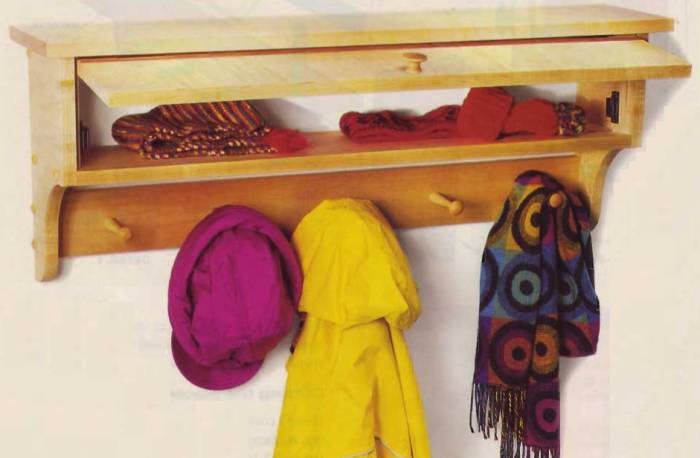
Not since I built him this simple coat rack. The design is easy to build with butt joints connected by screws that get hidden by wooden screw-hole buttons and wood plugs. The rack mounts easily to the wall with screws driven through the hidden hanging strip on the back. The five large Shaker pegs are great for holding hats, umbrellas, and coats, and the hinged-hatch door at the top keeps the clutter of gloves and scarves from view.
You can build this project in a few hours, with an additional hour to apply a finish. Maple is an ideal wood for Shaker-style pieces, but any hardwood will do. Figure on spending about $60 for wood, hardware, and varnish.
Cutting the pieces
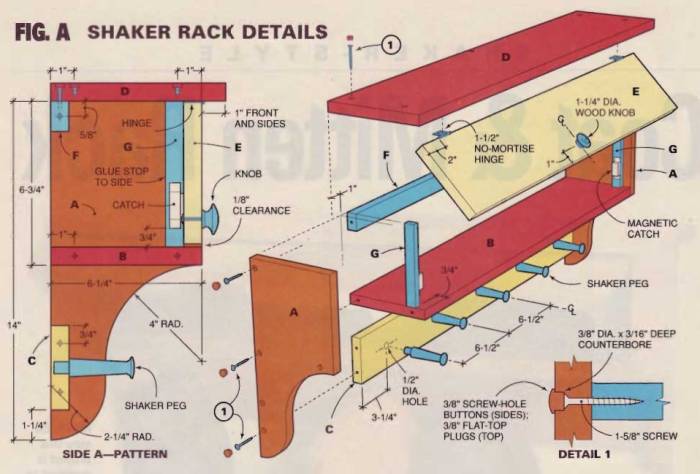
Using a compass, transfer the pattern measurements in Fig. A, above, and then cut the sides (A) with a jigsaw (Photo 1 below).
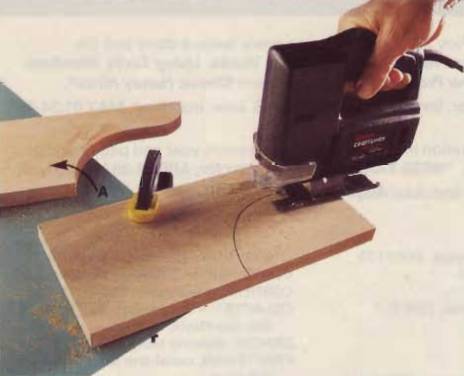
Cut the side pieces (A) using a jigsaw or band saw. Sand the curved edges smooth with a 1-1/2 in. drum sander attached to your drill.
Next cut the top (D) to length and rip the shelf (B) to the width given in the Cutting List, at left. Cut the hanging strip (F) and the peg strip (C) to the same length as the shelf (B). Now, using your spade bit, drill the 3/8-in. counterbore holes for the screw-hole buttons 3/16 in. deep into the outside of parts A (Fig. A and Photo 2). Also drill the 3/8-in. counterbore holes in the top. These holes must be 3/8 in. deep.
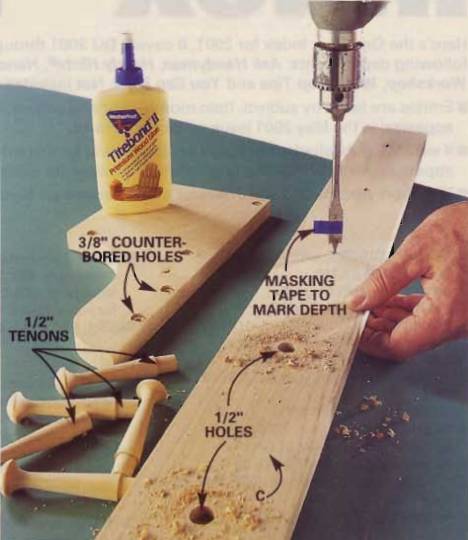
Drill the 1/2-in. holes 5/8 in. deep for the 3-3/8 in. Shaker pegs and the 3/8-in. counterbore holes 3/16 in. deep for the screw-hole buttons in parts A.
Mark and drill the 1/2-in. holes for the Shaker pegs in the peg strip. Drill the holes for the Shaker pegs perfectly perpendicular to the peg strip to ensure they all project evenly when glued in place.
Assembly
Lay the pieces on your workbench, as shown in Photo 3.
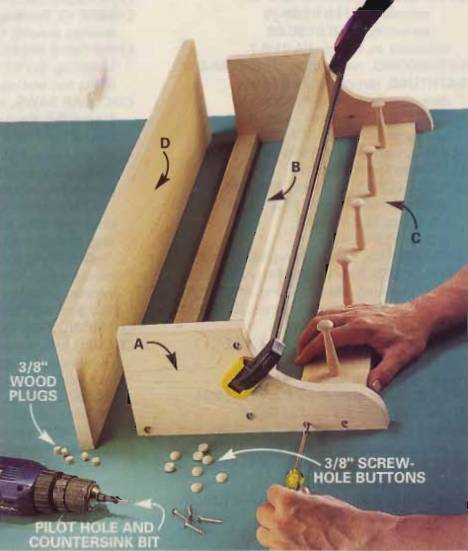
Assemble the shelf by clamping parts C, F, and B to the sides. Drill pilot holes and screw the pieces together. The screws will be covered by the buttons and plugs.
Align the hanging strip (F), the shelf (B), and the peg strip (C) as shown and clamp the sides (A) to these parts. Predrill the holes with a combination pilot hole/countersink bit using the center of the counterbore holes as a guide. Next, screw the sides to B, C, and F, Mark and drill hinge mounting holes in the top (D), then fasten the top to the sides in the same manner.
Glue and clamp the hatch stops to the inside of parts A, as shown in Fig. A. To finish the assembly, cut the hatch (E) to size and install the hinges on the underside of part D and the top of the hatch. Now glue the buttons and plugs into their corresponding holes. Use only a small drop of glue for the buttons but be sure to apply a thin layer of glue completely around the plugs. This will swell the plugs for a tight fit. After the glue is dry, trim the wood plugs flush with the top.
Tip: Sight down the edge of the peg strip to perfectly align each peg as the glue sets.
Finishing
After assembly, lightly sand the entire piece with 220-grit sandpaper. Apply two coats of clear Danish oil or polyurethane to all the surfaces (remove the hinges and knobs). Once the finish is dry, add two magnetic catches to the hatch stop (G).
When it was time to leave the house, my brother used to delay everyone while he searched for his misplaced jacket and baseball cap. Not anymore!
Not since I built him this simple coat rack. The design is easy to build with butt joints connected by screws that get hidden by wooden screw-hole buttons and wood plugs. The rack mounts easily to the wall with screws driven through the hidden hanging strip on the back. The five large Shaker pegs are great for holding hats, umbrellas, and coats, and the hinged-hatch door at the top keeps the clutter of gloves and scarves from view.
You can build this project in a few hours, with an additional hour to apply a finish. Maple is an ideal wood for Shaker-style pieces, but any hardwood will do. Figure on spending about $60 for wood, hardware, and varnish.
Cutting the pieces
Using a compass, transfer the pattern measurements in Fig. A, above, and then cut the sides (A) with a jigsaw (Photo 1 below).
Cut the side pieces (A) using a jigsaw or band saw. Sand the curved edges smooth with a 1-1/2 in. drum sander attached to your drill.
Next cut the top (D) to length and rip the shelf (B) to the width given in the Cutting List, at left. Cut the hanging strip (F) and the peg strip (C) to the same length as the shelf (B). Now, using your spade bit, drill the 3/8-in. counterbore holes for the screw-hole buttons 3/16 in. deep into the outside of parts A (Fig. A and Photo 2). Also drill the 3/8-in. counterbore holes in the top. These holes must be 3/8 in. deep.
Drill the 1/2-in. holes 5/8 in. deep for the 3-3/8 in. Shaker pegs and the 3/8-in. counterbore holes 3/16 in. deep for the screw-hole buttons in parts A.
Mark and drill the 1/2-in. holes for the Shaker pegs in the peg strip. Drill the holes for the Shaker pegs perfectly perpendicular to the peg strip to ensure they all project evenly when glued in place.
Assembly
Lay the pieces on your workbench, as shown in Photo 3.
Assemble the shelf by clamping parts C, F, and B to the sides. Drill pilot holes and screw the pieces together. The screws will be covered by the buttons and plugs.
Align the hanging strip (F), the shelf (B), and the peg strip (C) as shown and clamp the sides (A) to these parts. Predrill the holes with a combination pilot hole/countersink bit using the center of the counterbore holes as a guide. Next, screw the sides to B, C, and F, Mark and drill hinge mounting holes in the top (D), then fasten the top to the sides in the same manner.
Glue and clamp the hatch stops to the inside of parts A, as shown in Fig. A. To finish the assembly, cut the hatch (E) to size and install the hinges on the underside of part D and the top of the hatch. Now glue the buttons and plugs into their corresponding holes. Use only a small drop of glue for the buttons but be sure to apply a thin layer of glue completely around the plugs. This will swell the plugs for a tight fit. After the glue is dry, trim the wood plugs flush with the top.
Tip: Sight down the edge of the peg strip to perfectly align each peg as the glue sets.
Finishing
After assembly, lightly sand the entire piece with 220-grit sandpaper. Apply two coats of clear Danish oil or polyurethane to all the surfaces (remove the hinges and knobs). Once the finish is dry, add two magnetic catches to the hatch stop (G).