
Dry Stone Retaining Wall Construction – Method, Instructions, & Tips
You don’t have to be a stonemason to build a wall Fred Flintstone would be proud of.
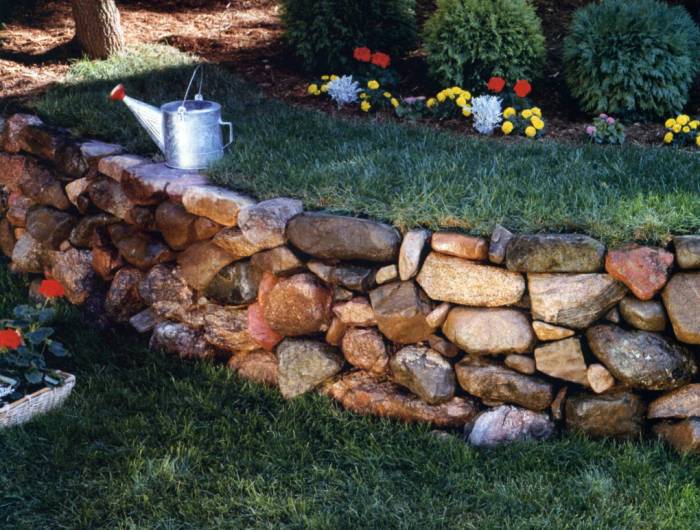
Building a dry stone retaining wall is hard work, but it’s also fun.
3 reasons why you will (also) love building a dry stone wall
- The low-tech appeal of doing what humans have done for thousands of years;
- The satisfaction of turning a pile of rocks into something beautiful and useful that will last for centuries;
- The challenge of fitting together a giant, three-dimensional puzzle.
Whatever your specific reasons are, many people find working with stone enjoyable and satisfying.
How long will it take?
You can, of course, turn any pleasant project into drudgery by overdoing it.
Two hours of wall-building is enjoyable exercise; six hours is an ordeal.
To keep it fun, think of your wall as a summer hobby, to be plugged away at on Sunday afternoons, not a project to be completed in a weekend.
What is a "dry" stone wall?
“Dry” simply means that mortar isn’t used to cement the structure together.
Rather, the stones are carefully fit into place and held there by gravity.
Mortared vs. dry stone wall: which is best?
Mixing up and slopping on mortar is, of course, a nuisance. But that’s not why it is left out of this wall recipe.
A dry stone wall, put together well, will actually outlast a mortared wall for two reasons:
- It can flex slightly, moving with the ground beneath it instead of cracking like a stiff mortared wall would; and
- Since it doesn't rely on mortar, it won't fall apart as mortar wears away, as all mortar eventually does.
How long do dry stone walls last?
Some dry stone retaining walls have stood for hundreds of years, even though they were thrown up carelessly.
But building this way is a gamble. A poorly built wall may stand for decades. Then again, it may topple over next spring. Worse, it could come apart as kids play on it, resulting in broken bones.
The method shown next isn’t the only way to build a dry stone wall, and it certainly isn’t the easiest. But the extra effort pays off with safety and longevity.
Finding free (or cheap) rocks
Gravel pits, quarries, farms, and construction sites are good sources of low-cost or no-cost rock. But always ask before you take.
Getting rocks home is the hard part. Building a wall takes a lot of rock (this 35-ft. long, 3-ft. high wall used 10 tons to be built). So even if you have a full-size pickup truck, you’ll need to make lots of trips.
For the backyard builder, rocks fall into two categories:
- angular, like shale, sandstone, marble or slate, and
- rounded, usually granite.
Angular rocks
Angular rocks have a definite grain, sort of like wood. So the forces of geology break them into irregular blocks with flat sides and sharp, squarish edges.
These flat surfaces make the rocks easier to fit together. They’re also easier to split because they usually break along predictable lines.
Rounded rocks
Rounded rocks (like the ones we used) are much harder and have a less definite grain. They come in all shapes, but they tend to have humped surfaces. Fitting them together takes a lot more trial and error, you set one in place, find it’s too wobbly and try another.
Bring your trailer!
In most regions, Mother Nature has made choosing a rock-type simple; you just take what you can get. Still, there are a few things to keep in mind while filling your truck or trailer:
- You'll need a mix of sizes; everything from baseball-size on up. But don't play Hercules. If it's too big, leave it alone.
- The flatter a rock's surfaces are, the better. Block-shaped rocks are valuable; round rocks are almost worthless.
- Long rocks, which are used as "tie-stones" (Photo 4), are treasures. The more you have, the stronger your wall will be.
- Wedge-shaped rocks are handy for "chinking" (Photo 5).
Shopping for rocks
If rocks are scarce in your area, or if you have no way to transport them, you can buy a load and have it dumped in your yard.
You should begin by calling a landscaping supplier. But don’t just phone in an order. One advantage of buying stone is that it usually gives you a choice of types and colors. So go and browse before you buy.
Prices vary widely, depending on what you get and whom you get it from. A farmer may deliver a load of fieldstone for little more than the cost of transportation. A few tons of richly colored granite from a landscaping supplier may cost you $2,000.
Planning your dry stone wall
Establish the course of your wall by laying out a garden hose and adjusting it until you establish the path you want the wall to follow. Then cut back the slope and dig the foundation trench.
Here are a few things to keep in mind as you plan your layout:
- If you have dirt hauled in to create or enlarge a slope, it should be thoroughly soaked a couple of times — by a garden hose or rain — so it settles before you build against it.
- Big tree roots can slowly tear a wall apart, so you'll need to cut back any that threaten to reach your wall.
First, the wall foundation
Soil moves as it gets soaked and dries, freezes and thaws. A dry stone wall is flexible and will survive centuries of minor shifting. But big shifts can make it crumble in just a few years.
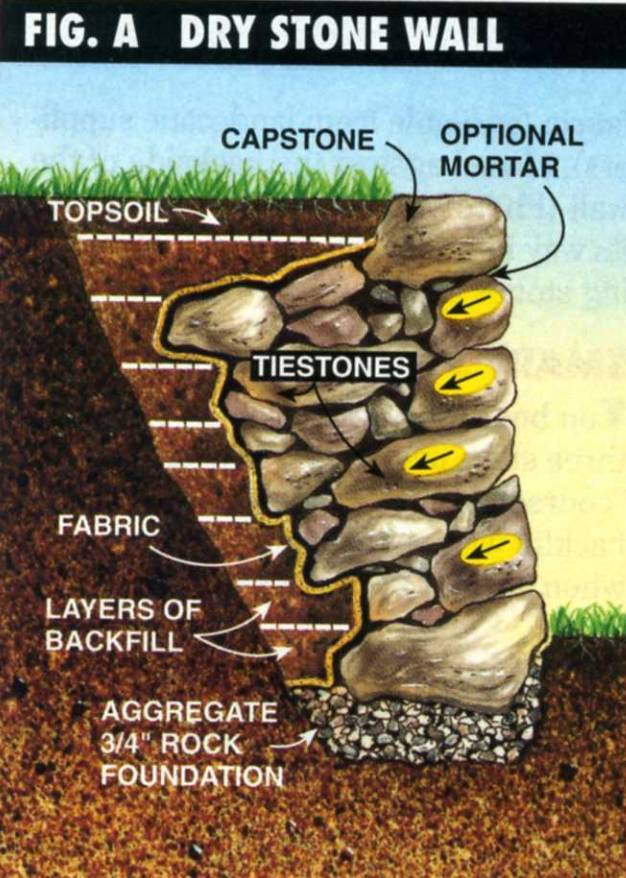
That’s why a simple foundation and landscape fabric are good ideas. A trench lined with 3/4-in. stone provides drainage and absorbs some movement of the soil below (Photo 1).

Cut back the slope and dig a 1-ft. deep 2-ft. wide trench at its base. Keep the topsoil and subsoil separate and pile both nearby; you’ll need them for backfill. Fill the trench with a 6-in. bed of 3/4-in. stone.

Lay your first course along the outer edge of the trench. Now’s the time to roll into place any rocks that are too big to lift onto upper courses.
Landscape fabric (available from landscape suppliers), placed against the backside of the wall (Photo 3), keeps soil from working its way into the wall and gradually forcing stones apart.
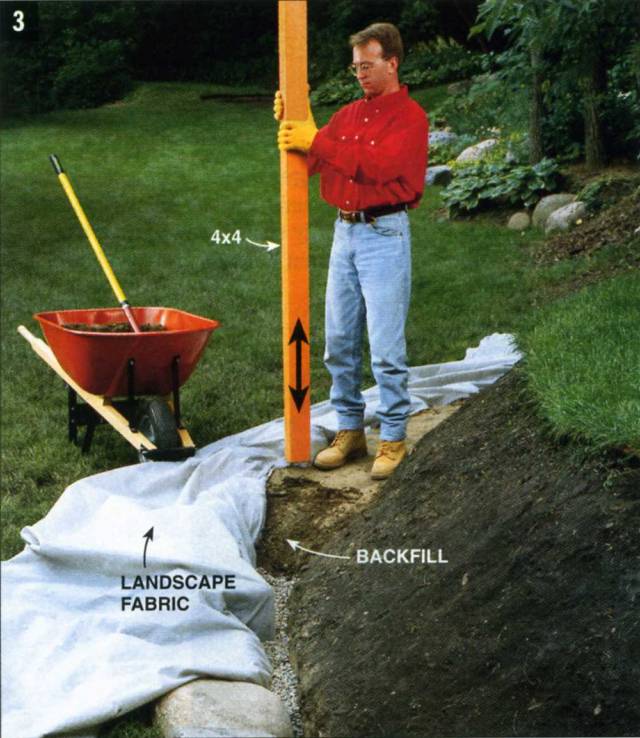
Tuck landscape fabric in behind the first course, fold it over the rocks, shovel in backfill and tamp the soil down by pounding it with a post. You’ll need to repeat this entire process after each course.
Setting your stones the smart way
You build a dry stone wall by repeating three steps over and over again:
- Lay a "course" (a horizontal row of rocks);
- backfill with subsoil you removed when you cut back the slope; and
- "tamp" or pack down the backfill.
Then on to the next course. Pretty simple, but not necessarily easy.
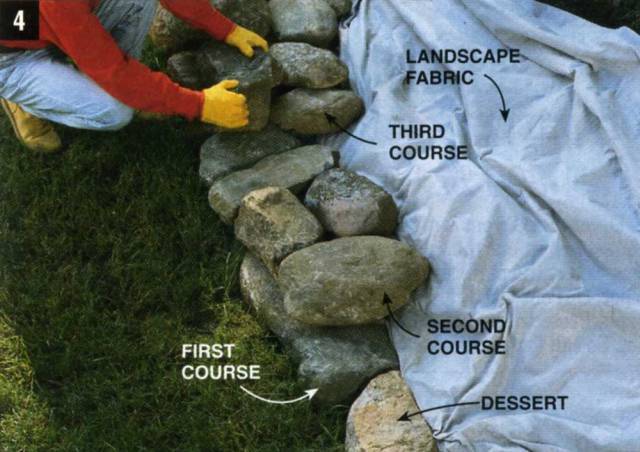
Lay the fabric back against the slope and set the next course. Each course should be wider than the previous. Note: For clarity, the photo shows three courses exposed here. You’re better off completing an entire course before moving on to the next.
Tips for saving time and labor

Drive chinking stones into the wall’s face to fill gaps or secure loose rocks. Wear safety glasses to protect your eyes from shards of stone.
- Building with stone is like putting together a jigsaw puzzle. So begin by spreading out the rocks just as you would the pieces of a puzzle.
- Put your best, wide, flat stones aside to be used as capstones (Photo 6).

Lay capstones, checking them with a level as you go. Capstones should bring the wall to a height roughly level with the embankment. Then tuck the fabric in behind the capstones, backfill and add topsoil.
- Use your biggest stones for the first course. That way you won't have to heave them up into place later.
- If, after the first course, you have a few biggies to raise onto the wall, use a wood plank to roll them up into place.
- Fitting stones together is mostly trial and error. Cut down on both by mentally measuring the shape and size of the stone you need first. Then go hunt for the perfect fit. You may even want to use a tape measure.
- Stone cutting is no fun. And doing it well is difficult. So we recommend you don't. But if you must, you can knock off troublesome crags or knobs with a hammer and cold chisel. If you do, wear eye protection and keep others out of the flying-stone zone!
3 tips for the face of the wall
Carefully choose rocks for the face of the wall:
- If you have different colors, mix them into a patchwork.
- For a neat, geometric look, lay stones with their flat sides facing out.
- For a rustic look, leave rounded, irregular sides exposed.
The 10 commandments of stonebuilding
I. Make "one over two, two over one" your wall-building motto
Lay the stones of one course over the vertical gaps between stones of the previous course; just like a bricklayer lays bricks. If you don’t do this, you get “vertical run” and a weaker wall (Fig. B).
II. Use tiestones
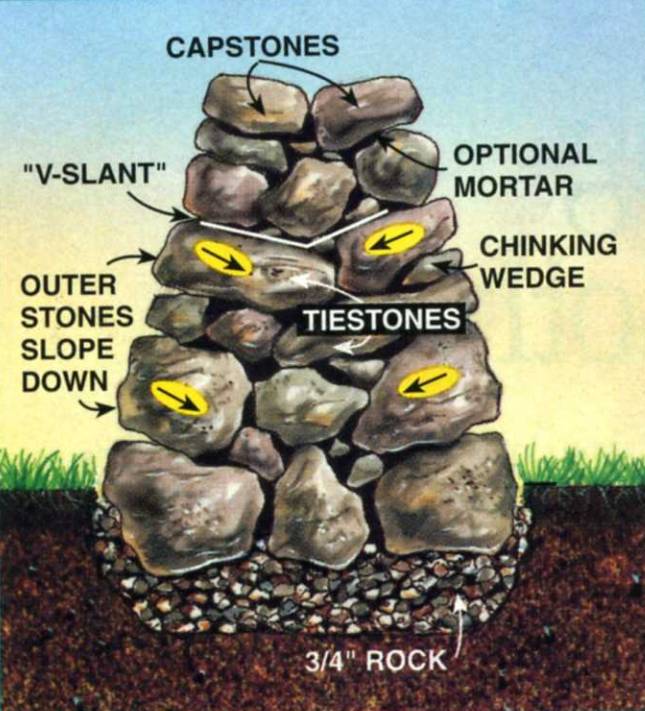
Tiestones are long rocks laid perpendicular to the face of the wall (Photo 4).
You’ll need at least one tiestone at least every 4 ft. on each course.
But you can’t have too many; the more tiestones, the stronger the wall.
III. All rocks on the face of the wall must slant down toward the inside of the wall
Those that don’t will eventually fall out (Fig. A).
A dry stone retaining wall is basically an organized pile of rocks that leans against an embankment and is held together by its own weight.
IV. Keep it roughly coursed
If you’re working with very irregular stone, you’re likely to build jagged, uneven courses. This makes the next course harder to fit together. Soon you have no courses at all and lots of vertical run.
Try instead for roughly even courses, by avoiding peaks and filling in valleys with smaller stones (Fig. B).

The left side of this wall will stand forever; the right may collapse with the next heavy rain.
V. Lay rocks flat, not on edge
This way the rocks will be more balanced (Fig. B).
VI. Use chinking
Chinking are small stone wedges driven between larger rocks, to tighten up loose-fitting rocks and fill gaps in the wall’s face (Fig. A).
VII. Make it as thick as it is high
If your wall will rise 3 ft. above the ground at its base, the course under the capstones should be 3 ft. thick.
VIII. Don't build it more than 4 ft. high
The higher the wall, the more potential for injury should it collapse.
IX. Don't make the face of the wall perfectly vertical
To hold back all that earth, it must lean into the slope. A minimum of 2 in. of backward tilt for each foot of height is a good rule of thumb.
X. Mortar if you must
You should have large, tight-fitting capstones that will stay solidly in place by themselves. If not, cement them with a mortar mix like Quikrete (Fig. A).
Building a freestanding dry stone wall
A freestanding dry stone wall is similar to a retaining wall, but with a few variations. You have to be more fussy about the fit of the stones.
Here are the three main principles you need to obey:
- A retaining wall leans against a solid mound of earth. A freestanding wall leans in on itself, so the two faces must slant into each other and lock together.
- The key to a strong freestanding wall is the "V-slant." Each course must be highest at the faces, with a gradual depression in the middle. With each stone tilting down toward the middle, gravity holds each in place and the entire wall together.
- A freestanding dry stone wall should be as wide at its base as it is tall. Both faces should lean inward at least 2 in. for each foot of height. Amateurs shouldn't build more than 3 ft. tall.
Related Content: Dry-Laid Patio

You don’t have to be a stonemason to build a wall Fred Flintstone would be proud of.
Building a dry stone retaining wall is hard work, but it’s also fun.
3 reasons why you will (also) love building a dry stone wall
- The low-tech appeal of doing what humans have done for thousands of years;
- The satisfaction of turning a pile of rocks into something beautiful and useful that will last for centuries;
- The challenge of fitting together a giant, three-dimensional puzzle.
Whatever your specific reasons are, many people find working with stone enjoyable and satisfying.
How long will it take?
You can, of course, turn any pleasant project into drudgery by overdoing it.
Two hours of wall-building is enjoyable exercise; six hours is an ordeal.
To keep it fun, think of your wall as a summer hobby, to be plugged away at on Sunday afternoons, not a project to be completed in a weekend.
What is a "dry" stone wall?
“Dry” simply means that mortar isn’t used to cement the structure together.
Rather, the stones are carefully fit into place and held there by gravity.
Mortared vs. dry stone wall: which is best?
Mixing up and slopping on mortar is, of course, a nuisance. But that’s not why it is left out of this wall recipe.
A dry stone wall, put together well, will actually outlast a mortared wall for two reasons:
- It can flex slightly, moving with the ground beneath it instead of cracking like a stiff mortared wall would; and
- Since it doesn't rely on mortar, it won't fall apart as mortar wears away, as all mortar eventually does.
How long do dry stone walls last?
Some dry stone retaining walls have stood for hundreds of years, even though they were thrown up carelessly.
But building this way is a gamble. A poorly built wall may stand for decades. Then again, it may topple over next spring. Worse, it could come apart as kids play on it, resulting in broken bones.
The method shown next isn’t the only way to build a dry stone wall, and it certainly isn’t the easiest. But the extra effort pays off with safety and longevity.
Finding free (or cheap) rocks
Gravel pits, quarries, farms, and construction sites are good sources of low-cost or no-cost rock. But always ask before you take.
Getting rocks home is the hard part. Building a wall takes a lot of rock (this 35-ft. long, 3-ft. high wall used 10 tons to be built). So even if you have a full-size pickup truck, you’ll need to make lots of trips.
For the backyard builder, rocks fall into two categories:
- angular, like shale, sandstone, marble or slate, and
- rounded, usually granite.
Angular rocks
Angular rocks have a definite grain, sort of like wood. So the forces of geology break them into irregular blocks with flat sides and sharp, squarish edges.
These flat surfaces make the rocks easier to fit together. They’re also easier to split because they usually break along predictable lines.
Rounded rocks
Rounded rocks (like the ones we used) are much harder and have a less definite grain. They come in all shapes, but they tend to have humped surfaces. Fitting them together takes a lot more trial and error, you set one in place, find it’s too wobbly and try another.
Bring your trailer!
In most regions, Mother Nature has made choosing a rock-type simple; you just take what you can get. Still, there are a few things to keep in mind while filling your truck or trailer:
- You'll need a mix of sizes; everything from baseball-size on up. But don't play Hercules. If it's too big, leave it alone.
- The flatter a rock's surfaces are, the better. Block-shaped rocks are valuable; round rocks are almost worthless.
- Long rocks, which are used as "tie-stones" (Photo 4), are treasures. The more you have, the stronger your wall will be.
- Wedge-shaped rocks are handy for "chinking" (Photo 5).
Shopping for rocks
If rocks are scarce in your area, or if you have no way to transport them, you can buy a load and have it dumped in your yard.
You should begin by calling a landscaping supplier. But don’t just phone in an order. One advantage of buying stone is that it usually gives you a choice of types and colors. So go and browse before you buy.
Prices vary widely, depending on what you get and whom you get it from. A farmer may deliver a load of fieldstone for little more than the cost of transportation. A few tons of richly colored granite from a landscaping supplier may cost you $2,000.
Planning your dry stone wall
Establish the course of your wall by laying out a garden hose and adjusting it until you establish the path you want the wall to follow. Then cut back the slope and dig the foundation trench.
Here are a few things to keep in mind as you plan your layout:
- If you have dirt hauled in to create or enlarge a slope, it should be thoroughly soaked a couple of times — by a garden hose or rain — so it settles before you build against it.
- Big tree roots can slowly tear a wall apart, so you'll need to cut back any that threaten to reach your wall.
First, the wall foundation
Soil moves as it gets soaked and dries, freezes and thaws. A dry stone wall is flexible and will survive centuries of minor shifting. But big shifts can make it crumble in just a few years.
That’s why a simple foundation and landscape fabric are good ideas. A trench lined with 3/4-in. stone provides drainage and absorbs some movement of the soil below (Photo 1).
Cut back the slope and dig a 1-ft. deep 2-ft. wide trench at its base. Keep the topsoil and subsoil separate and pile both nearby; you’ll need them for backfill. Fill the trench with a 6-in. bed of 3/4-in. stone.
Lay your first course along the outer edge of the trench. Now’s the time to roll into place any rocks that are too big to lift onto upper courses.
Landscape fabric (available from landscape suppliers), placed against the backside of the wall (Photo 3), keeps soil from working its way into the wall and gradually forcing stones apart.
Tuck landscape fabric in behind the first course, fold it over the rocks, shovel in backfill and tamp the soil down by pounding it with a post. You’ll need to repeat this entire process after each course.
Setting your stones the smart way
You build a dry stone wall by repeating three steps over and over again:
- Lay a "course" (a horizontal row of rocks);
- backfill with subsoil you removed when you cut back the slope; and
- "tamp" or pack down the backfill.
Then on to the next course. Pretty simple, but not necessarily easy.
Lay the fabric back against the slope and set the next course. Each course should be wider than the previous. Note: For clarity, the photo shows three courses exposed here. You’re better off completing an entire course before moving on to the next.
Tips for saving time and labor
Drive chinking stones into the wall’s face to fill gaps or secure loose rocks. Wear safety glasses to protect your eyes from shards of stone.
- Building with stone is like putting together a jigsaw puzzle. So begin by spreading out the rocks just as you would the pieces of a puzzle.
- Put your best, wide, flat stones aside to be used as capstones (Photo 6).
Lay capstones, checking them with a level as you go. Capstones should bring the wall to a height roughly level with the embankment. Then tuck the fabric in behind the capstones, backfill and add topsoil.
- Use your biggest stones for the first course. That way you won't have to heave them up into place later.
- If, after the first course, you have a few biggies to raise onto the wall, use a wood plank to roll them up into place.
- Fitting stones together is mostly trial and error. Cut down on both by mentally measuring the shape and size of the stone you need first. Then go hunt for the perfect fit. You may even want to use a tape measure.
- Stone cutting is no fun. And doing it well is difficult. So we recommend you don't. But if you must, you can knock off troublesome crags or knobs with a hammer and cold chisel. If you do, wear eye protection and keep others out of the flying-stone zone!
3 tips for the face of the wall
Carefully choose rocks for the face of the wall:
- If you have different colors, mix them into a patchwork.
- For a neat, geometric look, lay stones with their flat sides facing out.
- For a rustic look, leave rounded, irregular sides exposed.
The 10 commandments of stonebuilding
I. Make "one over two, two over one" your wall-building motto
Lay the stones of one course over the vertical gaps between stones of the previous course; just like a bricklayer lays bricks. If you don’t do this, you get “vertical run” and a weaker wall (Fig. B).
II. Use tiestones
Tiestones are long rocks laid perpendicular to the face of the wall (Photo 4).
You’ll need at least one tiestone at least every 4 ft. on each course.
But you can’t have too many; the more tiestones, the stronger the wall.
III. All rocks on the face of the wall must slant down toward the inside of the wall
Those that don’t will eventually fall out (Fig. A).
A dry stone retaining wall is basically an organized pile of rocks that leans against an embankment and is held together by its own weight.
IV. Keep it roughly coursed
If you’re working with very irregular stone, you’re likely to build jagged, uneven courses. This makes the next course harder to fit together. Soon you have no courses at all and lots of vertical run.
Try instead for roughly even courses, by avoiding peaks and filling in valleys with smaller stones (Fig. B).
The left side of this wall will stand forever; the right may collapse with the next heavy rain.
V. Lay rocks flat, not on edge
This way the rocks will be more balanced (Fig. B).
VI. Use chinking
Chinking are small stone wedges driven between larger rocks, to tighten up loose-fitting rocks and fill gaps in the wall’s face (Fig. A).
VII. Make it as thick as it is high
If your wall will rise 3 ft. above the ground at its base, the course under the capstones should be 3 ft. thick.
VIII. Don't build it more than 4 ft. high
The higher the wall, the more potential for injury should it collapse.
IX. Don't make the face of the wall perfectly vertical
To hold back all that earth, it must lean into the slope. A minimum of 2 in. of backward tilt for each foot of height is a good rule of thumb.
X. Mortar if you must
You should have large, tight-fitting capstones that will stay solidly in place by themselves. If not, cement them with a mortar mix like Quikrete (Fig. A).
Building a freestanding dry stone wall
A freestanding dry stone wall is similar to a retaining wall, but with a few variations. You have to be more fussy about the fit of the stones.
Here are the three main principles you need to obey:
- A retaining wall leans against a solid mound of earth. A freestanding wall leans in on itself, so the two faces must slant into each other and lock together.
- The key to a strong freestanding wall is the "V-slant." Each course must be highest at the faces, with a gradual depression in the middle. With each stone tilting down toward the middle, gravity holds each in place and the entire wall together.
- A freestanding dry stone wall should be as wide at its base as it is tall. Both faces should lean inward at least 2 in. for each foot of height. Amateurs shouldn't build more than 3 ft. tall.
Related Content: Dry-Laid Patio