
How do you strip and refinish furniture? (10 steps with pictures)
If you’ve ever wandered through a garage sale, you’ve probably found a piece of furniture that you fell in love with — at first glance. But upon closer inspection, its outward appearance looked like it was beyond hope.
Well, now you can buy those ugly ducklings, because you will learn how to remove that old, worn-out finish and bring back the natural beauty of the wood. Even if you’ve never stripped furniture before.
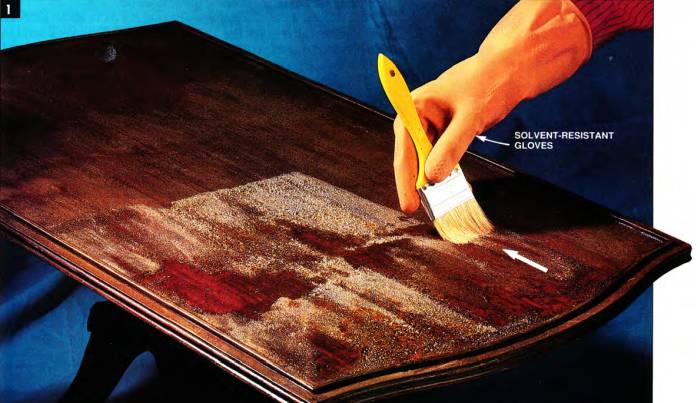
- Apply stripper with an old paint brush. Spread it in one direction only, because back-and-forth strokes reduce the stripper’s potency.
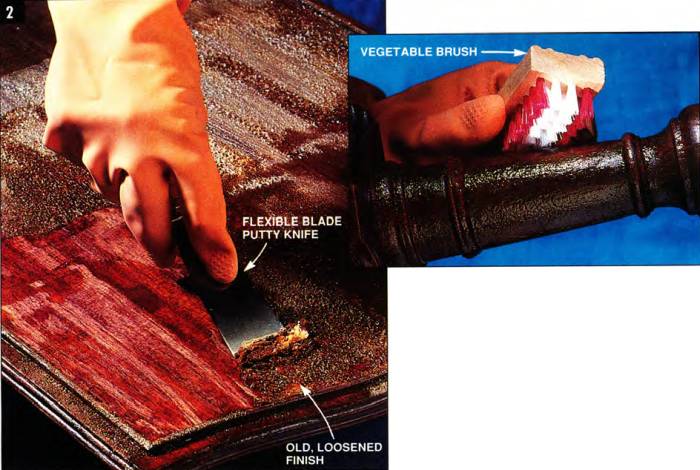
- Remove the stripper from flat surfaces with a putty knite. Don’t tone the stripper if it doesn’t come up easily. You may need to apply another coat and try again. Use a vegetable brush to loosen finish on rounded areas (inset photo) .
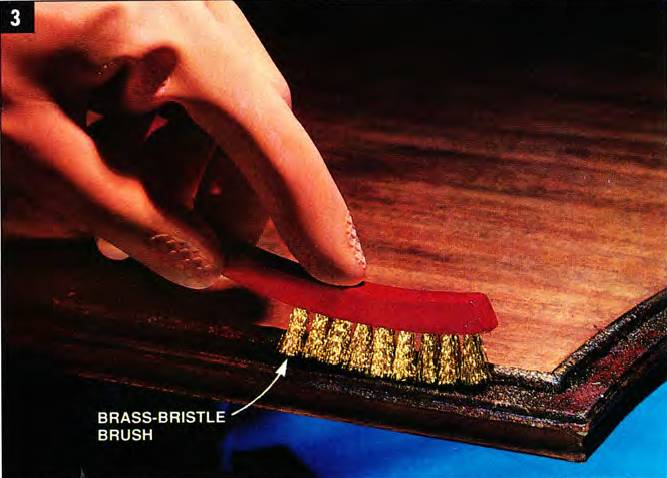
- Loosen the stripper and old finish along edges and corners with a brass-bristle brush. It’ll work better than a toothbrush and it won’t damage the wood.
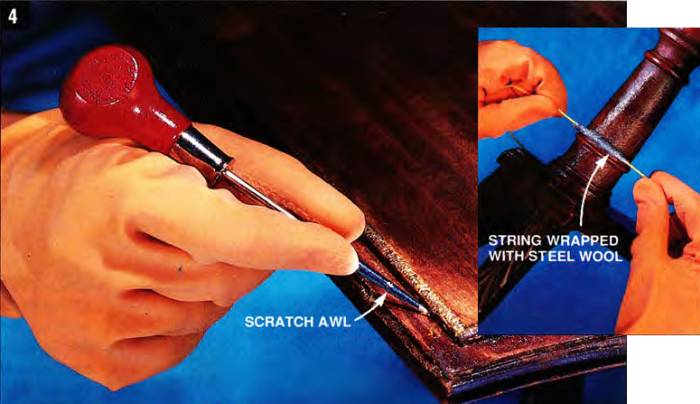
- Clean out stripper and old finish along edges and grooves with a scratch owl. Use light, soft strokes to avoid damaging the wood. To remove finish around carved or raised areas, use medium-grade steel wool wrapped around string. Move the string in a shoeshine motion (inset photo).
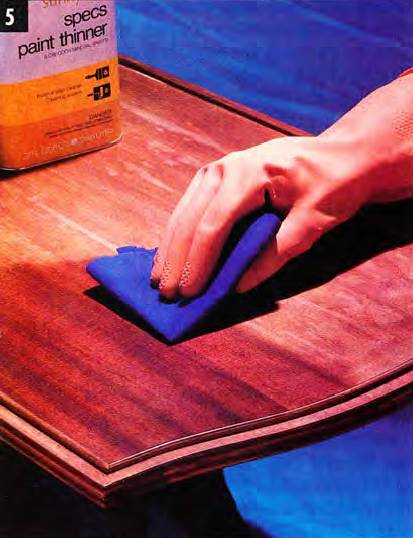
- Wash the entire surface to remove any residue. Use mineral spirits to wash solvent-base strippers, clear water for water-base strippers.
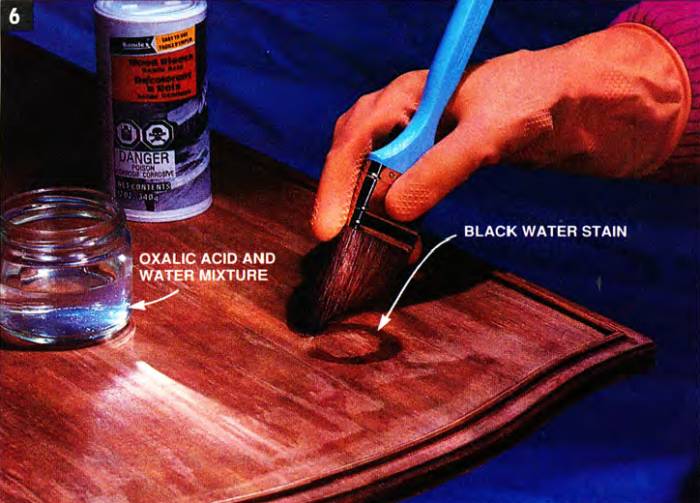
- Bleach out black water stains with an oxalic acid solution — it may take two applications. Neutralize the acid with a borax and water solution.
- Sand the surfaces beginning with 100-grit sandpaper, then 180-grit and finally 220-grit paper.

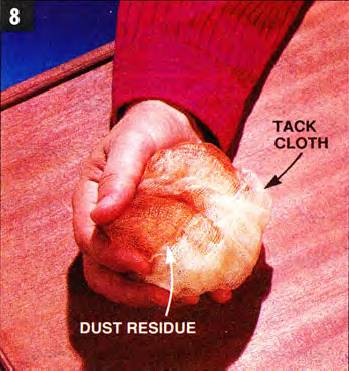
- Wipe the entire surface with a tack cloth. The tack cloth’s sticky coating picks up and holds any dust, which ensures a good-looking finish.
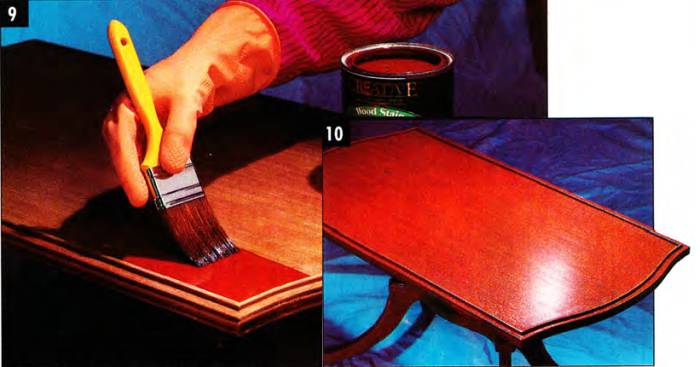
- Apply the new stain following the manufacturer’s instructions. Finally, apply the top coat. Use the same brand stain and top coat for best results.
- By following these 10 steps, you too can bring back the natural beauty of the wood.
Do you have to strip?
Completely removing the finish from an old piece of furniture, or “stripping,” may not be necessary. Often. the old finish is just tired or dirty and only needs a good cleaning, or what’s called “restoration.”
That’s a thorough scrubbing of the wood with mineral spirits, followed by a couple of new coats of varnish.
But if the old finish, whether it’s paint or varnish, is cracked or flaking, it’s time to strip. If you want to change the color, it’s time to strip. Or if you want to put on a hard-finish topcoat, such as polyurethane, the only way to get good results is to first strip off the old finish. And, finally, if the piece has deep stains or scratches, stripping is the first step in repairing these problems.
Tools needed
Here are the tools you’ll need to remove old finishes, all of which are in your home now or available at most paint and hardware stores:
- two flexible putty knives — one with a 2-in. wide blade and one with a 3- or 4-in. wide blade.
- medium-grade steel wool, or a finish-stripping scrub pad.
- a brass-bristle brush.
- a scratch awl or ice pick.
- a kitchen vegetable brush.
- string.
- old toothbrushes.
- old 1-1/2 or 2-in. wide paint brushes to apply the paint stripper.
- cardboard, newspapers or an old dropcloth that you're willing to throw away.
- aluminum pie tins — to catch the drips and to collect the old finish.
- rags.
- mineral spirits — for solvent-base stripper cleanup.
- oxalic acid and borax — to remove black water stains.
- tack cloth, and.
- safety gear (more details below).
You’ll notice that a number of these tools should be “old.” Stripping is a messy job and often the tools need to be thrown away after use.
Also, buy only the smallest amount of stripper that you think you’ll need to do the job. Storing excess stripper in your home can be dangerous. It’s better to have to buy more than to store.
Choosing a paint stripper
Deciding which stripper to use will depend on a number of factors: your safety when using the stripper, what you’ll be stripping, how much time you have to do the job, and how much money you want to spend.
Most solvent-base strippers contain methylene chloride, a potent chemical that makes them fast and thorough. However. the vapors these products give off as they evaporate can be extremely dangerous, even deadly.
If you or a member of your family is sensitive to chemical fumes, is pregnant or you simply want to play it safe, consider using a water-base stripper. These products are safe to use in most situations, according to the manufacturers.
Since stripping furniture involves both horizontal and vertical surfaces, it’s best to choose a stripper with a semi-paste consistency The semi-paste type will cling to the vertical surfaces; liquid strippers won’t.
You also need to decide how much time you have to work on the project. If you want the stripper to work in minutes, use a solvent-base stripper. But if you can let strippers work for hours or even overnight, consider using the water-base type.
The cost of materials could also be a factor. Water-base strippers cost 40% more than solvent-base strippers.
Finally, you could consider having the furniture stripped by a professional.
Safety equipment
Here‘s a good point to remember: If a product is strong enough to strip paint, you don‘t want to breathe it into your lungs, get it on your skin or in your eyes. To prevent this, you need to use the following safety equipment:
- Safety goggles. Make sure you get goggles and not glasses. Goggles wrap around the head and protect the entire eye; glasses don't.
- Solvent-resistant gloves. Don’t use the rubber type you wear when you wash dishes.
- A respirator. Make sure it’s a certified respirator, suitable for use with paint strippers.
These products are available at most full-service paint stores.
Also, wear a long-sleeve shirt to keep the stripper off your arms.
Stripping timetable
Stripping furniture is not a quick, one-day project. It’ll take a minimum of two days, depending on how difficult it is to remove the old finish, the size of the piece and whether there are ornate carvings and moldings.
Flat surfaces strip the fastest; intricate carvings and curved or rounded pieces often require multiple applications of stripper.
The most important point on using paint stripper: Don’t rush it. Read the container label before starting and then follow the instructions completely.
Once you apply the stripper, give it time to penetrate, but don’t let it dry out. If it does, you‘re in for even more work.
Ten steps to success
- Your work area must be well ventilated. If possible. work outdoors in a shaded area, such as on a patio or at the apron area of your garage. The temperature should be above 50 degrees F.
- Once you choose a spot. lay down cardboard or three or four layers of newspaper.
- Make sure you’ve read the directions on the stripper container.
- Apply the recommended amount of shipper using an old paint brush (Photo 1). Spread the stripper in one direction only. A back-and-forth brushing action will reduce its potency.
- Let the stripper work the recommended length of time. For solvent-base strippers it's between 10 and 30 minutes. Water-base strippers need to work longer, at least a couple of hours or even overnight.
- If you’re using a solvent-base stripper, check it periodically to make sure it doesn't dry out. If it starts to dry, apply a little more, in the same direction as the first coat.
- When the stripper has been in place the recommended time, lightly rub the area with medium-grade steel wool or a paint-stripping scrub pad to loosen the old finish.
- Now use a putty knife to remove the old finish from the flat surfaces (Photo 2). A vegetable brush works great on curved areas, such as legs (inset Photo 2). Use the aluminum pie tins to collect the old finish.
- This table had a raised edge, grooves and round sections — three areas that are always hard to strip.
Here’s how each was dealt with:
- A brass-bristle brush was used to loosen the old finish along the raised edge (Photo 3) .
- A scratch awl was used to remove old finish from the edges (Photo 4). Make light strokes to avoid gouging the wood.
- And, to remove the finish from the round legs, I wrapped medium-grade steel wool around a length of string and used it in a back-and-forth, shoeshine motion (inset, Photo 4).
- Finally, don’t get discouraged if all the finish doesn't come off the first time. Be prepared to apply more coats of stripper, especially in curved or carved areas.
Disposing of the old finish
Once the piece is completely stripped, you’ll have to dispose of the old finish. The best way to do this is to put the aluminum pie plates outside in the shade and allow the stripper to evaporate. Place any solvent-soaked rags outside, too. Make sure they’re out of the reach of kids and pets.
Most cities have hazardous waste disposal areas that will take this type of residue. Contact your city hall for instructions for your area.
Once the old stuff is off
Before you apply the new finish, make sure the surfaces are smooth and clean. To get rid of any solvent stripper residue, rinse the entire surface with mineral spirits (Photo 5). If the stripper is water-base, use clear water.
If you notice any black water stains on the stripped areas, you can bleach them out using an oxalic acid solution (Photo 6). Then neutralize the acid with a borax and water solution. Oxalic acid and borax are available at most full-service paint stores. Follow the directions and safety instructions on the oxalic acid container.
To get the best-looking finish, you need to sand the stripped wood. Sanding is done in three stages: Use 100-grit (medium) sandpaper for the first sanding; 180-grit (fine) for the second; and for the final sanding, use 220-grit (very fine) sandpaper (Photo 7).
To get rid of any dust, wipe the entire piece with a tack cloth (Photo 8). The tack cloth is a cheese cloth that has a sticky coating to pick up and hold dust.
The new finish
Now you’re ready to apply the new stain (Photo 9), but make sure the piece is dry first. Any major brand name product should give you good results, if you follow the directions.
Apply a final top coat. If the piece will get heavy-duty use, consider applying polyurethane rather than regular varnish. It’s recommended that you apply the same brand stain and finish.
If you’ve ever wandered through a garage sale, you’ve probably found a piece of furniture that you fell in love with — at first glance. But upon closer inspection, its outward appearance looked like it was beyond hope.
Well, now you can buy those ugly ducklings, because you will learn how to remove that old, worn-out finish and bring back the natural beauty of the wood. Even if you’ve never stripped furniture before.
- Apply stripper with an old paint brush. Spread it in one direction only, because back-and-forth strokes reduce the stripper’s potency.
- Remove the stripper from flat surfaces with a putty knite. Don’t tone the stripper if it doesn’t come up easily. You may need to apply another coat and try again. Use a vegetable brush to loosen finish on rounded areas (inset photo) .
- Loosen the stripper and old finish along edges and corners with a brass-bristle brush. It’ll work better than a toothbrush and it won’t damage the wood.
- Clean out stripper and old finish along edges and grooves with a scratch owl. Use light, soft strokes to avoid damaging the wood. To remove finish around carved or raised areas, use medium-grade steel wool wrapped around string. Move the string in a shoeshine motion (inset photo).
- Wash the entire surface to remove any residue. Use mineral spirits to wash solvent-base strippers, clear water for water-base strippers.
- Bleach out black water stains with an oxalic acid solution — it may take two applications. Neutralize the acid with a borax and water solution.
- Sand the surfaces beginning with 100-grit sandpaper, then 180-grit and finally 220-grit paper.
- Wipe the entire surface with a tack cloth. The tack cloth’s sticky coating picks up and holds any dust, which ensures a good-looking finish.
- Apply the new stain following the manufacturer’s instructions. Finally, apply the top coat. Use the same brand stain and top coat for best results.
- By following these 10 steps, you too can bring back the natural beauty of the wood.
Do you have to strip?
Completely removing the finish from an old piece of furniture, or “stripping,” may not be necessary. Often. the old finish is just tired or dirty and only needs a good cleaning, or what’s called “restoration.”
That’s a thorough scrubbing of the wood with mineral spirits, followed by a couple of new coats of varnish.
But if the old finish, whether it’s paint or varnish, is cracked or flaking, it’s time to strip. If you want to change the color, it’s time to strip. Or if you want to put on a hard-finish topcoat, such as polyurethane, the only way to get good results is to first strip off the old finish. And, finally, if the piece has deep stains or scratches, stripping is the first step in repairing these problems.
Tools needed
Here are the tools you’ll need to remove old finishes, all of which are in your home now or available at most paint and hardware stores:
- two flexible putty knives — one with a 2-in. wide blade and one with a 3- or 4-in. wide blade.
- medium-grade steel wool, or a finish-stripping scrub pad.
- a brass-bristle brush.
- a scratch awl or ice pick.
- a kitchen vegetable brush.
- string.
- old toothbrushes.
- old 1-1/2 or 2-in. wide paint brushes to apply the paint stripper.
- cardboard, newspapers or an old dropcloth that you're willing to throw away.
- aluminum pie tins — to catch the drips and to collect the old finish.
- rags.
- mineral spirits — for solvent-base stripper cleanup.
- oxalic acid and borax — to remove black water stains.
- tack cloth, and.
- safety gear (more details below).
You’ll notice that a number of these tools should be “old.” Stripping is a messy job and often the tools need to be thrown away after use.
Also, buy only the smallest amount of stripper that you think you’ll need to do the job. Storing excess stripper in your home can be dangerous. It’s better to have to buy more than to store.
Choosing a paint stripper
Deciding which stripper to use will depend on a number of factors: your safety when using the stripper, what you’ll be stripping, how much time you have to do the job, and how much money you want to spend.
Most solvent-base strippers contain methylene chloride, a potent chemical that makes them fast and thorough. However. the vapors these products give off as they evaporate can be extremely dangerous, even deadly.
If you or a member of your family is sensitive to chemical fumes, is pregnant or you simply want to play it safe, consider using a water-base stripper. These products are safe to use in most situations, according to the manufacturers.
Since stripping furniture involves both horizontal and vertical surfaces, it’s best to choose a stripper with a semi-paste consistency The semi-paste type will cling to the vertical surfaces; liquid strippers won’t.
You also need to decide how much time you have to work on the project. If you want the stripper to work in minutes, use a solvent-base stripper. But if you can let strippers work for hours or even overnight, consider using the water-base type.
The cost of materials could also be a factor. Water-base strippers cost 40% more than solvent-base strippers.
Finally, you could consider having the furniture stripped by a professional.
Safety equipment
Here‘s a good point to remember: If a product is strong enough to strip paint, you don‘t want to breathe it into your lungs, get it on your skin or in your eyes. To prevent this, you need to use the following safety equipment:
- Safety goggles. Make sure you get goggles and not glasses. Goggles wrap around the head and protect the entire eye; glasses don't.
- Solvent-resistant gloves. Don’t use the rubber type you wear when you wash dishes.
- A respirator. Make sure it’s a certified respirator, suitable for use with paint strippers.
These products are available at most full-service paint stores.
Also, wear a long-sleeve shirt to keep the stripper off your arms.
Stripping timetable
Stripping furniture is not a quick, one-day project. It’ll take a minimum of two days, depending on how difficult it is to remove the old finish, the size of the piece and whether there are ornate carvings and moldings.
Flat surfaces strip the fastest; intricate carvings and curved or rounded pieces often require multiple applications of stripper.
The most important point on using paint stripper: Don’t rush it. Read the container label before starting and then follow the instructions completely.
Once you apply the stripper, give it time to penetrate, but don’t let it dry out. If it does, you‘re in for even more work.
Ten steps to success
- Your work area must be well ventilated. If possible. work outdoors in a shaded area, such as on a patio or at the apron area of your garage. The temperature should be above 50 degrees F.
- Once you choose a spot. lay down cardboard or three or four layers of newspaper.
- Make sure you’ve read the directions on the stripper container.
- Apply the recommended amount of shipper using an old paint brush (Photo 1). Spread the stripper in one direction only. A back-and-forth brushing action will reduce its potency.
- Let the stripper work the recommended length of time. For solvent-base strippers it's between 10 and 30 minutes. Water-base strippers need to work longer, at least a couple of hours or even overnight.
- If you’re using a solvent-base stripper, check it periodically to make sure it doesn't dry out. If it starts to dry, apply a little more, in the same direction as the first coat.
- When the stripper has been in place the recommended time, lightly rub the area with medium-grade steel wool or a paint-stripping scrub pad to loosen the old finish.
- Now use a putty knife to remove the old finish from the flat surfaces (Photo 2). A vegetable brush works great on curved areas, such as legs (inset Photo 2). Use the aluminum pie tins to collect the old finish.
- This table had a raised edge, grooves and round sections — three areas that are always hard to strip.
Here’s how each was dealt with:
- A brass-bristle brush was used to loosen the old finish along the raised edge (Photo 3) .
- A scratch awl was used to remove old finish from the edges (Photo 4). Make light strokes to avoid gouging the wood.
- And, to remove the finish from the round legs, I wrapped medium-grade steel wool around a length of string and used it in a back-and-forth, shoeshine motion (inset, Photo 4).
- Finally, don’t get discouraged if all the finish doesn't come off the first time. Be prepared to apply more coats of stripper, especially in curved or carved areas.
Disposing of the old finish
Once the piece is completely stripped, you’ll have to dispose of the old finish. The best way to do this is to put the aluminum pie plates outside in the shade and allow the stripper to evaporate. Place any solvent-soaked rags outside, too. Make sure they’re out of the reach of kids and pets.
Most cities have hazardous waste disposal areas that will take this type of residue. Contact your city hall for instructions for your area.
Once the old stuff is off
Before you apply the new finish, make sure the surfaces are smooth and clean. To get rid of any solvent stripper residue, rinse the entire surface with mineral spirits (Photo 5). If the stripper is water-base, use clear water.
If you notice any black water stains on the stripped areas, you can bleach them out using an oxalic acid solution (Photo 6). Then neutralize the acid with a borax and water solution. Oxalic acid and borax are available at most full-service paint stores. Follow the directions and safety instructions on the oxalic acid container.
To get the best-looking finish, you need to sand the stripped wood. Sanding is done in three stages: Use 100-grit (medium) sandpaper for the first sanding; 180-grit (fine) for the second; and for the final sanding, use 220-grit (very fine) sandpaper (Photo 7).
To get rid of any dust, wipe the entire piece with a tack cloth (Photo 8). The tack cloth is a cheese cloth that has a sticky coating to pick up and hold dust.
The new finish
Now you’re ready to apply the new stain (Photo 9), but make sure the piece is dry first. Any major brand name product should give you good results, if you follow the directions.
Apply a final top coat. If the piece will get heavy-duty use, consider applying polyurethane rather than regular varnish. It’s recommended that you apply the same brand stain and finish.