
How to use 3 squares beyond measuring 90 degrees (with pictures)
Carpentry and woodworking are just not throw-together affairs. That can become joyfully apparent at the great moment of truth when you step back to look at your finished job and everything fits. And the square — in all its variations — is one of the tools that will get you to this moment of truth.
Six Tips for Three Squares
The carpenter’s square usually has a 16-in. longue and 24-in. blade, though some are smaller. The large size provides accuracy for framing or squaring large objects.
Make 45-degree angles with a carpenter’s square by setting the same number: along the board’s edge. Stair gauges are for repetitive cuts.
The combination square has a sliding blade and gives both 90- and 45-degree readings. The tongue contains a small level and the thumbscrew for locking the blade.
Mark a board for ripping by setting the blade to the desired measurement, then pull the square and the pencil together along the edge of the board.
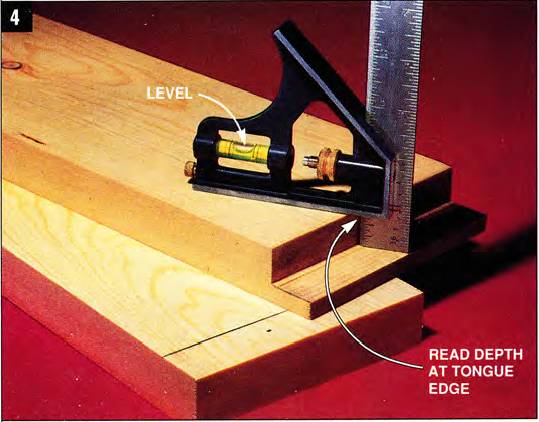
Measure the depth of a cut or a fitting by sliding the blade end to the bottom of the cut, locking the thumbscrew and taking your reading.
A Speed square has a tongue lip you can hold tight against the edge of the board, then run the circular saw base along the arm of the square. No need to mark a line.
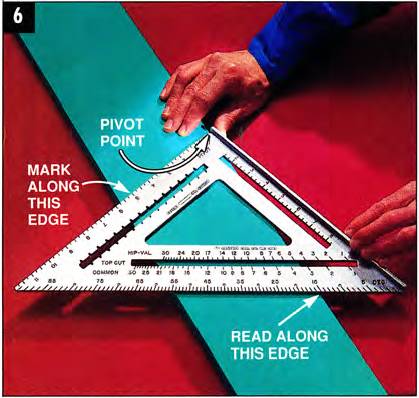
Compute any angle with a Speed square; hold the pivot point against the board edge and rotate the square to the desired angle, shown on the diagonal arm.
Go beyond measuring 90 degrees
There’s nothing really mysterious about squares. Yet, even the simplest square among all the variations does a lot more than just make a straight, right-angle line.
You’ll learn how to make squares do their best work for you, and how to use the three main types:
- the carpenter's square,
- the combination square, and
- the Speed square.
Working square
Every square has two basic parts:
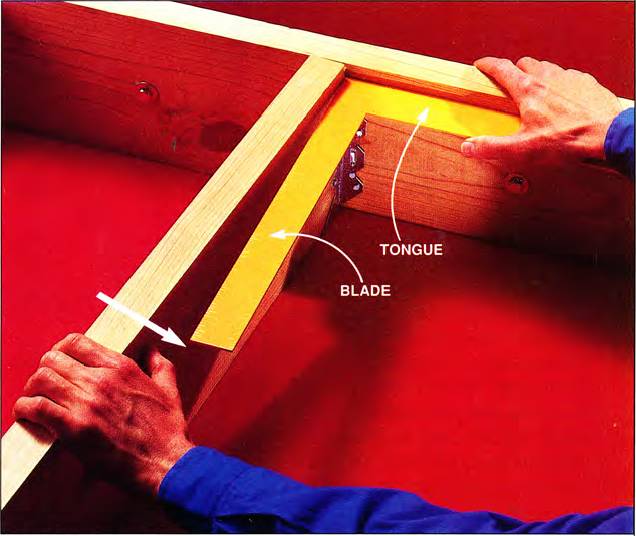
- The “tongue,” usually the shorter arm, goes against the edge of the board or the piece you want to mark.
- The “blade” is the arm against which you mark your line.
Some squares — the combination square, shown in Photo 3, for example, — have a double tongue, one for 90 degrees and the other for 45 degrees.
No matter what. your square has to be square. If it’s not. throw it away and buy a new one. Here’s how to test it:
- Hold the tongue tight against the straight edge of a board and mark a fine line along the blade.
- Flip the square over and with the tongue against the same edge of the board, mark a second line over the first.
- If the lines don't match, your square is no good.
Even if the square is off just a little, keep in mind that over longer distances — for example if you’re using a framing square to position deck joists — a small inaccuracy can add up to a lot at the far end.
Here are some other tips for squaring and marking accurately:
- Hold the tongue firmly against the edge of the piece you're marking, and make sure this edge is not irregular or bowed. Don't trust your lumber edge to be straight: sight along the edge first. And incidentally, don’t trust the precut ends of lumber or plywood to be square either, check them out.
- Keep the blade of the square flat on the surface of the board you’re marking. If the blade is raised at one end, your pencil mark will probably not be accurate.
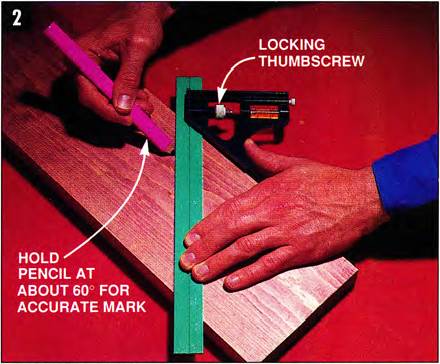
- Make your pencil line just dark enough to see it when you cut. If you bear down too hard on the pencil, the line you’re marking will thicken as the point wears down, and it will be inaccurate. Holding the pencil at about 60 degrees, as shown in Photo 2, also helps for line accuracy.
- After marking a line, double-check it with the tongue against the opposite edge of the board.
The time-honored carpenter’s square
The carpenter‘s square goes by other names as well: framing square, steel square, rafter square or flat square. It has been around in some form or other since the pyramids were built. It usually has a 16-in. tongue and a 24-in. blade, and this large size makes it highly accurate for laying out and squaring large patterns or pieces.
It’s especially useful for laying out deck framing, installing door and window frames, and placing joists and rafters. But it excels at simpler jobs as well — marking a door bottom for trimming, squaring cabinets, and cabinet parts, cutting large plywood sheets, laying tile, or simply as a long straight-edge for cutting glass, insulation. Shingles, or wallboard with a utility knife.
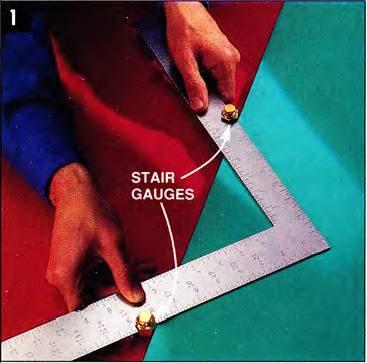
Both the tongue and blade of a carpenter’s square have incremental inch marks on both sides of both edges. These inch markings are useful for straight-line measuring, but they’re also valuable for making angle cuts or cutouts. Placing the same inch mark of each arm along the edge of a board will give you a 45-degree angle, as shown in Photo 1. The screw-on stair gauges shown allow you to preset any angle and make the same repetitive marks for cutting stair risers, rafters or decking.
Some carpenter’s squares come with root rafter framing tables stamped on the blade — used for determining rafter lengths and angles — along with very complicated instructions on how to use these tables.
You can expect to spend about $20 for a good-quality carpenter’s square.
The versatile combination square
A combination square is designed to give you a quick 90- or 45-degree angle. But its easy-sliding blade, which locks in place with a thumbscrew, gives this square lots of other uses besides.
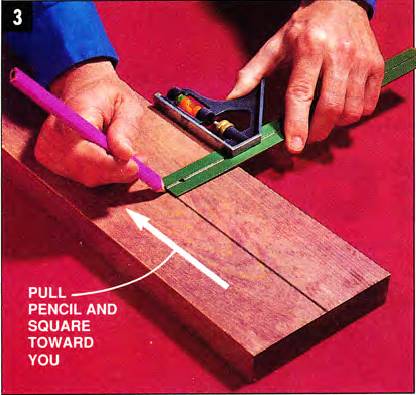
Reach for it whenever you need to mark a long, straight line along the length of a board, parallel to the edges. Just set the measurement you want using the inch markings on the blade. Then draw the square along the edge of a board, as shown in Photo 3. Of course, your board edge needs to be straight for the line to come out straight.
Combination squares are great for measuring the depth of a saw cut or other recess in a flat surface. You can get an easier and more accurate reading than you’ll usually get with a tape rule.
The combination square’s 12-in. steel blade can slide all the way out of its slot and you can use it as a straightedge for marking or for cutting with a utility knife.
The spirit level, set between the tongues, has limited accuracy because of its small size, but it’s quick and easy to use and always readily at hand, since the square is small enough to carry in most belt pouches.
A good combination square costs around $15.
The quick and handy Speed square
The Speed square is a recent invention. It’s called other things — triangle square, quick square — but Speed square is the name given to it by Swanson, the company that first made it, and it’s what most carpenters call it. You’ll find one in just about every carpenters pouch.
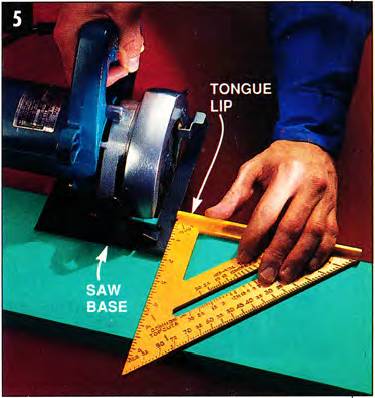
Not only does the Speed square give you a quick 90- or 45-degree angle, but the tongue lip allows you to hold the square securely in place against the edge of the board so you can use the square itself to run the base of a circular saw along (Photo 5): no need to even mark the board. Most Speed squares are made of material that’s lightweight, yet thick enough to guide the saw base.
The Speed square is also a quick and nifty angle finder. Photo 6 shows how the end at the tongue lip serves as the pivot point for finding and marking an angle. The angle readings are stamped on the diagonal arm of the triangle, and you draw your line along the vertical arm.
You can also buy a variation of the Speed square (not shown), which has a pivoting tongue guide that locks in place with a thumbscrew.
This allows you to make angle cuts using the square as a guide for the saw base, just as you would for 90-degree cuts.
Speed squares are made of steel or lighter metal, as well as plastic. They come in various sizes up to 12.in., and range in cost from $5 to $20.
Square care
Squares are precision tools; they should be treated with kindness. A carpenter’s square will be anything but if it‘s dropped from more than a few feet, and if either arm is bent, you‘ll get inaccurate readings. Combination squares are the most delicate, and shouldn’t be dropped or banged around. Speed squares are the toughest of the three, and can stand up to an occasional tumble. Just don’t use it to open paint cans.
Oil your squares occasionally with any light machine oil to prevent rusting, and apply oil to the moving parts of a combination square.
If the stamped markings on a metal square become worn and hard to read, you can make them visible again. Just wipe over them with a cloth dipped in either white or black paint. depending on the squares color. Then lightly wipe the paint from the surface.
Carpentry and woodworking are just not throw-together affairs. That can become joyfully apparent at the great moment of truth when you step back to look at your finished job and everything fits. And the square — in all its variations — is one of the tools that will get you to this moment of truth.
Six Tips for Three Squares
The carpenter’s square usually has a 16-in. longue and 24-in. blade, though some are smaller. The large size provides accuracy for framing or squaring large objects.
Make 45-degree angles with a carpenter’s square by setting the same number: along the board’s edge. Stair gauges are for repetitive cuts.
The combination square has a sliding blade and gives both 90- and 45-degree readings. The tongue contains a small level and the thumbscrew for locking the blade.
Mark a board for ripping by setting the blade to the desired measurement, then pull the square and the pencil together along the edge of the board.
Measure the depth of a cut or a fitting by sliding the blade end to the bottom of the cut, locking the thumbscrew and taking your reading.
A Speed square has a tongue lip you can hold tight against the edge of the board, then run the circular saw base along the arm of the square. No need to mark a line.
Compute any angle with a Speed square; hold the pivot point against the board edge and rotate the square to the desired angle, shown on the diagonal arm.
Go beyond measuring 90 degrees
There’s nothing really mysterious about squares. Yet, even the simplest square among all the variations does a lot more than just make a straight, right-angle line.
You’ll learn how to make squares do their best work for you, and how to use the three main types:
- the carpenter's square,
- the combination square, and
- the Speed square.
Working square
Every square has two basic parts:
- The “tongue,” usually the shorter arm, goes against the edge of the board or the piece you want to mark.
- The “blade” is the arm against which you mark your line.
Some squares — the combination square, shown in Photo 3, for example, — have a double tongue, one for 90 degrees and the other for 45 degrees.
No matter what. your square has to be square. If it’s not. throw it away and buy a new one. Here’s how to test it:
- Hold the tongue tight against the straight edge of a board and mark a fine line along the blade.
- Flip the square over and with the tongue against the same edge of the board, mark a second line over the first.
- If the lines don't match, your square is no good.
Even if the square is off just a little, keep in mind that over longer distances — for example if you’re using a framing square to position deck joists — a small inaccuracy can add up to a lot at the far end.
Here are some other tips for squaring and marking accurately:
- Hold the tongue firmly against the edge of the piece you're marking, and make sure this edge is not irregular or bowed. Don't trust your lumber edge to be straight: sight along the edge first. And incidentally, don’t trust the precut ends of lumber or plywood to be square either, check them out.
- Keep the blade of the square flat on the surface of the board you’re marking. If the blade is raised at one end, your pencil mark will probably not be accurate.
- Make your pencil line just dark enough to see it when you cut. If you bear down too hard on the pencil, the line you’re marking will thicken as the point wears down, and it will be inaccurate. Holding the pencil at about 60 degrees, as shown in Photo 2, also helps for line accuracy.
- After marking a line, double-check it with the tongue against the opposite edge of the board.
The time-honored carpenter’s square
The carpenter‘s square goes by other names as well: framing square, steel square, rafter square or flat square. It has been around in some form or other since the pyramids were built. It usually has a 16-in. tongue and a 24-in. blade, and this large size makes it highly accurate for laying out and squaring large patterns or pieces.
It’s especially useful for laying out deck framing, installing door and window frames, and placing joists and rafters. But it excels at simpler jobs as well — marking a door bottom for trimming, squaring cabinets, and cabinet parts, cutting large plywood sheets, laying tile, or simply as a long straight-edge for cutting glass, insulation. Shingles, or wallboard with a utility knife.
Both the tongue and blade of a carpenter’s square have incremental inch marks on both sides of both edges. These inch markings are useful for straight-line measuring, but they’re also valuable for making angle cuts or cutouts. Placing the same inch mark of each arm along the edge of a board will give you a 45-degree angle, as shown in Photo 1. The screw-on stair gauges shown allow you to preset any angle and make the same repetitive marks for cutting stair risers, rafters or decking.
Some carpenter’s squares come with root rafter framing tables stamped on the blade — used for determining rafter lengths and angles — along with very complicated instructions on how to use these tables.
You can expect to spend about $20 for a good-quality carpenter’s square.
The versatile combination square
A combination square is designed to give you a quick 90- or 45-degree angle. But its easy-sliding blade, which locks in place with a thumbscrew, gives this square lots of other uses besides.
Reach for it whenever you need to mark a long, straight line along the length of a board, parallel to the edges. Just set the measurement you want using the inch markings on the blade. Then draw the square along the edge of a board, as shown in Photo 3. Of course, your board edge needs to be straight for the line to come out straight.
Combination squares are great for measuring the depth of a saw cut or other recess in a flat surface. You can get an easier and more accurate reading than you’ll usually get with a tape rule.
The combination square’s 12-in. steel blade can slide all the way out of its slot and you can use it as a straightedge for marking or for cutting with a utility knife.
The spirit level, set between the tongues, has limited accuracy because of its small size, but it’s quick and easy to use and always readily at hand, since the square is small enough to carry in most belt pouches.
A good combination square costs around $15.
The quick and handy Speed square
The Speed square is a recent invention. It’s called other things — triangle square, quick square — but Speed square is the name given to it by Swanson, the company that first made it, and it’s what most carpenters call it. You’ll find one in just about every carpenters pouch.
Not only does the Speed square give you a quick 90- or 45-degree angle, but the tongue lip allows you to hold the square securely in place against the edge of the board so you can use the square itself to run the base of a circular saw along (Photo 5): no need to even mark the board. Most Speed squares are made of material that’s lightweight, yet thick enough to guide the saw base.
The Speed square is also a quick and nifty angle finder. Photo 6 shows how the end at the tongue lip serves as the pivot point for finding and marking an angle. The angle readings are stamped on the diagonal arm of the triangle, and you draw your line along the vertical arm.
You can also buy a variation of the Speed square (not shown), which has a pivoting tongue guide that locks in place with a thumbscrew.
This allows you to make angle cuts using the square as a guide for the saw base, just as you would for 90-degree cuts.
Speed squares are made of steel or lighter metal, as well as plastic. They come in various sizes up to 12.in., and range in cost from $5 to $20.
Square care
Squares are precision tools; they should be treated with kindness. A carpenter’s square will be anything but if it‘s dropped from more than a few feet, and if either arm is bent, you‘ll get inaccurate readings. Combination squares are the most delicate, and shouldn’t be dropped or banged around. Speed squares are the toughest of the three, and can stand up to an occasional tumble. Just don’t use it to open paint cans.
Oil your squares occasionally with any light machine oil to prevent rusting, and apply oil to the moving parts of a combination square.
If the stamped markings on a metal square become worn and hard to read, you can make them visible again. Just wipe over them with a cloth dipped in either white or black paint. depending on the squares color. Then lightly wipe the paint from the surface.