
How To Remove A Load-Bearing Wall
Ready to remodel? Here are the five key steps you need to follow when you tear out a wall.
Tired of your small, cramped kitchen or other room? Don’t despair. The extra space you always wanted may be only a wall away.
By removing a wall between two rooms, you can often create the larger, less confined living area that you want. You’re not really increasing the size of your home, of course. It’s the feeling of spaciousness (or the ease of keeping an eye on the kids in the family room while you cook) that counts.
As you size up this project, keep in mind that your house has two kinds of walls; “non-bearing” walls, which support little weight, and “bearing” walls, which support a lot of weight,
Removing a non-bearing wall is easy since it doesn’t affect the strength of your house. Nevertheless, be prepared to deal with electrical wires, pipes, and heating ducts that might lurk inside the wall.
I’ll discuss these problems below and in “Coping with Obstructions”. You’ll need only basic carpentry skills and hand tools to remove the wall and repair the scars left in the ceilings and woodwork.
In contrast, removing a bearing wall takes more planning. You have to replace the bearing wall with a heavy beam to support the weight it carries. A mistake here could seriously weaken your home, so don’t take on this project yourself unless you’ve had some building experience.
And review your plans with your local building inspector, especially regarding the size of the beam you plan to install in place of the wall.
I’m going to show you the key steps for the more challenging project, removing a bearing wall, and replacing it with a beam. Ask your building inspector whether your wall is bearing or non-bearing when you apply for a building permit for this project.
Anticipate obstructions and plan around them
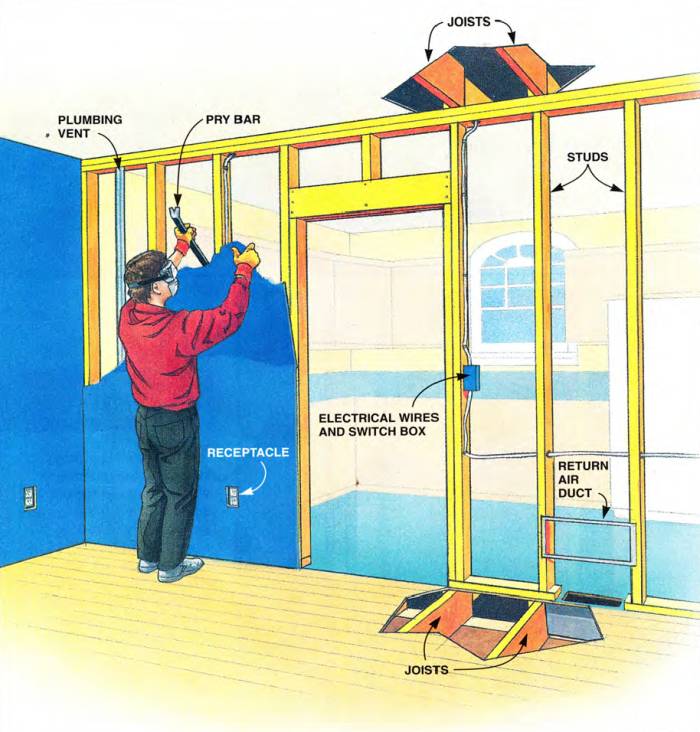
Besides holding up the house, walls hide electrical wires, plumbing pipes, heating and cooling ducts, telephone wires, TV cables and more.
You’ll have to reroute everything you find around your new opening. Perhaps you can do some of this work yourself, but you might have to hire professionals as well.
That’ll drive your project’s cost up, so try to figure out what’s inside the wall before you tear into it. You can then alter your plans if necessary before doing any damage.
To figure out what’s inside, look for clues:
- Receptacles and switches on either side of the wall are sure signs of electrical wires.
- Telephone jacks and TV cable outlets mean additional wiring.
- A register cover obviously indicates a heating or cooling duct.
If possible, check the wall from the basement or crawl space and also from above in the attic. Look especially for plumbing pipes, because rerouting them can be particularly difficult and expensive.
I won’t present detailed how-to information for running new electrical wires, plumbing lines, and ductwork here, although for general guidelines, please read “Coping With Obstructions” section below. Sometimes this work is tricky, so don’t hesitate to call in pros to help figure out problems you can’t solve.
Tip: Rather than removing an entire wall, leave one or two stud spaces intact at one end, and create what’s called a “wing wall”. Use these stud spaces to reroute wiring, pipes. etc.
Once you’ve anticipated and planned for as many obstructions as you can, you’re ready to shut off the electrical power at the main panel and strip the wallboard or plaster, keeping an eye out for the unexpected wire or plumbing vent.
This is dirty work, so seal off the work area with plastic and masking tape. And wear a dust mask and eye protection.
Don’t remove any studs yet. At this point, reroute all wiring, pipes, and ductwork, calling on the pros as needed,
Erect Temporary Support Walls
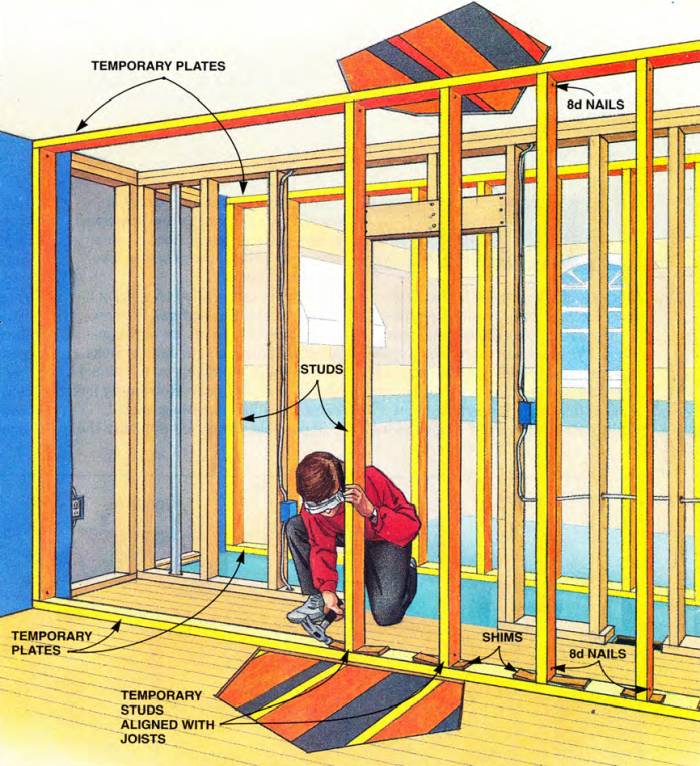
Ceiling joists usually run at right angles over the top of a bearing wall. They support a lot of weight, so you’ll need to temporarily brace these joists while you tear out the studs that currently support them and permanently replace the studs with a beam,
Though it’s unusual, joists sometimes run parallel to a bearing wall. Check with your building inspector if you have any doubts.
To build temporary support walls:
- Lay 2x4s (called “plates”) along the floor and ceiling about 3 ft. out from each side of the wall. You don’t have to nail the plates in place.
- Then erect 2x4 studs between the plates. Line them up with the ceiling joists above.
- Drive shims under the bottom end of the studs to wedge them upward and support the ceiling above.
- Finally, toenail each end of the stud to a plate with two 8d nails.
Remove The Old Wall Studs
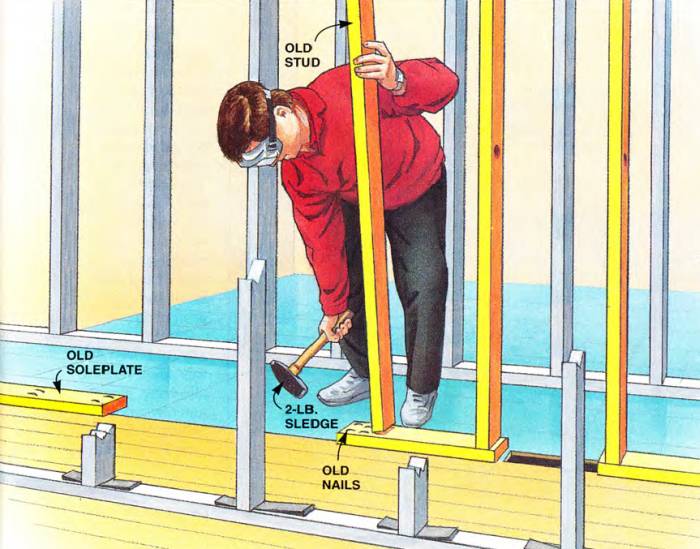
With the ceiling firmly braced by the temporary walls, knock out the old wall studs with a 2-lb. sledge or a hammer.
If you want to reuse the studs, slide a reciprocating saw with a metal-cutting blade between the stud and the soleplate to cut the nails.
However, it’s not always worthwhile trying to reuse old lumber. It has usually become brittle with age and splits easily when you try to renail it.
Leave the old soleplate in place. You’ll use it later.
Prepare The Frame For The Beam
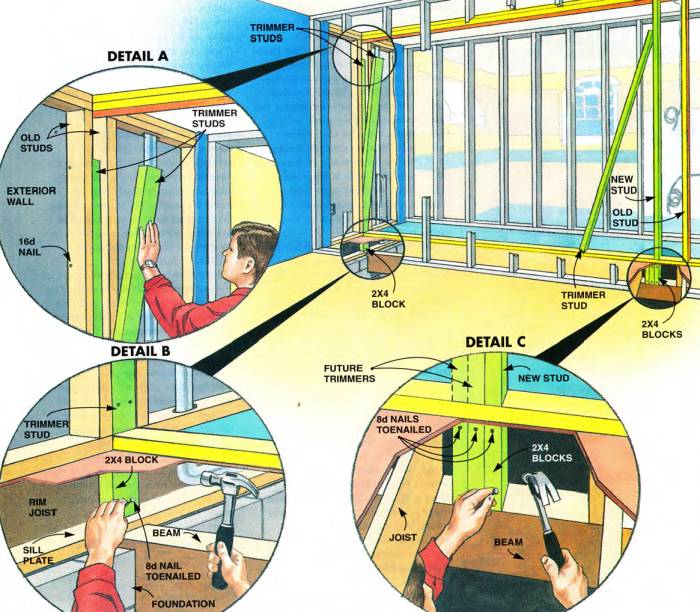
The new studs that you’ll put in to support the beam are called “trimmers.”
The longer the beam, the more weight the trimmers have to support. If your beam span exceeds 6 it, it’s recommendable that you use four trimmers, two at each end. This helps keep the beam from crushing at the point where it rests on the trimmers.
The illustration below shows two ways to install trimmers. On one side they are nailed inside an adjacent wall. That way they’re out of sight, which will leave the finished wall smooth and uninterrupted.
At the other end, a short section of the old wall (a wing wall) was left. This approach is partly for looks. It emphasizes the transition from one room to the other, maintaining a sense of two separate rooms. But it’s also practical because it’s a good place to reroute some of those wires and water pipes.
In either case, keep in mind one important framing principle: the trimmers should be supported continuously down to the foundation or to another beam (Details B and C). They can’t simply rest on the floor.
In Detail B the rim (or “band”) joist already supports one trimmer, so you only have to add one short 2x4 block to support the other.
In Detail C, a 2x4 block was nailed under each of them (and under the new stud too). The blocks rest on the solid beam.
Set The Beam
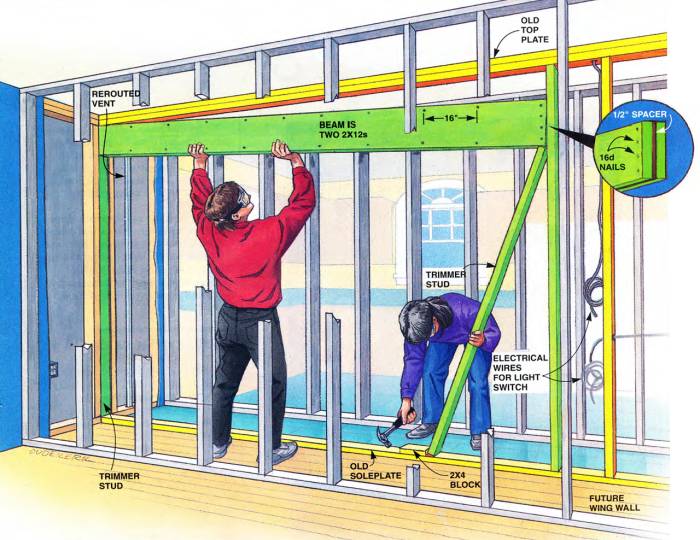
This beam consists of two 2x12s spaced 1/2 in. apart and nailed together with 16d nails spaced every 16 in. along the edges. The 1/2-in. plywood spacer simply makes the beam 3-1/2 in. wide, the exact width of a 2x4 stud wall.
For longer spans, you have to use stronger beams. Consult your building inspector or a structural engineer to make sure your beam is strong enough and won’t sag. A full-service lumberyard will often provide this service if you buy your lumber there.
- Ask a friend to help you lift the beam onto the set of trimmers, which you’ve already nailed in place at one end.
- Use a trimmer at the other end to lever the beam into place, as the illustration shows.
- Cut this second set of trimmers 1/8 in. longer than necessary to make sure the beam wedges up tightly.
- The trimmer will slide along the old plate as you drive it in, but protect the end of the trimmer with a block so you don’t damage it.
- Add the second trimmer and nail the assembly with 16d nails. You can now remove the temporary support walls.
Notice that this is a two-person project. Beams are heavy and dangerous when lifted overhead. One person should steady the beam while the other drives the trimmers into place.
To finish the project, saw off the old soleplate flush with the trimmers and repair the floor between the two rooms. If your floors are hardwood, you’ll be left with an ugly, difficult-to-repair gap.
You might have to hire a specialist to make the two floors blend. Then cover the framing with drywall and woodwork to match the decor of the rooms.
Coping With Obstructions
How Do You Reroute Electrical Wires?
Almost every wall contains electrical wiring, but if you’re experienced in wiring procedures, it’s relatively easy to move.
Trace the wires back to their nearest electrical box and disconnect them there before removing them. (Be sure to turn off the power at the main panel first.) Then, if necessary, reroute the wires around the wall opening, using new wiring, connectors, staples and other materials.
Wiring can get tricky, so if you’re unsure about how to do it correctly, hire a licensed electrician. And be sure that your local electrical inspector checks the work before you close up the walls again.
You’ll probably have to break open additional walls to gain access to some boxes and properly connect wires. One advantage of hiring a licensed electrician is that he knows how to minimize the damage to other walls, so you won’t be left with a lot of repair work.
Never simply cut wires and leave them hanging inside the wall.
How Should I Reroute Plumbing?
Moving plumbing will be more challenging. You could find any of three types in the wall:
- water supply lines,
- drains, and
- vents (which run up from the drains to open air).
A plumber can reroute supply lines and vents relatively easily. But expect to tear open additional walls and ceilings to provide access to new routes. Plumbing costs for these should be less than $800 if you do the wall tearing and repairing yourself.
Rerouting drainpipes can pose a bigger problem, because you’ll have to put more bends in the line, yet always keep the pipe angled downward to drain properly. And too many turns can result in clogged pipes in the future.
Discuss the options with a plumber. You might have to lower an entire ceiling or a section of it to hide a redirected drain.
If by a stroke of bad luck the wall holds the main drain (a 3- or 4-in. diameter pipe, called a “soil stack”), the price tag could easily reach $1,500. At this price, you might want to revise the original plan so you don’t have to move this pipe.
How Can You Reroute Heating And Cooling Ducts?
Removing an interior wall usually won’t affect a forced-air heating system, because most heating supply ducts run up exterior walls.
Of course, if you find a duct where you want to install a patio door, you’ll have to reroute the duct through another stud cavity.
However, the return air part of the system is usually installed in an interior wall. While you can sometimes block off this return air without hampering the effectiveness of the heating system, you’ll need professional advice to know for sure.
And if you have central air conditioning, you must maintain proper return air ducts, because they’re essential for effective cooling.
In any case, installing new ducts requires sheet metal working skills and tools and the know-how to balance airflows so all your rooms are comfortable. Unless you have this experience, call in a heating and cooling professional to help out.
Ready to remodel? Here are the five key steps you need to follow when you tear out a wall.
Tired of your small, cramped kitchen or other room? Don’t despair. The extra space you always wanted may be only a wall away.
By removing a wall between two rooms, you can often create the larger, less confined living area that you want. You’re not really increasing the size of your home, of course. It’s the feeling of spaciousness (or the ease of keeping an eye on the kids in the family room while you cook) that counts.
As you size up this project, keep in mind that your house has two kinds of walls; “non-bearing” walls, which support little weight, and “bearing” walls, which support a lot of weight,
Removing a non-bearing wall is easy since it doesn’t affect the strength of your house. Nevertheless, be prepared to deal with electrical wires, pipes, and heating ducts that might lurk inside the wall.
I’ll discuss these problems below and in “Coping with Obstructions”. You’ll need only basic carpentry skills and hand tools to remove the wall and repair the scars left in the ceilings and woodwork.
In contrast, removing a bearing wall takes more planning. You have to replace the bearing wall with a heavy beam to support the weight it carries. A mistake here could seriously weaken your home, so don’t take on this project yourself unless you’ve had some building experience.
And review your plans with your local building inspector, especially regarding the size of the beam you plan to install in place of the wall.
I’m going to show you the key steps for the more challenging project, removing a bearing wall, and replacing it with a beam. Ask your building inspector whether your wall is bearing or non-bearing when you apply for a building permit for this project.
Anticipate obstructions and plan around them
Besides holding up the house, walls hide electrical wires, plumbing pipes, heating and cooling ducts, telephone wires, TV cables and more.
You’ll have to reroute everything you find around your new opening. Perhaps you can do some of this work yourself, but you might have to hire professionals as well.
That’ll drive your project’s cost up, so try to figure out what’s inside the wall before you tear into it. You can then alter your plans if necessary before doing any damage.
To figure out what’s inside, look for clues:
- Receptacles and switches on either side of the wall are sure signs of electrical wires.
- Telephone jacks and TV cable outlets mean additional wiring.
- A register cover obviously indicates a heating or cooling duct.
If possible, check the wall from the basement or crawl space and also from above in the attic. Look especially for plumbing pipes, because rerouting them can be particularly difficult and expensive.
I won’t present detailed how-to information for running new electrical wires, plumbing lines, and ductwork here, although for general guidelines, please read “Coping With Obstructions” section below. Sometimes this work is tricky, so don’t hesitate to call in pros to help figure out problems you can’t solve.
Tip: Rather than removing an entire wall, leave one or two stud spaces intact at one end, and create what’s called a “wing wall”. Use these stud spaces to reroute wiring, pipes. etc.
Once you’ve anticipated and planned for as many obstructions as you can, you’re ready to shut off the electrical power at the main panel and strip the wallboard or plaster, keeping an eye out for the unexpected wire or plumbing vent.
This is dirty work, so seal off the work area with plastic and masking tape. And wear a dust mask and eye protection.
Don’t remove any studs yet. At this point, reroute all wiring, pipes, and ductwork, calling on the pros as needed,
Erect Temporary Support Walls
Ceiling joists usually run at right angles over the top of a bearing wall. They support a lot of weight, so you’ll need to temporarily brace these joists while you tear out the studs that currently support them and permanently replace the studs with a beam,
Though it’s unusual, joists sometimes run parallel to a bearing wall. Check with your building inspector if you have any doubts.
To build temporary support walls:
- Lay 2x4s (called “plates”) along the floor and ceiling about 3 ft. out from each side of the wall. You don’t have to nail the plates in place.
- Then erect 2x4 studs between the plates. Line them up with the ceiling joists above.
- Drive shims under the bottom end of the studs to wedge them upward and support the ceiling above.
- Finally, toenail each end of the stud to a plate with two 8d nails.
Remove The Old Wall Studs
With the ceiling firmly braced by the temporary walls, knock out the old wall studs with a 2-lb. sledge or a hammer.
If you want to reuse the studs, slide a reciprocating saw with a metal-cutting blade between the stud and the soleplate to cut the nails.
However, it’s not always worthwhile trying to reuse old lumber. It has usually become brittle with age and splits easily when you try to renail it.
Leave the old soleplate in place. You’ll use it later.
Prepare The Frame For The Beam
The new studs that you’ll put in to support the beam are called “trimmers.”
The longer the beam, the more weight the trimmers have to support. If your beam span exceeds 6 it, it’s recommendable that you use four trimmers, two at each end. This helps keep the beam from crushing at the point where it rests on the trimmers.
The illustration below shows two ways to install trimmers. On one side they are nailed inside an adjacent wall. That way they’re out of sight, which will leave the finished wall smooth and uninterrupted.
At the other end, a short section of the old wall (a wing wall) was left. This approach is partly for looks. It emphasizes the transition from one room to the other, maintaining a sense of two separate rooms. But it’s also practical because it’s a good place to reroute some of those wires and water pipes.
In either case, keep in mind one important framing principle: the trimmers should be supported continuously down to the foundation or to another beam (Details B and C). They can’t simply rest on the floor.
In Detail B the rim (or “band”) joist already supports one trimmer, so you only have to add one short 2x4 block to support the other.
In Detail C, a 2x4 block was nailed under each of them (and under the new stud too). The blocks rest on the solid beam.
Set The Beam
This beam consists of two 2x12s spaced 1/2 in. apart and nailed together with 16d nails spaced every 16 in. along the edges. The 1/2-in. plywood spacer simply makes the beam 3-1/2 in. wide, the exact width of a 2x4 stud wall.
For longer spans, you have to use stronger beams. Consult your building inspector or a structural engineer to make sure your beam is strong enough and won’t sag. A full-service lumberyard will often provide this service if you buy your lumber there.
- Ask a friend to help you lift the beam onto the set of trimmers, which you’ve already nailed in place at one end.
- Use a trimmer at the other end to lever the beam into place, as the illustration shows.
- Cut this second set of trimmers 1/8 in. longer than necessary to make sure the beam wedges up tightly.
- The trimmer will slide along the old plate as you drive it in, but protect the end of the trimmer with a block so you don’t damage it.
- Add the second trimmer and nail the assembly with 16d nails. You can now remove the temporary support walls.
Notice that this is a two-person project. Beams are heavy and dangerous when lifted overhead. One person should steady the beam while the other drives the trimmers into place.
To finish the project, saw off the old soleplate flush with the trimmers and repair the floor between the two rooms. If your floors are hardwood, you’ll be left with an ugly, difficult-to-repair gap.
You might have to hire a specialist to make the two floors blend. Then cover the framing with drywall and woodwork to match the decor of the rooms.
Coping With Obstructions
How Do You Reroute Electrical Wires?
Almost every wall contains electrical wiring, but if you’re experienced in wiring procedures, it’s relatively easy to move.
Trace the wires back to their nearest electrical box and disconnect them there before removing them. (Be sure to turn off the power at the main panel first.) Then, if necessary, reroute the wires around the wall opening, using new wiring, connectors, staples and other materials.
Wiring can get tricky, so if you’re unsure about how to do it correctly, hire a licensed electrician. And be sure that your local electrical inspector checks the work before you close up the walls again.
You’ll probably have to break open additional walls to gain access to some boxes and properly connect wires. One advantage of hiring a licensed electrician is that he knows how to minimize the damage to other walls, so you won’t be left with a lot of repair work.
Never simply cut wires and leave them hanging inside the wall.
How Should I Reroute Plumbing?
Moving plumbing will be more challenging. You could find any of three types in the wall:
- water supply lines,
- drains, and
- vents (which run up from the drains to open air).
A plumber can reroute supply lines and vents relatively easily. But expect to tear open additional walls and ceilings to provide access to new routes. Plumbing costs for these should be less than $800 if you do the wall tearing and repairing yourself.
Rerouting drainpipes can pose a bigger problem, because you’ll have to put more bends in the line, yet always keep the pipe angled downward to drain properly. And too many turns can result in clogged pipes in the future.
Discuss the options with a plumber. You might have to lower an entire ceiling or a section of it to hide a redirected drain.
If by a stroke of bad luck the wall holds the main drain (a 3- or 4-in. diameter pipe, called a “soil stack”), the price tag could easily reach $1,500. At this price, you might want to revise the original plan so you don’t have to move this pipe.
How Can You Reroute Heating And Cooling Ducts?
Removing an interior wall usually won’t affect a forced-air heating system, because most heating supply ducts run up exterior walls.
Of course, if you find a duct where you want to install a patio door, you’ll have to reroute the duct through another stud cavity.
However, the return air part of the system is usually installed in an interior wall. While you can sometimes block off this return air without hampering the effectiveness of the heating system, you’ll need professional advice to know for sure.
And if you have central air conditioning, you must maintain proper return air ducts, because they’re essential for effective cooling.
In any case, installing new ducts requires sheet metal working skills and tools and the know-how to balance airflows so all your rooms are comfortable. Unless you have this experience, call in a heating and cooling professional to help out.