
How to Tile a Bathroom Floor and Walls
Nothing beats ceramic tile in the bathroom. Here’s how to install it.
Historians may argue whether it was the automobile or the computer, supermarkets or TV that most changed modern civilization, but for most homeowners, it was none of those — it was the tile bathroom. Sparkling, easy-to-clean, water resistant, hygienic and long-lasting, the tile bathroom was the final step in our long march away from the outhouse.
Well, okay, maybe I’m laying it on a bit thick, but it’s no exaggeration that ceramic tile is almost perfect for bathroom floors and walls.
Setting the tile is also a great project to do yourself.
You’ll find it pleasant work — no screaming saws, no grunting under massive loads of lumber and no gagging from dangerous fumes. You don’t need any experience with tile, either, to do a first-class job — a beginner can do it. However, you do need to have enough patience to plan, plan, and plan some more, and then to work carefully. Laying tile isn’t difficult, but if you goof, you can’t paint over it or sand it smooth.
What I will (and won’t) talk about
This is a complete guide to tiling a simple bathroom I’ll cover the basic tiling steps, the major snags you may run into, and I’ll pay particular attention to the most critical part: planning the tile layout.
But there’s much more that I won’t cover in this story — borders, diagonal arrangements, shower floors, countertops, marble and primitive tiles, just for starters. You may also run into problems from severely out-of-square rooms or from hidden rot. If you need assistance, tile shops can be a great resource to help you.
Part I – Planning
Costs: time and dollars
Tiling takes time; count on at least a day or two to prepare the room, and anywhere from a day to a week for the tiling itself. Don’t forget that you’ll be living without the bathroom during that time. Make other arrangements or you’ll have a mutiny on your hands.
If you’re like me, you’re probably thinking, “Okay, but how much is this wonderful tile bathroom going to set me back?”
Depending on how fancy your tile is, the answer is from $2 to $13 a square foot, including adhesive and grout. Cement backer board, which usually goes under the tile on the floor and around the tub, costs an additional $2 a square foot.
Tips on buying tile
I love home centers (which is good, considering I spend half my paycheck there), but when you’re shopping for tile, go to a tile shop instead. They have a tremendous variety of tiles, they’ll usually lend you tile-cutting tools, and they‘re more likely to have salespeople who can help you with installation questions.
When you visit a tile shop, you’ll be blown away by the choices: unglazed quarry tiles, little mosaic tiles, super-hard porcelain tiles, marble tiles, hand-painted decorative tiles and rustic hand-made tiles. Here I’ll be installing the familiar glazed wall and floor tiles. Other tiles are installed in similar but not identical ways. Ask a salesperson at your tile shop for details.
Here are some buying tips:
- Floor tiles differ from wall tiles — they're harder and less glazed. You can use floor tiles on walls, but not wall tiles on the floor — they're too slippery and too fragile.
- Don't be limited to small tiles — especially on the floor. Large tiles look impressive, they're very quick to install, and there are fewer grout lines to mess with.
- Don’t use floor tiles that are the same size as the wall tiles — it's hard to get the grout lines to line up where the wall meets the floor.
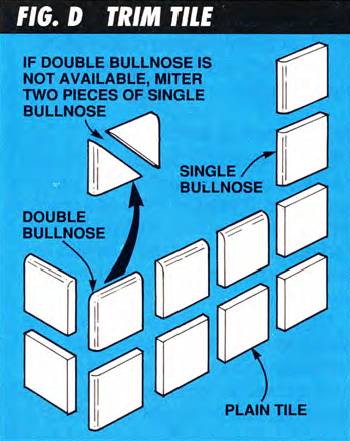
- Check on the availability of “trim”. These are the tiles with smooth edges that you use to finish off the edge of a tiled surface (see Fig. D and Photo 11). Bullnose tile (one smooth edge) is usually available, but double-bullnose (two smooth edges) may not be or may have to be specially ordered. Check this out before you order tile.
- Buy a threshold for the doorway (see Photo 14). Forget about the old-fashioned marble ones, which require a wet saw, and buy a Corian threshold instead. You can cut it with a hacksaw.
- When you go shopping, take along a measured drawing of each surface you want to tile. The tile shop salesperson can tell you what trim tiles you’ll need, and help you estimate quantities. Don’t worry about ordering more than you need; most tile shops will allow you to return unused tile, and it’s a smart idea to keep a handful of tiles and some grout for any later repairs.
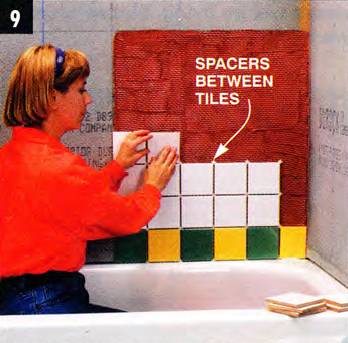
- Tiles need spaces between them for the grout. Some tiles have little lugs on the edges to keep them the right distance apart; others are mounted on mesh sheets, already spaced (Photo 5). For other tiles, use plastic spacers, as I did (Photo 6). These are available in different widths; wall tiles usually have 1/16-in. spaces, and floor tiles 3/16- to 1/4-in. spaces, depending on how big the tiles are.
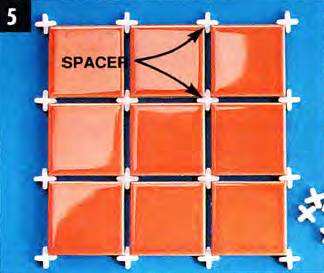
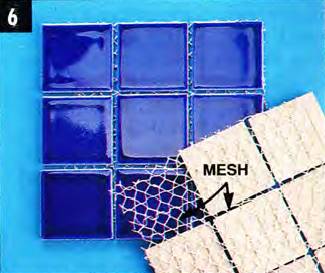
Tile spacing can be done in several ways: by plastic spacers, by buying tiles mounted on a mash banking, or by buying tiles with small lugs along the edges.
Buying grout and adhesive
Besides tile, you’ll need to buy grout and adhesive.
Tile adhesive: latex-modified thin-set
Latex-modified thin-set is a cement product. rather like mortar, with a latex additive for greater flexibility and strength.
It’s the best general-purpose adhesive: waterproof, gap-filling, strong under heavy traffic, and low-odor. It’s the hands-down choice for floors that get wet and shower enclosures.
Thin-set comes as a powder that you mix with a latex additive. The mixture must be wet enough to stick to the tiles, but not so wet that it oozes up between the tiles as you push them down. Do a quick experiment: Spread a gob of adhesive on a scrap of plywood, push down a couple of tiles, and make sure they stick without adhesive coming up between them.
Tile adhesive: organic mastic
Organic mastic is your other adhesive choice: It’s slightly cheaper, premixed, and gives you plenty of time to work. However, it isn’t waterproof, so don’t use it for floors or shower walls; it can’t fill gaps larger than 1/4 in, and it has a strong odor.
Grout
Grout comes in two forms, sanded and unsanded.
Use sanded grout for grout lines larger than 1/8 in.; otherwise, use unsanded.
Like thin-set, grout is a powder that you mix with a latex additive. Grout comes in different colors, so you can make the grout lines less visible by matching the grout to the tiles, or more visible by choosing a contrasting color.
White grout on a floor will get dirty unless you use a penetrating alkaline sealer and reapply it as needed.
You’ll need special tile tools
You’re in luck in this department — most specialized tiling tools can be rented from a rental outfit or borrowed from a tile shop. (See, those tile shops are great, aren’t they?)
If you do have to buy a trowel, get a disposable one; you’re not likely to need it more than once or twice in your lifetime.
Here are the tools you’ll need:
- A notched trowel or two for applying adhesive (Photo 8). The size of the notches determines how much adhesive goes on, and different-size tiles require different-size trowels. Ask your tile supplier what trowel to use with your tile. If you put cement board on the floor, you’ll need a 1/4-in. square-notch trowel for that adhesive.
- A “grout float" (Photo 15). This trowel-like tool has a hard rubber edge that you use to spread the grout and push it firmly down into the grout spaces.
- A tile cutter (Photo A). Used for cutting straight lines in tile.
- Tile nippers (Photo B). These special pliers have hardened jaws for breaking off bits of tile.
- A round-cornered sponge. which you can buy for $7. This is used for wiping off the grout.
You may need a rod saw ($7) for cutting curves in the tile (Photo C) or an undercut saw (Photo 2) for cutting the wooden trim around your door. For the latter, you can substitute a handsaw with a fairly flexible blade.
You’ll also need a handful of normal carpenter’s tools for tiling, like a level, chalk line and framing square, plus several specialized tiling tools.
Masking tape is handy to keep the occasional slippery wall tile from sliding down or to hold a soap dish in place.
Finally, remember to have several buckets and plenty of rags on hand.
Tile needs a good base
Tile has absolutely no “give” to it, so it has to be mounted to a surface that will not budge. It can’t be used as a quick fix for a weak or uneven surface; the underlying wall or floor must be stiff and strong, or the grout will crack and the tile may pop right off.
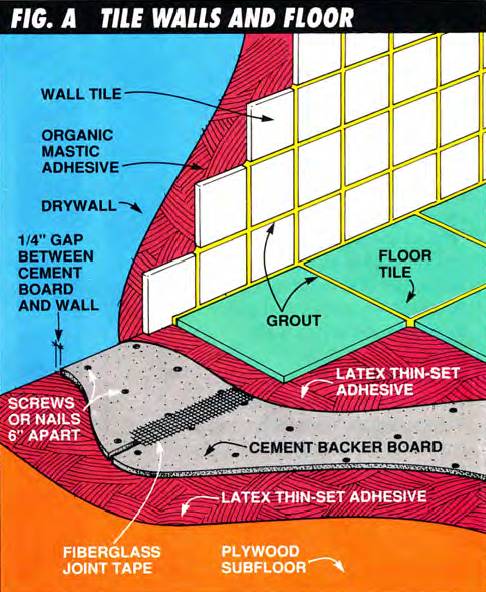
Drywall and plaster walls, if they’re hard and not coming apart, make good surfaces to tile, except around the tub. Even green, moisture-resistant drywall is not moisture resistant enough for around a shower enclosure.
These walls should be replaced with cement backer board. This is a sheet material, generally 1/2 in. thick, composed of concrete sandwiched between two layers of nylon mesh. You can buy it at home centers in various sheet sizes. It is totally rot-proof.
Though it’s not essential, cement board is also the best floor material, because moisture often penetrates the floor around the base of the toilet and at the edges of the tub. If any of you are parents of young children, you know what I’m talking about.
Layout is everything
When you’ve got a sample of the tile you want to use, you should make a detailed layout sketch. Make one drawing for each surface you’re going to tile that shows:
- How many tiles go across and up and down. Don't forget to include the space for grout lines.
- Where the cut tiles will be and approximately how large they'll be.
- Where the bullnose tiles fit.
- Where accessories like soap dishes will go.
I want you to be a detail maniac about this, okay? A real nut case. The layout is the key to successful tiling, and it’s just plain impossible for you to spend too much time planning.
The safest method is to lay a row of tiles on the floor, with their spacers if necessary, and actually measure them to get the dimensions you need.
The drawings unlock the mystery of tile layout — the key to a well-tiled room.
Here’s how to plan your layout:
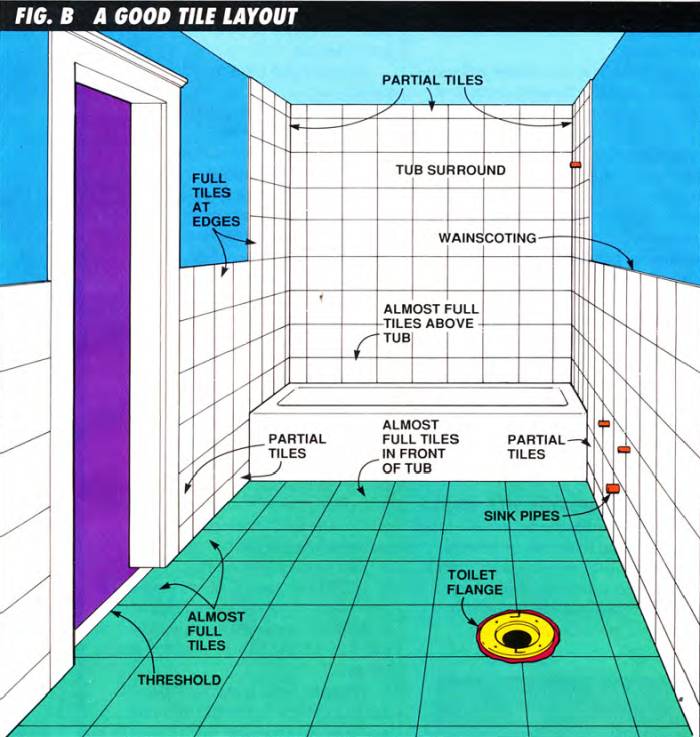
- Hide the cut tiles. Keep the cut tiles in the less visually prominent areas of the room, and use whole or almost whole tiles in the most prominent places (Fig. B). The cut tiles should go in the corners, behind the sink or toilet, at the ceiling, and at the base of walls. But don't end up with “slivers"—cut tiles that are less than about half a tile width.
- Avoid the slivers. You can avoid slivers by eliminating one whole tile and having a cut tile at each end (Fig. C). A cut tile at both sides is also a good approach if you want a more symmetrical appearance, for instance, on the wall behind the tub.

- Check for square and level. Your rows of tile must be level and straight up and down, even though your floor, tub, and walls may not be. Check with a framing square and level. If the surfaces are more than 3/ 8 in. out of square over 8 ft. you'll get noticeably angled cuts, which look awful. Try to lay out the tiles so the angled cuts are concealed, like under the sink or toilet, but if that won‘t work, consult a professional tile setter—there are fixes.
- Watch the tub. You should have full or nearly full tiles along the upper edge of the tub. But the tub may slope, so plan to use a full tile at its lowest point and to cut the rest of the first row. Be sure to leave 1/8 in. of space between the tub and the tiles. You’ll fill it with caulk later.
- Don't forget the trim. As you plan your layout, make sure you include the special edge tiles, called “trim,” especially if you have any outside corners. The two common forms of trim are single- and double-bullnose tiles, which are used as shown in Fig. D and Photo 11.
- Plan the corners. Remember, one wall will have tile going all the way into the corner, and the other wall will have tile that butts up to that tile. Plan the trim particularly carefully on outside corners, and make sure the horizontal grout lines are continuous as they go around the corner.
- Watch the doorway. When you tile a floor, do the area near the door last, so you don’t walk on the freshly laid tile. But if you plan a row of whole tiles along the wall near the door, you could find yourself needing to add a thin sliver of tile at that wall, right at the last minute, just because your grout lines were a bit narrow, or the room is out of square. So plan for a row of cut tiles along that wall. They should, however, be 2/3 to 3/4 of a full tile, because this is a visually prominent area. Be sure to plan the threshold in your layout (Photo 14).
- Plan for your accessories. If you're going to put in a soap dish, towel bar, grab bar or corner shelf, plan for it early. You may need to leave a couple of wall tiles off to make room for the soap dish, for instance, and it may also require cut tiles on either side. "Flatback" fixtures can be surface-mounted over the completed tile wall. When you buy your accessories, ask how they should be mounted.
Part II – Prepare the room
This project used cement board on the floor and around the shower walls to create a stiff and rot-proof surface to tile on.
Getting the room ready
With a detailed layout in hand, you’re ready to go:
- Remove the sink, vanity, toilet, shower fixtures (but not the tub), and all furnishings.
- Stuff rags in the waste pipes under the sink and toilet.
- Use cardboard or a heavy drop-cloth to protect the tub from scratches, and to keep the drain from getting clogged with debris.
- Rip off the old drywall or plaster around the tub, until you're down to bare studs, ready to receive cement board. If there's rotten insulation, get rid of it and staple up paper-faced fiberglass batts.
- I know you’re probably dying to set tile, but now’s a great time to paint the ceiling, while the drips won't matter, and also to replace your tub and shower fixtures, while the walls are accessible.
- If you're tiling any walls outside the tub area, you may have to work around an electrical outlet or switch. Although you can leave the lights on now when you actually start tiling, you must turn off the electricity to your bathroom at the main panel, so get some work lights ready.
- On the floor, it’s best to tear up the old tile or vinyl flooring so you're down to the plywood subfloor.
- However, if you have an old vinyl floor, it may contain asbestos, so have a piece tested, either by a state agency or a commercial testing firm. If it does have asbestos, leave it alone and cover it with the cement board.
Putting up cement board
Cement board is heavy, but otherwise easy to work with.
To cut it, score one side with a utility knife, deep enough to cut into the surface mesh. Then snap the sheet backward and it will break along the score mark.
To make a hole, score a circle, then pound it out with a hammer and trim the edges. You can also cut holes with a jigsaw and a metal-cutting blade.
On the floor, glue 1/2-in. cement board to the underlying subfloor using latex-modified thin-set adhesive, spread with a 1/4-in. square-notch trowel (Photo 1). The rough side of the cement board should face out.
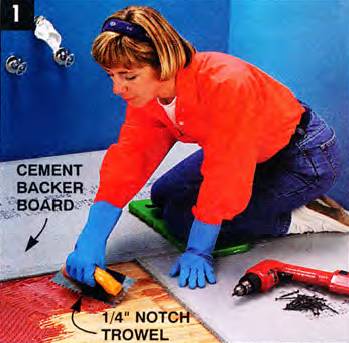
Spread thin-set tile adhesive on the floor with a notched trowel, then screw the cement board down with drywall screws.
Screw it down with 1-1/4 in. galvanized screws every 6 in. in all directions. Yeah, that’s right—it‘s a lot of screws. Don’t have the seams in the cement board line up with seams in your subfloor, and be sure to leave gaps between the sheets as shown in Fig. A.
At the doorway, cut the cement board so the threshold will fit properly. The threshold should rest directly on the subfloor and its outer edge should be halfway under the door (see Photo 14).
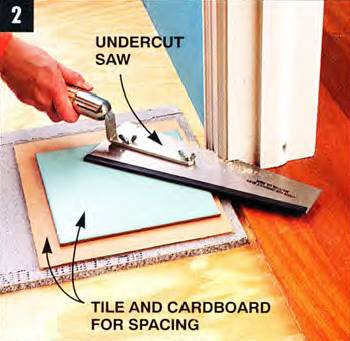
Cut the door trim so the cement board and floor tile will tit underneath it. This is a special undercut saw, available at tile shops.
One place that’s often a pain in the kazoo to fit cement board is the toilet flange, that plate that goes around the waste pipe under the toilet (Fig. B). The cement board and tile should go under the edges of this flange, according to many building codes
If you can get to it, cut the waste pipe and fit a new piece on so the flange will be higher, or hire a plumber to do this.
However, in some situations, it may be very difficult to get to the waste pipe. In that case, fit the cement board and tile up to the flange and use two wax rings when you reinstall the toilet. The lower ring should be one with a plastic horn; the upper one must be without You may need longer bolts to hold the toilet down too.
Install cement board around the tub and shower (Photo 3), using galvanized screws or roofing nails every 6 in. along the studs to attach the cement board to the walls.
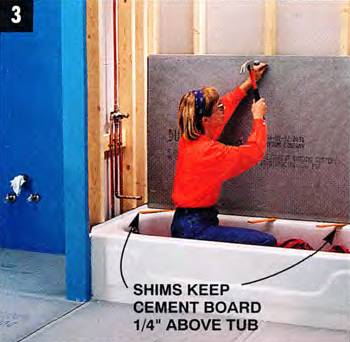
Nail cement board around the tub with galvanized roofing nails or screws. You cut cement board like drywall, by storing it with a knife, then snapping it.
Leave a 1/ 4-in. gap between the tub and cement board. and fill it with adhesive when you apply the tiles.
Cover all seams in the cement board with self-adhesive fiberglass joint tape (Photo 4).
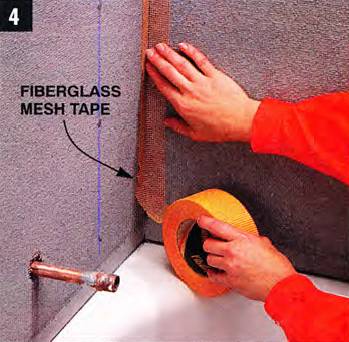
Tape the joints with self-adhesive fiberglass mesh tape, the same kind that’s used for drywall. When you tile, the tape will be covered with adhesive.
Part III – Tiling The Walls
With reference lines to serve as a guide, all that’s needed is to spread adhesive and set the tiles level.
The first step: reference lines
Begin with the back wall behind the tub. Your first step is to draw a pair of perpendicular reference lines, one level, the other plumb (straight up and down), that you can use to align your tile (Photo 7). These lines show where the edges of tiles should be.
Use a level to find the lowest point of the tub, and measure up a convenient number (about 2 ft. worth) of whole tiles, including spaces for the grout and a 1/8-in. space above the edge of the tub. Mark a level line through that point all the way around the wall of the tub enclosure (Photo 7).
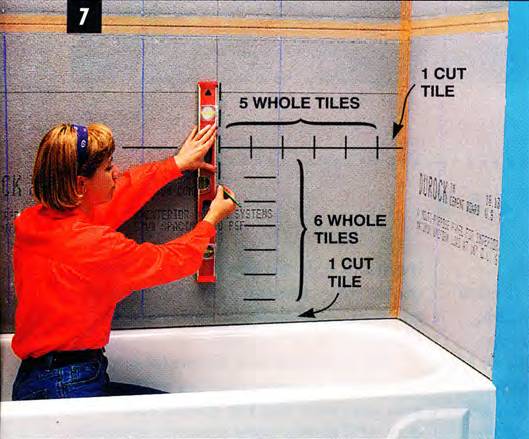
Mark reference lines, level, and plumb, to guide your tile placement. Cut tiles should go at the bottom and corner, following your layout.
Then use your level to mark another line, this time plumb (up and down) and going from tub to ceiling. You’ll need to measure out from the corner a convenient number of whole files, including grout lines, plus the width of the cut tile in the corner. Your layout drawing will show how large the cut tiles in the corner need to be (see Fig. B). Mark similar plumb reference lines on each wall.
After you’ve drawn the reference lines, double-check your layout and lines. Take a break — it’s time to lay tile.
Spreading adhesive
Mix your adhesive to the consistency of mayonnaise, then spread a few square feet of it on the lower corner of the back wall of the tub (Photo 8).
Don’t cover up your reference lines. Spread the adhesive thickly at first, pushing it hard against the wall, then “comb” it with the notched edge of the trowel. This will leave smooth ridges of adhesive.
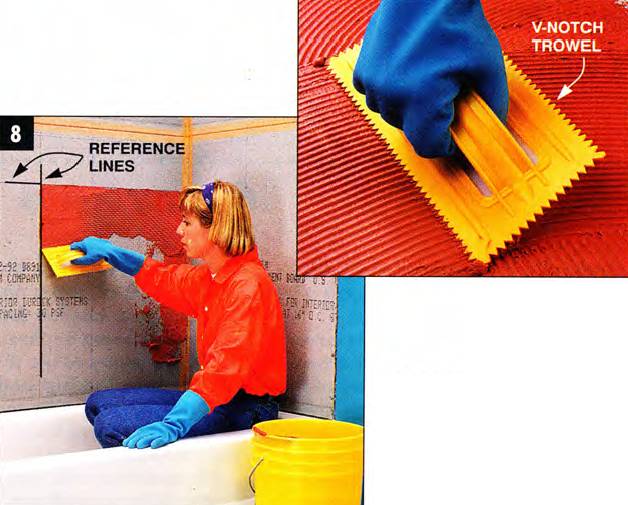
Apply adhesive with a V-notched trowel, doing only about a square yard at a time. Don’t cover up your reference lines.
If, as you’re laying file, the adhesive starts to get a skin on it or you feel it getting stiff, it’s starting to set up. Scrape it off, apply new adhesive and work on a smaller area next time.
Laying the wall tile
Work with whole, uncut tiles first, and press them firmly into the adhesive, making sure they’re lined up with your reference lines. If you’re using plastic spacers, use one at each corner. The tiles should look straight. level and equally spaced.
Avoid sliding the tiles into place, because this will scrape adhesive from underneath the tile, and check that adhesive is not oozing up between the tiles. If it is, scrape or wipe the adhesive out, or if necessary, use less adhesive or a less soupy mixture.
You’ll need to cut the tiles in the row near the corner and probably in the row above the tub, as well. See “Cutting Tile” below. Keep the bottom row of tiles 1/8 in, away from the tub.
When all the tiles are installed in the first square where you spread adhesive, move sideways and do another square. Gradually work your way up. one square at a time.
Set the tiles so they follow your reference lines. I used plastic spacers to keep the spacing uniform. Do the rut tiles in the earner lost.
As you move up, you’ll run into the plumbing pipes. Here’s what to do:
- Set all the whole, uncut tiles that fit around the pipes.
- Then cut tiles to fit around them.
- If a pipe ends up in the middle of a tile. cut the tile into two rectangles and nip out a semicircular hole in the edge of each.
- Then reassemble the two parts, leaving a grout space.
- Don’t be fanatical about getting the tile right against the pipe; within 1/4 in. is fine.
- TIP: You may also be able to rent or borrow a carbide-tip hole saw for drilling a hole in the tile. Ask at the tile shop.
If you’re tiling more walls than those around the tub, you may have to tile around an outlet or switch.
- First, turn off the power at your main panel.
- Remove the screws that attach the switch or outlet to the electrical box, then pull it out of the box.
- Set the tile to within 1/8 in. of the box, then replace the switch or outlet so the metal tabs on the end of it rest on top of the tile.
- You may have to buy longer screws.
Once all the tiles are installed, gently level them by tapping with a hammer and a wood block (Photo 10). A bit of blanket or firm carpet on the block makes this a bit easier on the ears.
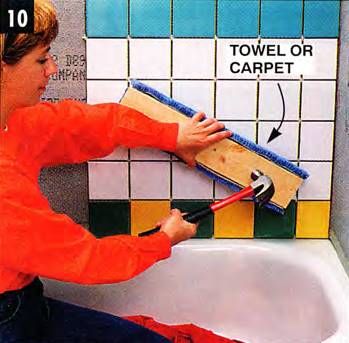
Level the tiles by tapping them with a piece of padded wood and a hammer, after you’ve done several square yards.
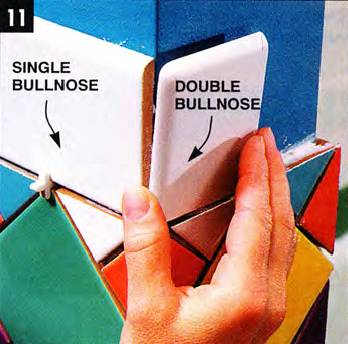
Set trim tile around the edges of the tiled surface. Single-bullnose files go on edges; double-bullnose tiles go on outside corners.
Cutting Tile
Cutting tile is a snap — literally. It’s brittle, so the fastest way to cut it is to break it.
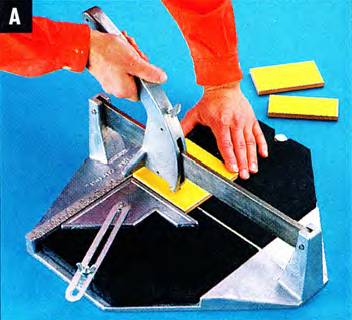
For straight cuts, use a tile cutter (Photo A). It has a hardened wheel that scores the glazed surface of the tile. When you push down on the handle, the tile is clamped on either side of the score line and it snaps neatly in two. Most tile shops will lend you this tool if you’re buying tile. If the snapped edge is a bit rough, you can smooth it with a coarse sharpening stone.

For curved cuts, like around plumbing pipes, use a nipper (Photo B). The nipper has hardened teeth, and as the name implies, you nip gradually away at the tile with it. It’s rather crude but fast and effective. The trick is not to take too much off at a time and use the corner of the jaws for more control.
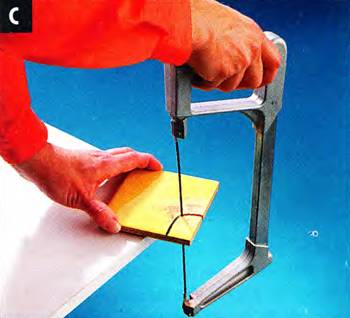
For smoother cuts, use a rod saw (Photo C) for curved cuts, or a wet saw for straight cuts. The rod saw is a round carbide blade (it costs around $7) that fits in a hacksaw frame. It cuts slowly, but you can make nice, smooth curves if you need to, especially in softer wall tiles.
The wet saw is a diamond-tooth saw with a water cooling system; you can rent one for about $50 a day. It’ll make very smooth, straight cuts, and is especially good for L-shaped cuts and notches. It’s also very safe—it cuts tile, but not flesh.
Caution: When you cut tile, sharp pieces will go flying. Please, wear your safety glasses.
Part IV – Laying Floor Tile
Floor tile is set much the same as wall tile: You mark reference lines, then working one small area at a time, you spread adhesive, apply whole tiles so they follow the lines, then set any cut tiles along the edges.
It’s more fun, though, because the larger floor tiles cover the surface quickly. Most floor tiles require the use of plastic spacers for uniform grout lines.

Mark a reference line in front of the tub, and another line perpendicular to it. Lay the tiles out first without adhesive to double-check your layout.
Start near the tub, in the corner farthest from the door, and work your way to the door. If you need to cut the tiles that are directly in front of the tub, be very neat because this joint is painfully visible.
Don’t walk on the tiles until the adhesive sets, which usually takes about eight hours.
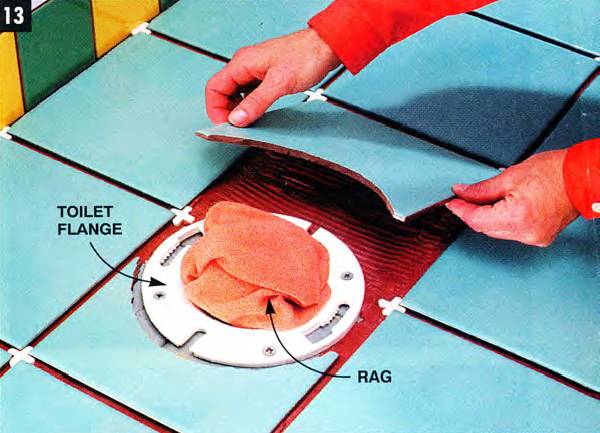
Cut tiles to fit around the toilet flange. The tiles should be flush with the flange and within 1/4 in. of it.
You’ll need to nip tiles so they fit around the toilet flange (Photo 13), and cut them to fit around the threshold. Roughen the back of the threshold with 50-grit sandpaper, then glue it to the subfloor with thin-set mortar (Photo 14).
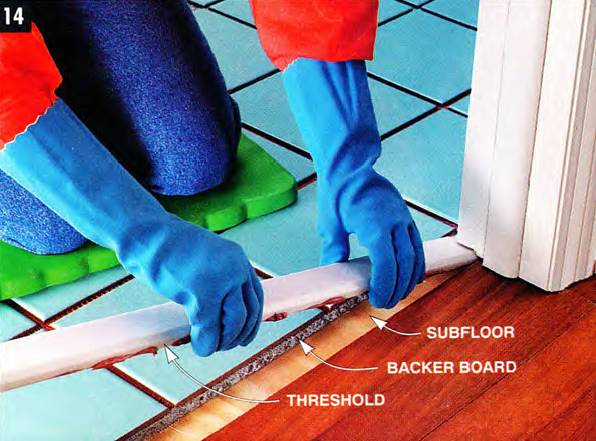
Glue threshold directly to the subfloor, so it’s level with the tiles and its outer edge is halfway under the door.
Part V – Grouting
The final step – packing grout between the files and smoothing it out.
After the tile adhesive has set for 24 hours, you can grout the tiles. Stir up a batch of grout to about the consistency of peanut butter. using a latex additive instead of water.
Apply it with a float (Photo 15), doing a couple of square yards at a time. Use the edge of the float to firmly pack the grout down into the spaces.
Then scrape the excess grout off with the edge of the float, going diagonally to the grout lines to avoid digging it out of the spaces.
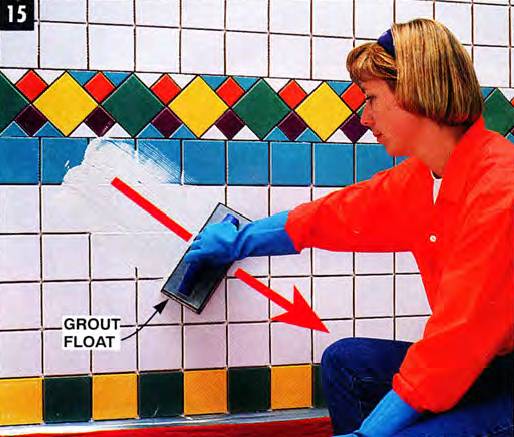
Apply grout in a diagonal motion, packing it firmly between the tiles. Go in the opposite direction to remove the excess grout and pack the grout lines further.
After packing the joints, wipe the tiles diagonally to the grout lines with a damp, round-cornered sponge, rinsing it frequently in a bucket of water (Photo 16).
The goal is to remove the grout from the flat surface of the tile and to produce smooth grout lines, slightly lower than the tiles. It‘s okay if there’s a thin cloudy film left on the tiles. because you can buff it off later.
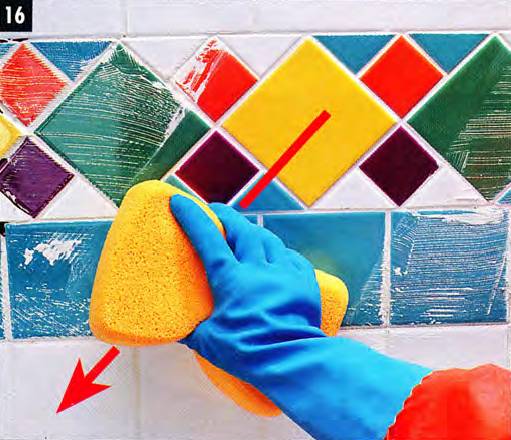
Wipe the grout with a round-cornered sponge, going diagonally. Finally, smooth the grout lines with the corner of the sponge.
Once the tiles look clean, shape the grout lines by making a light pass along the length of the grout line with a rounded corner of the sponge. Rinse the sponge after every pass. Allow 24 hours for the grout to harden.
After the grout has hardened, clean off the surface of the tiles with cheese cloth or a plastic scrub pad. If necessary, you can buy a solution for removing “grout haze” from your tile dealer.
By the way, if you’re using two different-colored grouts on different surfaces, use masking tape to mask each area off as you apply the grout, and use a new sponge for each color.
Part VI – Final Touches
You’re on the home stretch now!
- Once the tiles are sparkling clean. you can reinstall the toilet. Be sure to use a new wax ring.
- With an acrylic caulk, caulk all the joints where tiles meet the tub, around the base of the toilet, and around the plumbing pipes.
- Reinstall the remaining faucets and other fixtures.
- Rehang the door, and trim its bottom edge if necessary.
After two to three days, soak the grout with penetrating alkaline sealer to make it stain resistant. Check the label to be sure the sealer is the penetrating type, which lasts for a few years, not the silicone type, which wears off in months. Your tile dealer can help.
That’s it — you’re done.
Nothing beats ceramic tile in the bathroom. Here’s how to install it.
Historians may argue whether it was the automobile or the computer, supermarkets or TV that most changed modern civilization, but for most homeowners, it was none of those — it was the tile bathroom. Sparkling, easy-to-clean, water resistant, hygienic and long-lasting, the tile bathroom was the final step in our long march away from the outhouse.
Well, okay, maybe I’m laying it on a bit thick, but it’s no exaggeration that ceramic tile is almost perfect for bathroom floors and walls.
Setting the tile is also a great project to do yourself.
You’ll find it pleasant work — no screaming saws, no grunting under massive loads of lumber and no gagging from dangerous fumes. You don’t need any experience with tile, either, to do a first-class job — a beginner can do it. However, you do need to have enough patience to plan, plan, and plan some more, and then to work carefully. Laying tile isn’t difficult, but if you goof, you can’t paint over it or sand it smooth.
What I will (and won’t) talk about
This is a complete guide to tiling a simple bathroom I’ll cover the basic tiling steps, the major snags you may run into, and I’ll pay particular attention to the most critical part: planning the tile layout.
But there’s much more that I won’t cover in this story — borders, diagonal arrangements, shower floors, countertops, marble and primitive tiles, just for starters. You may also run into problems from severely out-of-square rooms or from hidden rot. If you need assistance, tile shops can be a great resource to help you.
Part I – Planning
Costs: time and dollars
Tiling takes time; count on at least a day or two to prepare the room, and anywhere from a day to a week for the tiling itself. Don’t forget that you’ll be living without the bathroom during that time. Make other arrangements or you’ll have a mutiny on your hands.
If you’re like me, you’re probably thinking, “Okay, but how much is this wonderful tile bathroom going to set me back?”
Depending on how fancy your tile is, the answer is from $2 to $13 a square foot, including adhesive and grout. Cement backer board, which usually goes under the tile on the floor and around the tub, costs an additional $2 a square foot.
Tips on buying tile
I love home centers (which is good, considering I spend half my paycheck there), but when you’re shopping for tile, go to a tile shop instead. They have a tremendous variety of tiles, they’ll usually lend you tile-cutting tools, and they‘re more likely to have salespeople who can help you with installation questions.
When you visit a tile shop, you’ll be blown away by the choices: unglazed quarry tiles, little mosaic tiles, super-hard porcelain tiles, marble tiles, hand-painted decorative tiles and rustic hand-made tiles. Here I’ll be installing the familiar glazed wall and floor tiles. Other tiles are installed in similar but not identical ways. Ask a salesperson at your tile shop for details.
Here are some buying tips:
- Floor tiles differ from wall tiles — they're harder and less glazed. You can use floor tiles on walls, but not wall tiles on the floor — they're too slippery and too fragile.
- Don't be limited to small tiles — especially on the floor. Large tiles look impressive, they're very quick to install, and there are fewer grout lines to mess with.
- Don’t use floor tiles that are the same size as the wall tiles — it's hard to get the grout lines to line up where the wall meets the floor.
- Check on the availability of “trim”. These are the tiles with smooth edges that you use to finish off the edge of a tiled surface (see Fig. D and Photo 11). Bullnose tile (one smooth edge) is usually available, but double-bullnose (two smooth edges) may not be or may have to be specially ordered. Check this out before you order tile.
- Buy a threshold for the doorway (see Photo 14). Forget about the old-fashioned marble ones, which require a wet saw, and buy a Corian threshold instead. You can cut it with a hacksaw.
- When you go shopping, take along a measured drawing of each surface you want to tile. The tile shop salesperson can tell you what trim tiles you’ll need, and help you estimate quantities. Don’t worry about ordering more than you need; most tile shops will allow you to return unused tile, and it’s a smart idea to keep a handful of tiles and some grout for any later repairs.
- Tiles need spaces between them for the grout. Some tiles have little lugs on the edges to keep them the right distance apart; others are mounted on mesh sheets, already spaced (Photo 5). For other tiles, use plastic spacers, as I did (Photo 6). These are available in different widths; wall tiles usually have 1/16-in. spaces, and floor tiles 3/16- to 1/4-in. spaces, depending on how big the tiles are.
Tile spacing can be done in several ways: by plastic spacers, by buying tiles mounted on a mash banking, or by buying tiles with small lugs along the edges.
Buying grout and adhesive
Besides tile, you’ll need to buy grout and adhesive.
Tile adhesive: latex-modified thin-set
Latex-modified thin-set is a cement product. rather like mortar, with a latex additive for greater flexibility and strength.
It’s the best general-purpose adhesive: waterproof, gap-filling, strong under heavy traffic, and low-odor. It’s the hands-down choice for floors that get wet and shower enclosures.
Thin-set comes as a powder that you mix with a latex additive. The mixture must be wet enough to stick to the tiles, but not so wet that it oozes up between the tiles as you push them down. Do a quick experiment: Spread a gob of adhesive on a scrap of plywood, push down a couple of tiles, and make sure they stick without adhesive coming up between them.
Tile adhesive: organic mastic
Organic mastic is your other adhesive choice: It’s slightly cheaper, premixed, and gives you plenty of time to work. However, it isn’t waterproof, so don’t use it for floors or shower walls; it can’t fill gaps larger than 1/4 in, and it has a strong odor.
Grout
Grout comes in two forms, sanded and unsanded.
Use sanded grout for grout lines larger than 1/8 in.; otherwise, use unsanded.
Like thin-set, grout is a powder that you mix with a latex additive. Grout comes in different colors, so you can make the grout lines less visible by matching the grout to the tiles, or more visible by choosing a contrasting color.
White grout on a floor will get dirty unless you use a penetrating alkaline sealer and reapply it as needed.
You’ll need special tile tools
You’re in luck in this department — most specialized tiling tools can be rented from a rental outfit or borrowed from a tile shop. (See, those tile shops are great, aren’t they?)
If you do have to buy a trowel, get a disposable one; you’re not likely to need it more than once or twice in your lifetime.
Here are the tools you’ll need:
- A notched trowel or two for applying adhesive (Photo 8). The size of the notches determines how much adhesive goes on, and different-size tiles require different-size trowels. Ask your tile supplier what trowel to use with your tile. If you put cement board on the floor, you’ll need a 1/4-in. square-notch trowel for that adhesive.
- A “grout float" (Photo 15). This trowel-like tool has a hard rubber edge that you use to spread the grout and push it firmly down into the grout spaces.
- A tile cutter (Photo A). Used for cutting straight lines in tile.
- Tile nippers (Photo B). These special pliers have hardened jaws for breaking off bits of tile.
- A round-cornered sponge. which you can buy for $7. This is used for wiping off the grout.
You may need a rod saw ($7) for cutting curves in the tile (Photo C) or an undercut saw (Photo 2) for cutting the wooden trim around your door. For the latter, you can substitute a handsaw with a fairly flexible blade.
You’ll also need a handful of normal carpenter’s tools for tiling, like a level, chalk line and framing square, plus several specialized tiling tools.
Masking tape is handy to keep the occasional slippery wall tile from sliding down or to hold a soap dish in place.
Finally, remember to have several buckets and plenty of rags on hand.
Tile needs a good base
Tile has absolutely no “give” to it, so it has to be mounted to a surface that will not budge. It can’t be used as a quick fix for a weak or uneven surface; the underlying wall or floor must be stiff and strong, or the grout will crack and the tile may pop right off.
Drywall and plaster walls, if they’re hard and not coming apart, make good surfaces to tile, except around the tub. Even green, moisture-resistant drywall is not moisture resistant enough for around a shower enclosure.
These walls should be replaced with cement backer board. This is a sheet material, generally 1/2 in. thick, composed of concrete sandwiched between two layers of nylon mesh. You can buy it at home centers in various sheet sizes. It is totally rot-proof.
Though it’s not essential, cement board is also the best floor material, because moisture often penetrates the floor around the base of the toilet and at the edges of the tub. If any of you are parents of young children, you know what I’m talking about.
Layout is everything
When you’ve got a sample of the tile you want to use, you should make a detailed layout sketch. Make one drawing for each surface you’re going to tile that shows:
- How many tiles go across and up and down. Don't forget to include the space for grout lines.
- Where the cut tiles will be and approximately how large they'll be.
- Where the bullnose tiles fit.
- Where accessories like soap dishes will go.
I want you to be a detail maniac about this, okay? A real nut case. The layout is the key to successful tiling, and it’s just plain impossible for you to spend too much time planning.
The safest method is to lay a row of tiles on the floor, with their spacers if necessary, and actually measure them to get the dimensions you need.
The drawings unlock the mystery of tile layout — the key to a well-tiled room.
Here’s how to plan your layout:
- Hide the cut tiles. Keep the cut tiles in the less visually prominent areas of the room, and use whole or almost whole tiles in the most prominent places (Fig. B). The cut tiles should go in the corners, behind the sink or toilet, at the ceiling, and at the base of walls. But don't end up with “slivers"—cut tiles that are less than about half a tile width.
- Avoid the slivers. You can avoid slivers by eliminating one whole tile and having a cut tile at each end (Fig. C). A cut tile at both sides is also a good approach if you want a more symmetrical appearance, for instance, on the wall behind the tub.
- Check for square and level. Your rows of tile must be level and straight up and down, even though your floor, tub, and walls may not be. Check with a framing square and level. If the surfaces are more than 3/ 8 in. out of square over 8 ft. you'll get noticeably angled cuts, which look awful. Try to lay out the tiles so the angled cuts are concealed, like under the sink or toilet, but if that won‘t work, consult a professional tile setter—there are fixes.
- Watch the tub. You should have full or nearly full tiles along the upper edge of the tub. But the tub may slope, so plan to use a full tile at its lowest point and to cut the rest of the first row. Be sure to leave 1/8 in. of space between the tub and the tiles. You’ll fill it with caulk later.
- Don't forget the trim. As you plan your layout, make sure you include the special edge tiles, called “trim,” especially if you have any outside corners. The two common forms of trim are single- and double-bullnose tiles, which are used as shown in Fig. D and Photo 11.
- Plan the corners. Remember, one wall will have tile going all the way into the corner, and the other wall will have tile that butts up to that tile. Plan the trim particularly carefully on outside corners, and make sure the horizontal grout lines are continuous as they go around the corner.
- Watch the doorway. When you tile a floor, do the area near the door last, so you don’t walk on the freshly laid tile. But if you plan a row of whole tiles along the wall near the door, you could find yourself needing to add a thin sliver of tile at that wall, right at the last minute, just because your grout lines were a bit narrow, or the room is out of square. So plan for a row of cut tiles along that wall. They should, however, be 2/3 to 3/4 of a full tile, because this is a visually prominent area. Be sure to plan the threshold in your layout (Photo 14).
- Plan for your accessories. If you're going to put in a soap dish, towel bar, grab bar or corner shelf, plan for it early. You may need to leave a couple of wall tiles off to make room for the soap dish, for instance, and it may also require cut tiles on either side. "Flatback" fixtures can be surface-mounted over the completed tile wall. When you buy your accessories, ask how they should be mounted.
Part II – Prepare the room
This project used cement board on the floor and around the shower walls to create a stiff and rot-proof surface to tile on.
Getting the room ready
With a detailed layout in hand, you’re ready to go:
- Remove the sink, vanity, toilet, shower fixtures (but not the tub), and all furnishings.
- Stuff rags in the waste pipes under the sink and toilet.
- Use cardboard or a heavy drop-cloth to protect the tub from scratches, and to keep the drain from getting clogged with debris.
- Rip off the old drywall or plaster around the tub, until you're down to bare studs, ready to receive cement board. If there's rotten insulation, get rid of it and staple up paper-faced fiberglass batts.
- I know you’re probably dying to set tile, but now’s a great time to paint the ceiling, while the drips won't matter, and also to replace your tub and shower fixtures, while the walls are accessible.
- If you're tiling any walls outside the tub area, you may have to work around an electrical outlet or switch. Although you can leave the lights on now when you actually start tiling, you must turn off the electricity to your bathroom at the main panel, so get some work lights ready.
- On the floor, it’s best to tear up the old tile or vinyl flooring so you're down to the plywood subfloor.
- However, if you have an old vinyl floor, it may contain asbestos, so have a piece tested, either by a state agency or a commercial testing firm. If it does have asbestos, leave it alone and cover it with the cement board.
Putting up cement board
Cement board is heavy, but otherwise easy to work with.
To cut it, score one side with a utility knife, deep enough to cut into the surface mesh. Then snap the sheet backward and it will break along the score mark.
To make a hole, score a circle, then pound it out with a hammer and trim the edges. You can also cut holes with a jigsaw and a metal-cutting blade.
On the floor, glue 1/2-in. cement board to the underlying subfloor using latex-modified thin-set adhesive, spread with a 1/4-in. square-notch trowel (Photo 1). The rough side of the cement board should face out.
Spread thin-set tile adhesive on the floor with a notched trowel, then screw the cement board down with drywall screws.
Screw it down with 1-1/4 in. galvanized screws every 6 in. in all directions. Yeah, that’s right—it‘s a lot of screws. Don’t have the seams in the cement board line up with seams in your subfloor, and be sure to leave gaps between the sheets as shown in Fig. A.
At the doorway, cut the cement board so the threshold will fit properly. The threshold should rest directly on the subfloor and its outer edge should be halfway under the door (see Photo 14).
Cut the door trim so the cement board and floor tile will tit underneath it. This is a special undercut saw, available at tile shops.
One place that’s often a pain in the kazoo to fit cement board is the toilet flange, that plate that goes around the waste pipe under the toilet (Fig. B). The cement board and tile should go under the edges of this flange, according to many building codes
If you can get to it, cut the waste pipe and fit a new piece on so the flange will be higher, or hire a plumber to do this.
However, in some situations, it may be very difficult to get to the waste pipe. In that case, fit the cement board and tile up to the flange and use two wax rings when you reinstall the toilet. The lower ring should be one with a plastic horn; the upper one must be without You may need longer bolts to hold the toilet down too.
Install cement board around the tub and shower (Photo 3), using galvanized screws or roofing nails every 6 in. along the studs to attach the cement board to the walls.
Nail cement board around the tub with galvanized roofing nails or screws. You cut cement board like drywall, by storing it with a knife, then snapping it.
Leave a 1/ 4-in. gap between the tub and cement board. and fill it with adhesive when you apply the tiles.
Cover all seams in the cement board with self-adhesive fiberglass joint tape (Photo 4).
Tape the joints with self-adhesive fiberglass mesh tape, the same kind that’s used for drywall. When you tile, the tape will be covered with adhesive.
Part III – Tiling The Walls
With reference lines to serve as a guide, all that’s needed is to spread adhesive and set the tiles level.
The first step: reference lines
Begin with the back wall behind the tub. Your first step is to draw a pair of perpendicular reference lines, one level, the other plumb (straight up and down), that you can use to align your tile (Photo 7). These lines show where the edges of tiles should be.
Use a level to find the lowest point of the tub, and measure up a convenient number (about 2 ft. worth) of whole tiles, including spaces for the grout and a 1/8-in. space above the edge of the tub. Mark a level line through that point all the way around the wall of the tub enclosure (Photo 7).
Mark reference lines, level, and plumb, to guide your tile placement. Cut tiles should go at the bottom and corner, following your layout.
Then use your level to mark another line, this time plumb (up and down) and going from tub to ceiling. You’ll need to measure out from the corner a convenient number of whole files, including grout lines, plus the width of the cut tile in the corner. Your layout drawing will show how large the cut tiles in the corner need to be (see Fig. B). Mark similar plumb reference lines on each wall.
After you’ve drawn the reference lines, double-check your layout and lines. Take a break — it’s time to lay tile.
Spreading adhesive
Mix your adhesive to the consistency of mayonnaise, then spread a few square feet of it on the lower corner of the back wall of the tub (Photo 8).
Don’t cover up your reference lines. Spread the adhesive thickly at first, pushing it hard against the wall, then “comb” it with the notched edge of the trowel. This will leave smooth ridges of adhesive.
Apply adhesive with a V-notched trowel, doing only about a square yard at a time. Don’t cover up your reference lines.
If, as you’re laying file, the adhesive starts to get a skin on it or you feel it getting stiff, it’s starting to set up. Scrape it off, apply new adhesive and work on a smaller area next time.
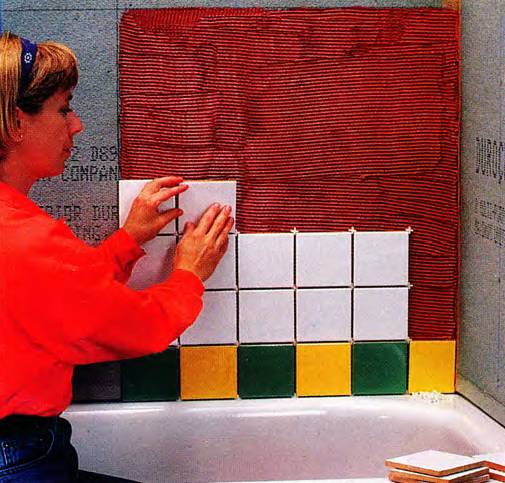
Laying the wall tile
Work with whole, uncut tiles first, and press them firmly into the adhesive, making sure they’re lined up with your reference lines. If you’re using plastic spacers, use one at each corner. The tiles should look straight. level and equally spaced.
Avoid sliding the tiles into place, because this will scrape adhesive from underneath the tile, and check that adhesive is not oozing up between the tiles. If it is, scrape or wipe the adhesive out, or if necessary, use less adhesive or a less soupy mixture.
You’ll need to cut the tiles in the row near the corner and probably in the row above the tub, as well. See “Cutting Tile” below. Keep the bottom row of tiles 1/8 in, away from the tub.
When all the tiles are installed in the first square where you spread adhesive, move sideways and do another square. Gradually work your way up. one square at a time.
Set the tiles so they follow your reference lines. I used plastic spacers to keep the spacing uniform. Do the rut tiles in the earner lost.
As you move up, you’ll run into the plumbing pipes. Here’s what to do:
- Set all the whole, uncut tiles that fit around the pipes.
- Then cut tiles to fit around them.
- If a pipe ends up in the middle of a tile. cut the tile into two rectangles and nip out a semicircular hole in the edge of each.
- Then reassemble the two parts, leaving a grout space.
- Don’t be fanatical about getting the tile right against the pipe; within 1/4 in. is fine.
- TIP: You may also be able to rent or borrow a carbide-tip hole saw for drilling a hole in the tile. Ask at the tile shop.
If you’re tiling more walls than those around the tub, you may have to tile around an outlet or switch.
- First, turn off the power at your main panel.
- Remove the screws that attach the switch or outlet to the electrical box, then pull it out of the box.
- Set the tile to within 1/8 in. of the box, then replace the switch or outlet so the metal tabs on the end of it rest on top of the tile.
- You may have to buy longer screws.
Once all the tiles are installed, gently level them by tapping with a hammer and a wood block (Photo 10). A bit of blanket or firm carpet on the block makes this a bit easier on the ears.
Level the tiles by tapping them with a piece of padded wood and a hammer, after you’ve done several square yards.
Set trim tile around the edges of the tiled surface. Single-bullnose files go on edges; double-bullnose tiles go on outside corners.
Cutting Tile
Cutting tile is a snap — literally. It’s brittle, so the fastest way to cut it is to break it.
For straight cuts, use a tile cutter (Photo A). It has a hardened wheel that scores the glazed surface of the tile. When you push down on the handle, the tile is clamped on either side of the score line and it snaps neatly in two. Most tile shops will lend you this tool if you’re buying tile. If the snapped edge is a bit rough, you can smooth it with a coarse sharpening stone.
For curved cuts, like around plumbing pipes, use a nipper (Photo B). The nipper has hardened teeth, and as the name implies, you nip gradually away at the tile with it. It’s rather crude but fast and effective. The trick is not to take too much off at a time and use the corner of the jaws for more control.
For smoother cuts, use a rod saw (Photo C) for curved cuts, or a wet saw for straight cuts. The rod saw is a round carbide blade (it costs around $7) that fits in a hacksaw frame. It cuts slowly, but you can make nice, smooth curves if you need to, especially in softer wall tiles.
The wet saw is a diamond-tooth saw with a water cooling system; you can rent one for about $50 a day. It’ll make very smooth, straight cuts, and is especially good for L-shaped cuts and notches. It’s also very safe—it cuts tile, but not flesh.
Caution: When you cut tile, sharp pieces will go flying. Please, wear your safety glasses.
Part IV – Laying Floor Tile
Floor tile is set much the same as wall tile: You mark reference lines, then working one small area at a time, you spread adhesive, apply whole tiles so they follow the lines, then set any cut tiles along the edges.
It’s more fun, though, because the larger floor tiles cover the surface quickly. Most floor tiles require the use of plastic spacers for uniform grout lines.
Mark a reference line in front of the tub, and another line perpendicular to it. Lay the tiles out first without adhesive to double-check your layout.
Start near the tub, in the corner farthest from the door, and work your way to the door. If you need to cut the tiles that are directly in front of the tub, be very neat because this joint is painfully visible.
Don’t walk on the tiles until the adhesive sets, which usually takes about eight hours.
Cut tiles to fit around the toilet flange. The tiles should be flush with the flange and within 1/4 in. of it.
You’ll need to nip tiles so they fit around the toilet flange (Photo 13), and cut them to fit around the threshold. Roughen the back of the threshold with 50-grit sandpaper, then glue it to the subfloor with thin-set mortar (Photo 14).
Glue threshold directly to the subfloor, so it’s level with the tiles and its outer edge is halfway under the door.
Part V – Grouting
The final step – packing grout between the files and smoothing it out.
After the tile adhesive has set for 24 hours, you can grout the tiles. Stir up a batch of grout to about the consistency of peanut butter. using a latex additive instead of water.
Apply it with a float (Photo 15), doing a couple of square yards at a time. Use the edge of the float to firmly pack the grout down into the spaces.
Then scrape the excess grout off with the edge of the float, going diagonally to the grout lines to avoid digging it out of the spaces.
Apply grout in a diagonal motion, packing it firmly between the tiles. Go in the opposite direction to remove the excess grout and pack the grout lines further.
After packing the joints, wipe the tiles diagonally to the grout lines with a damp, round-cornered sponge, rinsing it frequently in a bucket of water (Photo 16).
The goal is to remove the grout from the flat surface of the tile and to produce smooth grout lines, slightly lower than the tiles. It‘s okay if there’s a thin cloudy film left on the tiles. because you can buff it off later.
Wipe the grout with a round-cornered sponge, going diagonally. Finally, smooth the grout lines with the corner of the sponge.
Once the tiles look clean, shape the grout lines by making a light pass along the length of the grout line with a rounded corner of the sponge. Rinse the sponge after every pass. Allow 24 hours for the grout to harden.
After the grout has hardened, clean off the surface of the tiles with cheese cloth or a plastic scrub pad. If necessary, you can buy a solution for removing “grout haze” from your tile dealer.
By the way, if you’re using two different-colored grouts on different surfaces, use masking tape to mask each area off as you apply the grout, and use a new sponge for each color.
Part VI – Final Touches
You’re on the home stretch now!
- Once the tiles are sparkling clean. you can reinstall the toilet. Be sure to use a new wax ring.
- With an acrylic caulk, caulk all the joints where tiles meet the tub, around the base of the toilet, and around the plumbing pipes.
- Reinstall the remaining faucets and other fixtures.
- Rehang the door, and trim its bottom edge if necessary.
After two to three days, soak the grout with penetrating alkaline sealer to make it stain resistant. Check the label to be sure the sealer is the penetrating type, which lasts for a few years, not the silicone type, which wears off in months. Your tile dealer can help.
That’s it — you’re done.