
Mission-Style Blanket Chest (with pictures, plans, and a detailed step-by-step)
This blanket chest fits comfortably at the foot of a bed, and can be used as a bench as well. It’s built in the traditional Mission style, but the look is softened by using rift-sawn rather than quarter-sawn white oak. You’ll notice that the rift-sawn oak has a very straight grain in contrast to the wavy grain pattern of quarter-sawn oak. And this project uses a lighter, natural finishing instead of the dark finish typical of the Mission style.

In spite of its sophisticated look, it’s not difficult to build. All of the joints are cut on a table saw, and the whole thing goes together quickly once you’ve cut the mortise grooves and tenons. You might have some issues finding rift-sawn white oak locally, but it’s certainly worth it.
If you consider your woodworking skill level to be about average, plan to spend two to three weekends building it.
What tools will you need?
Nothing too unusual here. You’ll need a table saw with a miter gauge and a stacking-type dado blade, a jigsaw, belt sander, orbital sander, flat bastard file, six 20-in. bar or pipe clamps and two 48-in. pipe clamps.
Always use eye protection, hearing protection, and a dust mask when going to the shop.
If you buy rough lumber, you’ll also need a jointer and a planer to plane it to the proper dimension.
Test all of your cutting setups on scrap wood first before making your final cuts. If you think you may want to stain your blanket chest, make test samples on scrap pieces to see how it looks.
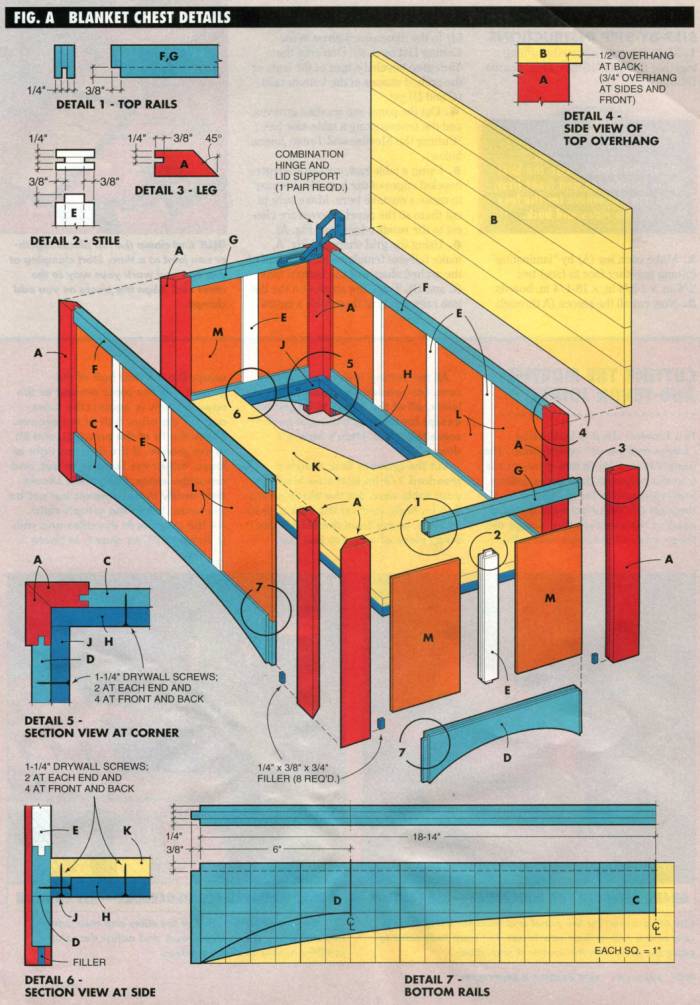
Blanket Chest Free Plans (Exploded View)
Cutting List
- For the legs, glue the faces of two 3/4" thick pieces together for each leg, then cut to size.
- For the top, glue the edges of five equal width pieces together, then cut to size.
| Key | Pcs. | Size & Description |
|---|---|---|
| A | 8 | 1" x 2-1/2" x 17-1/4" rift-sawn white oak (legs) |
| B | 1 | 3/4" x 18-1/4" x 43" rift-sawn white oak (top) |
| C | 2 | 3/4" x 4" x 37-1/4" rift-sawn white oak (bottom rails) |
| D | 2 | 3/4" x 4" x 12-3/4" rift-sawn white oak (bottom rails) |
| E | 8 | 3/4" x 1-1/2" x 12" rift-sawn white oak (stiles) |
| F | 2 | 3/4" x 1-1/4" x 37-1/4" rift-sawn white oak (top rails) |
| G | 2 | 3/4" x 1-1/4" x 12-3/4" rift-sawn white oak (top rails) |
| H | 2 | 3/4" x 3/4" x 39-1/2" rift-sawn white oak (cleats) |
| J | 2 | 3/4" x 3/4" x 13-1/2" rift-sawn white oak (cleats) |
| K | 1 | 3/4" x 15" x 39-1/2" fir plywood (bottom) |
| L | 8 | 3/4" x 8-3/4" x 12" rift-sawn white oak (panels) |
| M | 4 | 3/4" x 6" x 12" rift-sawn white oak (panels) |
Step-by-sep building instructions
- Make the top (B) by edge-gluing together five 3-11/16 in. x 44-in. boards.
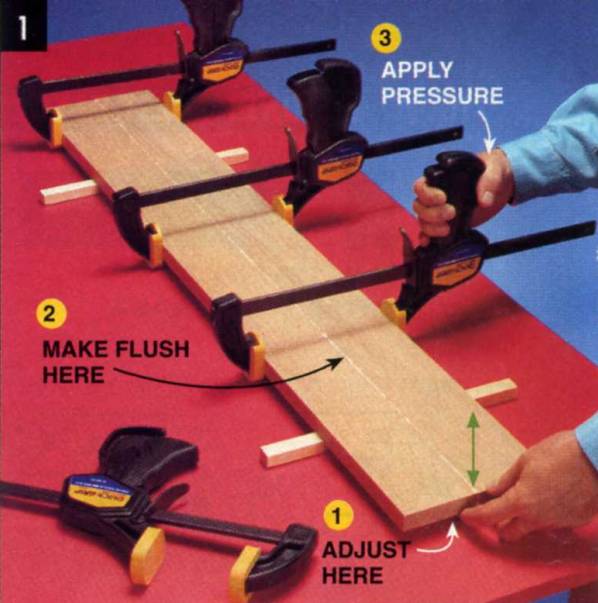
Glue and clamp the top pieces together one joint at a time. Start clamping at one end and work your way to the other end. Align the pieces as you add clamps.
Tip: select the boards with the best grain for the top and front first, and use the others for the less visible sides and back.
- Make each leg (A) by “laminating” (gluing together face to face) two 3/4-in. x 2-3/4 in. x 18-1/4 in. boards.
- Now cut all the pieces (A through M) to the dimensions given in the Cutting List. Don’t cut the 45-degree beveled edges of the legs, or the arched shapes of the bottom rails (C and D) yet.
- Cut the panel and mortise grooves, and the tenons using a table saw as per the section below.
Cutting the mortise-and-tenon joints
This blanket chest is built using “frame and panel” construction. The panels (L and M) fit into grooves cut into the edges of their surrounding legs, rails and stiles (A, and C through G). These grooves are also used as the mortises that accept the tenon ends of the stiles and rails.
All the cutting is done on a table saw. For consistently good-fitting joints, all of the pieces to be joined, except for the legs (A), must be the same thickness. Here’s how it’s done.
Cut the grooves first. Mount a standard 1/8-in. kerf saw blade in your table saw. Set the blade so it’s 3/8 in. high, and set the saw’s fence 9/32 in. away from the blade. Use a scrap piece of wood to test the setup. Cut the first half of the groove, flip the piece around so the opposite face is against the fence, and cut the other half of the groove.
Check the fit of the panels (L and M) in the groove. If the fit is too tight or loose, adjust the fence in or out, and retest the setup. The panels should slide easily in the grooves but not be too loose. When the setup’s right, cut the grooves in the stiles and rails (C through G), as shown in Photo 2.
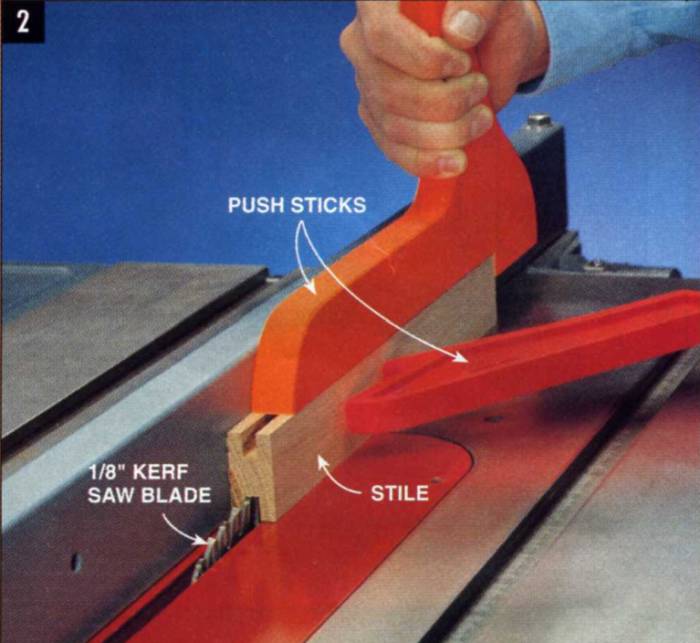
Cut the grooves for the panel and mortises using a table saw and a 1/8-in. kerf saw blade. Cut from both sides to place the groove in the center of each piece.
Without changing the groove cutting setup, cut the inside half of the panel grooves in all eight legs, plus one scrap piece to test the next setup. Now move the saw’s fence about 1/16 in. away from the blade, run the piece through the saw the same way and cut the outside half of the panel groove in the test piece. Check the fit of the panels in the groove of the test piece, then make any necessary adjustments before cutting the grooves in the leg pieces.
Cut the tenons next. Mount a 1/2-in. wide dado blade in your table saw, and set the height lower than the table of the table saw. Clamp an auxiliary wooden fence to your table saw’s fence to protect the blade. Set the saw’s fence so the auxiliary fence is 1/8 in. over the dado blade to cut 3/8-in. long tenons. Turn the saw on, slowly raise the dado blade until it’s about 1/4 in. high, then turn the saw off.
Attach a wooden fence to your miter gauge and cut a test tenon on scrap wood. Cut one side, then flip the piece over and cut the other side. Test the fit in the panel grooves. Adjust the setup until the tenons fit snugly in the grooves of the scrap piece, then cut the tenons on the ends of the stiles and rails (C through G), as shown in Photo 3.
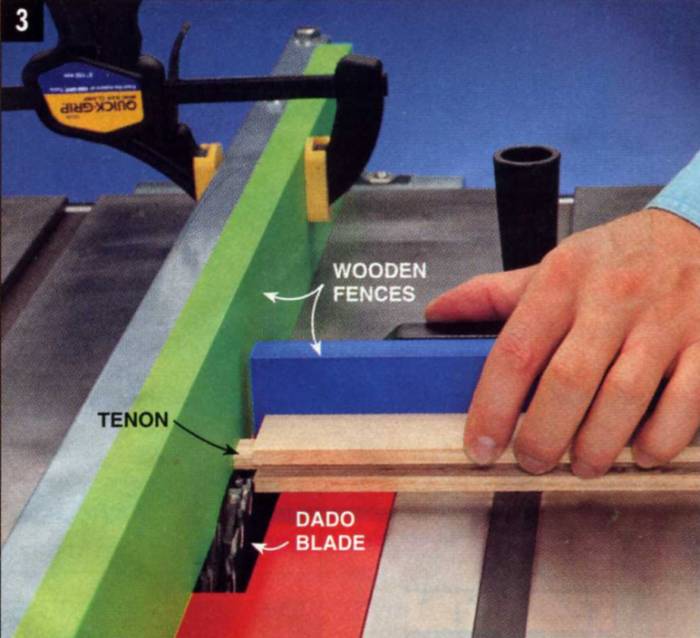
Cut the tenons on the ends of the stiles and rails using this setup. Test it on scrap wood, and adjust the setup until the tenons fit in the grooves.
- Using a table saw, cut the 45-degree beveled edges of the legs (A). It’s easy to make a mistake here. Make sure to cut them so the panel grooves are clos est to the inside edges (see Fig. A).
- Using the grid shapes in Fig. A, make full-size templates for each half of the arched shapes of the bottom rails (C and D). Trace the shapes on the bottom rails, then cut them with a jigsaw. Smooth the sawn edges with a flat bastard file, then sandpaper (Photo 4).
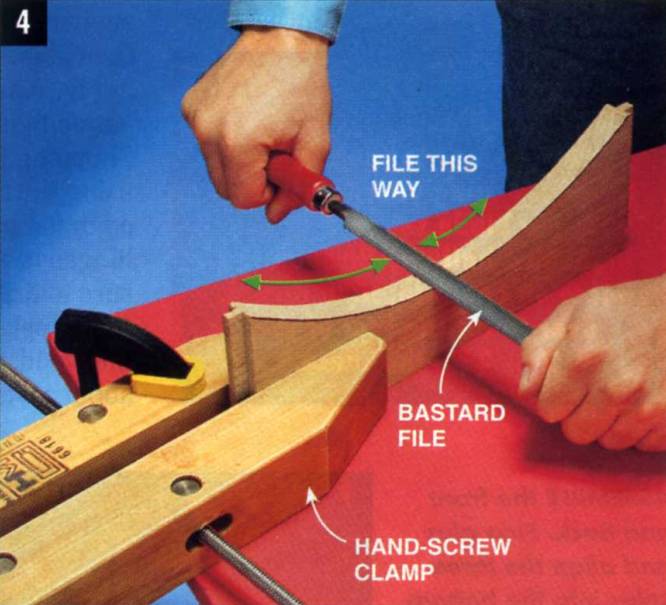
Smooth the sawn edges of the arch-shaped bottom rails using a flat bastard file. File across the grain to remove the high spots, then with the grain to make the shape a perfect arch. Finish shaping using 80-grit sandpaper and a sanding block, then 120-grit, and finally 150-grit.
- Glue and clamp the legs (A) together. Use masking tape to hold the joints closed as the glue dries (Photo 5).
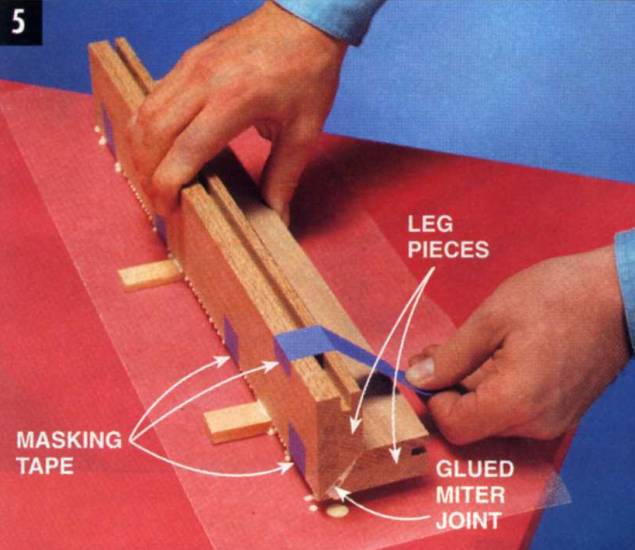
Don’t struggle with complex ways to clamp a mitered joint. Set the two pieces face up on your work table. Align the beveled edges and place short pieces of masking tape across the joint. Flip both pieces over, apply glue in the joint, close the joint, and place masking tape across the pieces to hold them as the glue dries.
- Fill the lower 3/4 in. of the panel grooves in the legs using short pieces of rift-sawn white oak (Photo 6).

Use small pieces of oak to fill in the grooves where the bottom rails go. Glue the pieces in the grooves, then trim off the excess.
- Finish-sand the panel groove edges of the stiles, rails and legs using 150-grit sandpaper wrapped around a block of wood. Be careful not to round over the edges. Finish-sand the panels (L and M) using an orbital sander and 150-grit sandpaper, then 180-grit.
- Assemble the front and back by gluing together the stiles and rails (E, C and F) with the two center panels (L) in place (Photo 7). Next, finish-sand the faces of the stiles and rails. Slide the remaining panels (L) in their grooves, then glue and clamp the legs in place. Assemble the sides the same way, then glue and clamp the front and back to the sides to finish assembling the box.

Assemble the front and back. First glue and align the three stiles into the bottom rail. Slide the panel in, glue and align the top rail, then clamp it.
- Finish-sand the top (B) and bottom (K), and any other unsanded surfaces with 150-grit, then 180-grit sandpaper. Sand all the sharp edges smooth. Cover the panels with a piece of cardboard to protect them from scratches as you sand the edges of the surrounding pieces.
- Lay out, countersink and drill the screw holes in the cleats (H and J), then screw the cleats in place as shown in Fig. A.
- Turn the chest over and place the support on the underside of the top, then align it using the dimensions given in Fig. A and Photo 8.
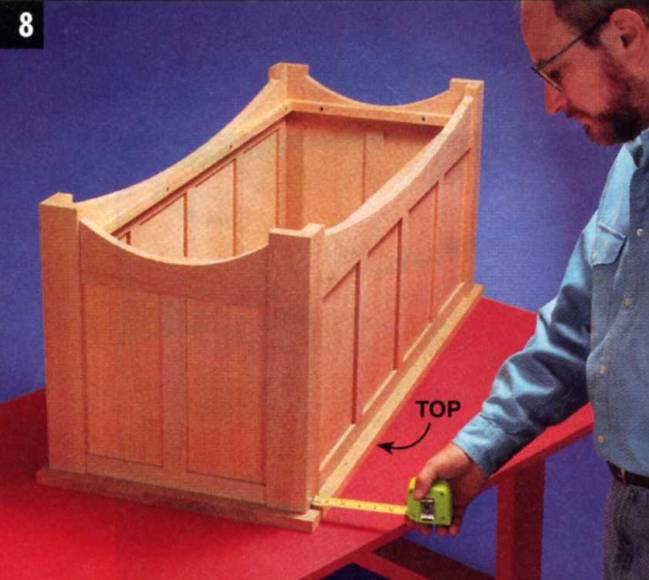
Align the box to the top with 3/4-in. overhang on the front and sides, and 1/2-in. overhang on the back. Mount the combination hinge and lid supports (see Shopping List) to the sides of the chest using the mounting instructions included in the package. Now screw the hinges to the top (inset to Photo 8). Be sure to drill pilot holes.

Drill pilot holes and insert the screws.
- Apply three coats of Danish oil to the wood, then let the finish dry for about a week, or until the smell is gone.
- Remount the top, slide the bottom in from above, screw it in place from underneath, and you’re done.
Shopping List
The below quantity of rift-saw white oak lumber allows for 50% waste.
| Item | Qty. |
|---|---|
| 4/4 rift-sawn white oak | 23 board ft. |
| 1/4" x 24" x 32" rift-sawn white oak plywood | 2 pieces |
| 3/4" x 15" x 39-1/2" fir (or other) plywood | 1 piece |
| No. 6 x 1-1/4" drywall screws | 24 |
| combination hinge and lid supports | 1 pair |
| 1/2" diam. felt dots | 3 |
| Danish oil finish | 1 pint |
This blanket chest fits comfortably at the foot of a bed, and can be used as a bench as well. It’s built in the traditional Mission style, but the look is softened by using rift-sawn rather than quarter-sawn white oak. You’ll notice that the rift-sawn oak has a very straight grain in contrast to the wavy grain pattern of quarter-sawn oak. And this project uses a lighter, natural finishing instead of the dark finish typical of the Mission style.
In spite of its sophisticated look, it’s not difficult to build. All of the joints are cut on a table saw, and the whole thing goes together quickly once you’ve cut the mortise grooves and tenons. You might have some issues finding rift-sawn white oak locally, but it’s certainly worth it.
If you consider your woodworking skill level to be about average, plan to spend two to three weekends building it.
What tools will you need?
Nothing too unusual here. You’ll need a table saw with a miter gauge and a stacking-type dado blade, a jigsaw, belt sander, orbital sander, flat bastard file, six 20-in. bar or pipe clamps and two 48-in. pipe clamps.
Always use eye protection, hearing protection, and a dust mask when going to the shop.
If you buy rough lumber, you’ll also need a jointer and a planer to plane it to the proper dimension.
Test all of your cutting setups on scrap wood first before making your final cuts. If you think you may want to stain your blanket chest, make test samples on scrap pieces to see how it looks.
Blanket Chest Free Plans (Exploded View)
Cutting List
- For the legs, glue the faces of two 3/4" thick pieces together for each leg, then cut to size.
- For the top, glue the edges of five equal width pieces together, then cut to size.
| Key | Pcs. | Size & Description |
|---|---|---|
| A | 8 | 1" x 2-1/2" x 17-1/4" rift-sawn white oak (legs) |
| B | 1 | 3/4" x 18-1/4" x 43" rift-sawn white oak (top) |
| C | 2 | 3/4" x 4" x 37-1/4" rift-sawn white oak (bottom rails) |
| D | 2 | 3/4" x 4" x 12-3/4" rift-sawn white oak (bottom rails) |
| E | 8 | 3/4" x 1-1/2" x 12" rift-sawn white oak (stiles) |
| F | 2 | 3/4" x 1-1/4" x 37-1/4" rift-sawn white oak (top rails) |
| G | 2 | 3/4" x 1-1/4" x 12-3/4" rift-sawn white oak (top rails) |
| H | 2 | 3/4" x 3/4" x 39-1/2" rift-sawn white oak (cleats) |
| J | 2 | 3/4" x 3/4" x 13-1/2" rift-sawn white oak (cleats) |
| K | 1 | 3/4" x 15" x 39-1/2" fir plywood (bottom) |
| L | 8 | 3/4" x 8-3/4" x 12" rift-sawn white oak (panels) |
| M | 4 | 3/4" x 6" x 12" rift-sawn white oak (panels) |
Step-by-sep building instructions
- Make the top (B) by edge-gluing together five 3-11/16 in. x 44-in. boards.
Glue and clamp the top pieces together one joint at a time. Start clamping at one end and work your way to the other end. Align the pieces as you add clamps.
Tip: select the boards with the best grain for the top and front first, and use the others for the less visible sides and back.
- Make each leg (A) by “laminating” (gluing together face to face) two 3/4-in. x 2-3/4 in. x 18-1/4 in. boards.
- Now cut all the pieces (A through M) to the dimensions given in the Cutting List. Don’t cut the 45-degree beveled edges of the legs, or the arched shapes of the bottom rails (C and D) yet.
- Cut the panel and mortise grooves, and the tenons using a table saw as per the section below.
Cutting the mortise-and-tenon joints
This blanket chest is built using “frame and panel” construction. The panels (L and M) fit into grooves cut into the edges of their surrounding legs, rails and stiles (A, and C through G). These grooves are also used as the mortises that accept the tenon ends of the stiles and rails.
All the cutting is done on a table saw. For consistently good-fitting joints, all of the pieces to be joined, except for the legs (A), must be the same thickness. Here’s how it’s done.
Cut the grooves first. Mount a standard 1/8-in. kerf saw blade in your table saw. Set the blade so it’s 3/8 in. high, and set the saw’s fence 9/32 in. away from the blade. Use a scrap piece of wood to test the setup. Cut the first half of the groove, flip the piece around so the opposite face is against the fence, and cut the other half of the groove.
Check the fit of the panels (L and M) in the groove. If the fit is too tight or loose, adjust the fence in or out, and retest the setup. The panels should slide easily in the grooves but not be too loose. When the setup’s right, cut the grooves in the stiles and rails (C through G), as shown in Photo 2.
Cut the grooves for the panel and mortises using a table saw and a 1/8-in. kerf saw blade. Cut from both sides to place the groove in the center of each piece.
Without changing the groove cutting setup, cut the inside half of the panel grooves in all eight legs, plus one scrap piece to test the next setup. Now move the saw’s fence about 1/16 in. away from the blade, run the piece through the saw the same way and cut the outside half of the panel groove in the test piece. Check the fit of the panels in the groove of the test piece, then make any necessary adjustments before cutting the grooves in the leg pieces.
Cut the tenons next. Mount a 1/2-in. wide dado blade in your table saw, and set the height lower than the table of the table saw. Clamp an auxiliary wooden fence to your table saw’s fence to protect the blade. Set the saw’s fence so the auxiliary fence is 1/8 in. over the dado blade to cut 3/8-in. long tenons. Turn the saw on, slowly raise the dado blade until it’s about 1/4 in. high, then turn the saw off.
Attach a wooden fence to your miter gauge and cut a test tenon on scrap wood. Cut one side, then flip the piece over and cut the other side. Test the fit in the panel grooves. Adjust the setup until the tenons fit snugly in the grooves of the scrap piece, then cut the tenons on the ends of the stiles and rails (C through G), as shown in Photo 3.
Cut the tenons on the ends of the stiles and rails using this setup. Test it on scrap wood, and adjust the setup until the tenons fit in the grooves.
- Using a table saw, cut the 45-degree beveled edges of the legs (A). It’s easy to make a mistake here. Make sure to cut them so the panel grooves are clos est to the inside edges (see Fig. A).
- Using the grid shapes in Fig. A, make full-size templates for each half of the arched shapes of the bottom rails (C and D). Trace the shapes on the bottom rails, then cut them with a jigsaw. Smooth the sawn edges with a flat bastard file, then sandpaper (Photo 4).
Smooth the sawn edges of the arch-shaped bottom rails using a flat bastard file. File across the grain to remove the high spots, then with the grain to make the shape a perfect arch. Finish shaping using 80-grit sandpaper and a sanding block, then 120-grit, and finally 150-grit.
- Glue and clamp the legs (A) together. Use masking tape to hold the joints closed as the glue dries (Photo 5).
Don’t struggle with complex ways to clamp a mitered joint. Set the two pieces face up on your work table. Align the beveled edges and place short pieces of masking tape across the joint. Flip both pieces over, apply glue in the joint, close the joint, and place masking tape across the pieces to hold them as the glue dries.
- Fill the lower 3/4 in. of the panel grooves in the legs using short pieces of rift-sawn white oak (Photo 6).
Use small pieces of oak to fill in the grooves where the bottom rails go. Glue the pieces in the grooves, then trim off the excess.
- Finish-sand the panel groove edges of the stiles, rails and legs using 150-grit sandpaper wrapped around a block of wood. Be careful not to round over the edges. Finish-sand the panels (L and M) using an orbital sander and 150-grit sandpaper, then 180-grit.
- Assemble the front and back by gluing together the stiles and rails (E, C and F) with the two center panels (L) in place (Photo 7). Next, finish-sand the faces of the stiles and rails. Slide the remaining panels (L) in their grooves, then glue and clamp the legs in place. Assemble the sides the same way, then glue and clamp the front and back to the sides to finish assembling the box.
Assemble the front and back. First glue and align the three stiles into the bottom rail. Slide the panel in, glue and align the top rail, then clamp it.
- Finish-sand the top (B) and bottom (K), and any other unsanded surfaces with 150-grit, then 180-grit sandpaper. Sand all the sharp edges smooth. Cover the panels with a piece of cardboard to protect them from scratches as you sand the edges of the surrounding pieces.
- Lay out, countersink and drill the screw holes in the cleats (H and J), then screw the cleats in place as shown in Fig. A.
- Turn the chest over and place the support on the underside of the top, then align it using the dimensions given in Fig. A and Photo 8.
Align the box to the top with 3/4-in. overhang on the front and sides, and 1/2-in. overhang on the back. Mount the combination hinge and lid supports (see Shopping List) to the sides of the chest using the mounting instructions included in the package. Now screw the hinges to the top (inset to Photo 8). Be sure to drill pilot holes.
Drill pilot holes and insert the screws.
- Apply three coats of Danish oil to the wood, then let the finish dry for about a week, or until the smell is gone.
- Remount the top, slide the bottom in from above, screw it in place from underneath, and you’re done.
Shopping List
The below quantity of rift-saw white oak lumber allows for 50% waste.
| Item | Qty. |
|---|---|
| 4/4 rift-sawn white oak | 23 board ft. |
| 1/4" x 24" x 32" rift-sawn white oak plywood | 2 pieces |
| 3/4" x 15" x 39-1/2" fir (or other) plywood | 1 piece |
| No. 6 x 1-1/4" drywall screws | 24 |
| combination hinge and lid supports | 1 pair |
| 1/2" diam. felt dots | 3 |
| Danish oil finish | 1 pint |