
Best hybrid table saw for fine woodworking (Updated 2021!)
Table saws are the center of most woodworking shops. Who doesn’t want a robust machine with a precise fence and a powerful motor? These are all important features that any woodworker can appreciate.
But what type of saw should you choose? If you are on a tighter budget or needs to move the saw around often, check my portable (jobsite) saw review and guide.
If you’d like to look at better options, you should definitely consider hybrid table saws. The name is a hint to what they offer: the lighter weight of a portable unit and the precision and size of a cabinet saw.
Their value is somewhere between both types of saws, too.
Jet ProShop II 708494K JPS/10TS Review - Best Hybrid Table Saw
The Jet ProShop II hybrid table saw offers the benefits of high-end cabinet saws. It packs them in the compact size of a portable machine. The cast iron table top gives extra stability for this saw, and the miter gauge slot has a T shape.
Popular Woodworking tested the ProShop II against other competitors in the market. They selected those with the same rated horsepower. The surprise was that Jet’s actual cutting capacity is higher. They made a test cut ripping down some oak lumber to simulate an increased demand in your workshop. The Jet hybrid saw had the fastest cutting rate speed.
The blade guard is transparent and the leaves on either side work independently. The riving knife is close to the blade, reducing the chances of kickback. Jet also includes a low-profile riving knife. You can install it when you need to make a non-through cut.
You change blades from the top and very fast. The blade guard and the riving knife have a quick release. So, mounting and removal require zero tools.
The fence system is also the best out of all the saws reviewed here. Sliding it along the rails is a simple operation and smooth glide. The aluminum faces have t-slots on the top edge for attaching jigs. How can’t you love that? It is available with a rip capacity of either 30 or 52 inches.
Speaking of dimensions, the table height is 34-3/4”. The table size without wings is 27” long by 20” wide, while the table with the standard extensions 27” long by 44” wide.
The sloped cabinet floor increases dust collection efficiency. This is good. The metal cabinet is on the smaller side, which demands dust collection to be on at all times.
The cabinet has powder-coated paint on all sides. This finish is chip-resistant and long-lasting.
It accepts dado stacks of 8 inches in diameter and 13/16” wide.
Quick Summary
- The Jet Proshop II has the most "actual" power when cutting materials.
- The ProShop fence system is the main star of the show.
- Smaller cabinet size requires dust collection during all cuts to avoid dust build-up.
- Click here to buy this Jet hybrid table saw

Ridgid R4512 Review - Best Hybrid Table Saw Under $1000
Are a hobbyist woodworker looking to upgrade from a benchtop saw? The Ridgid R4512 is a strong contender for your shop space.
This machine has a sturdy and spacious cast iron top. That reduces motor vibrations. It also adds a great deal of structural integrity to your machine. Finally, your table saw will remain flatter, rigid, and level.
Hybrid table saws with a cast iron top are heavy and hard to move around. The Ridgid is very portable and easy to maneuver because it has one caster and two fixed wheels. That allows you to park your car in your garage.
Its fan-cooled induction motor comes pre-wired for 110V. You can also rewire it for 220V. It runs at 13 Amps and 3,450 RPM, allowing you to use it in a normal 15A circuit.
The R4512 is a safe saw. It has a blade guard to help prevent accidental contact with the spinning blade. It also features a riving knife to help prevent kickback.
The Ridgid’s main negatives relate to assembly and setup. You need to be patient when assembling it at home for the first time. Fine tuning the saw to run parallel to the fence is also tricky. But we all want to avoid kickback and ensure precise cuts, right? The lateral trunnion setup is also complicated.
This saw compensates all that by being the cheapest hybrid saw on the market today.
Quick Summary
- The cast iron table adds stability to this machine.
- The adjustable fence and the t-slot miter gauge are both a great upgrade from contractor saws.
- The riving knife requires no tools for mounting or removal.
- Click here to see today's Amazon prices for yourself.

SawStop PCS175-TGP236 Review - Safest Hybrid Table Saw
SawStop sells the PCS175-TGP236 as a cabinet saw, but it is a hybrid saw.
They should instead emphasize their proprietary safety features. This is the safest hybrid table saw available on the market today. It stops and retracts the blade upon contact with the skin within 3 milliseconds.
How does it work? The blade carries a small electrical signal. Wood doesn’t conduct electricity. But as soon as the skin touches the blade, this signal changes. The human body conduces electricity. This signal change activates the blade brake, shuts off the motor, and drops the blade.
Resetting the system is simple and takes only 90 seconds.
The SawStop also offers tool-free blade guard and riving knife changes. The zero-clearance insert is also released without tools.
The SawStop safety proposition also reaches your lungs. Plywood and MDF generate carcinogenic sawdust. Exotic hardwoods are, often, allergenic and bring their own host of issues. SawStop has an (optional) overarm dust collection accessory. It collects 99% of all the dust created during operation. That’s a professional level of dust control for your home shop.
Also like the Jet ProShop II, the SawStop includes 2 riving knives for anti kickback. Switch between them as you make a full cut or a partial cut.
The SawStop also accepts dado blades. The only observation is that it requires a separate table insert and brake cartridge.
Quick Summary
- This is the safest hybrid table saw for your fingers and your lungs.
- Top-notch construction quality, easy assembly, and precision is on par with the competition.
- The main negative is the expensive price, but what is a finger worth to you?
- Check the updated prices on Amazon.

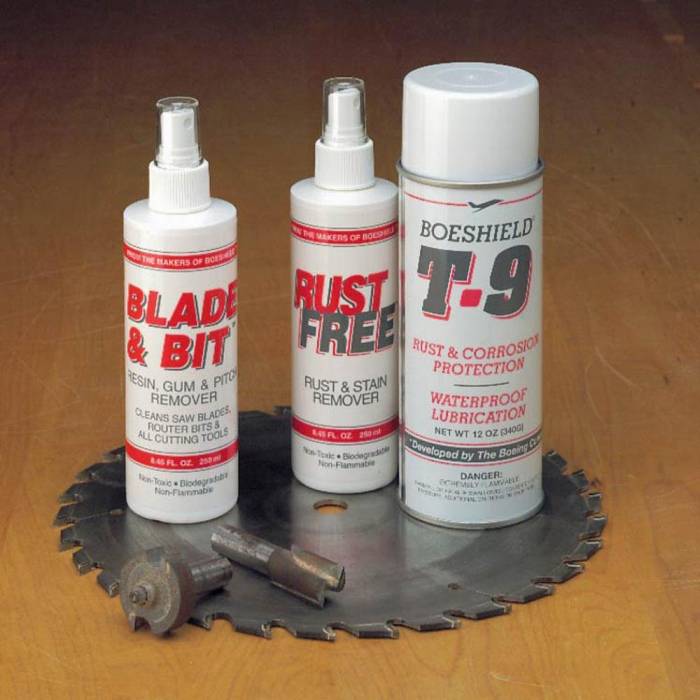
Boeshield 3-Pack Kit Review - Best Table Saw Maintenance Products
This Boeshield 3-pack kit is a great shop companion. These are safe to use in all your woodwork machinery.
- The first bottle is a cleaner. It works on saw blades, router bits, and all your cutting tools by removing resin, gum, and pitch. A spray or two, 3 min, and you're done.
- A second bottle removes rust and stains. It smells terrible but removes surface rust fast, and cleans up other oxidization reactions as well.
- The third bottle is the industry-leading Boeshield T-9. It offers rust and corrosion protection. Boeing developed it to prevent corrosion in hard-to-reach places. It is a superior rust preventative and it doesn't remain greasy after it dries.
Hybrid Table Saw Buying Guide
These machines have arrived to stay due to a great value proposition. They have the best from portable table saws, the best from cabinet table saws, and a price range between the two.
Most hybrid saws assemble trunnions on the table top, as a portable saw. Cabinet saws use the more robust trunnion assemblies on their cabinets. This is the most overlooked difference between both saw types.
Another important difference to their bigger sister saws is the power of the motor. Hybrid saws vary from 1-1/2 and 2 hp, while the cabinet table saws start from 3 hp.
You can use most hybrid saws them on 110-volt plugs. Most cabinet saws need a 220v. That could be a concern for your small shop. So, upgrading from a jobsite saw is easy.
Motors placed inside the cabinet need no exposed belts. That solves the problem of small cutoff pieces getting caught on the belts.
The enclosed base also improves your shop dust collection. Plus, a 4-inch dust collection hose works much better than a dust box under your old contractor saw.
There are two types of enclosed cabinets. Some are a partial height supported on legs. Others are a full cabinet from the table top to the floor.
Table Saw Safety
Like most workshop warriors, you probably know how to rip a board to width on your table saw. But perhaps you haven’t explored its other talents: creating woodworking joints, cutting grooves, mitering corners, mass-producing parts and cutting plywood.
The table saw can do all this and more, provided it’s accurately adjusted, used safely and is operated with the proper know-how.
I’ll explore this great tool by answering some common (and not so common) questions about hybrid table saws. Keep reading the article to find out all about it!
From safeguarding your fingers to creating finger joint jigs — getting better acquainted with your “big saw.”
Your table saw is (choose one):
- A convenient place to set my coffee mug while I work.
- A great tool for turning 2x4s into 2x2s.
- A machine I used a lot — until it launched a board through my garage wall.
- The next tool I'll purchase.
- A versatile saw I have mastered totally and completely.
Unless you chose the last one, read on.
What This Article Is And Isn’t About
I presume you know the basics:
- how to cut boards to width (rip) using the rip fence, and
- how to cut boards to length using the miter gauge.
I also presume you’ve developed a few sloppy work habits, maybe let your saw drift out of accuracy, and perhaps have begun thinking of it as a “one trick pony.” I’ll try to freshen your memory, review some basic tune-up and safety procedures, plus show you some new jigs and uses.
If you go right now to Amazon, there are 38 books devoted solely to table saws. There are accessories that can turn your table saw into a disc sander or molding cutter, and jigs that will help you create dovetail joints and perfect circles. I can’t possibly cover everything here.
Bear in mind, every type of saw is different, Some blades tilt left, others tilt right (some saws even have a table that tilts around a fixed blade). There are miniature “hobby” saws with 3-1/2 in. diameter blades and commercial varieties with blades 12 in. and larger.
I urge you to locate and review your owner’s manual; it will be more specific when it comes to the adjustments I describe below, and will also cover safety tips, maintenance, and accessories particular to your saw. Google your saw’s make and model if you can’t find the paper manual, chances are there’s a PDF somewhere on the internet.
How do I get my table saw to cut straight and square again?
Start by conducting the simple test you see in Figs. A, B, and C.
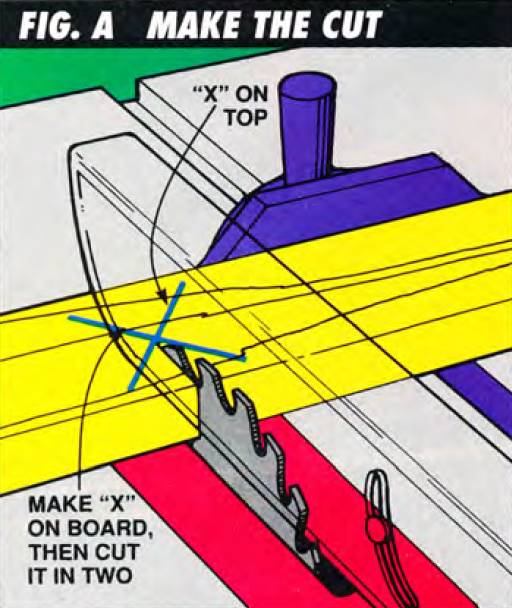
Make an “X” on a 1x3 or 1x4, then cut it in half using the miter gauge as a guide (Fig A).
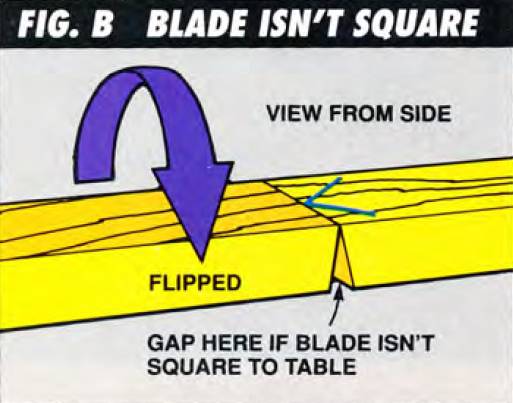
Flip one half over (Fig. B), butt the two cut ends together and view them from the side. If there’s a wedge-shaped gap where the cut ends meet, your blade isn’t square to your tabletop.
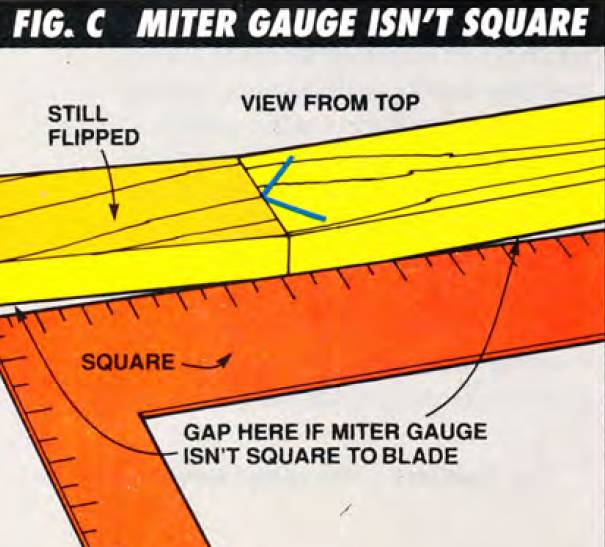
Keep the blocks in the same position, place a carpenter’s square along with their edges (Fig. C). and view them from the top. If you see wedge-shaped gaps, your miter gauge isn’t square to the saw blade.
You can readjust your saw to correct these and other problems, but first, check to make sure the blade is parallel to the miter gauge slots. It should be unless your saw’s been moved or banged around a lot, but check this first or some of the other adjustments will be useless.
Unplug the saw (as you should for all major adjustments) and crank the blade to its full height. Measure from the front and back of the blade over to one of the miter gauge slots.
If the measurements aren’t identical, loosen the bolts on the underside of the table that secure the blade “cradle” or carriage. then slightly reposition it. On saws with four bolts, loosen three of them and use the other as a pivot point. Consult your owner’s manual for the specific steps.
How do I adjust my table saw blade?
With the blade angle degree scale (usually on the front of the saw) set at “0” and the blade cranked to full height, rest one leg of a square on the table and the other 1/16 in. away from the blade. Sight between the square and body of the blade.
If you see a wedge, rather than a straight line, of daylight between blade and square, adjust the screw that stops the blade in the perpendicular position. On the Delta saw pictured here, this is a little hex screw on the table top.
Once the blade is perpendicular, readjust the arrow on the blade angle scale to “0” degrees. This is usually done by loosening a small screw and moving the pointer slightly. On some saws, you simply bend the pointer.

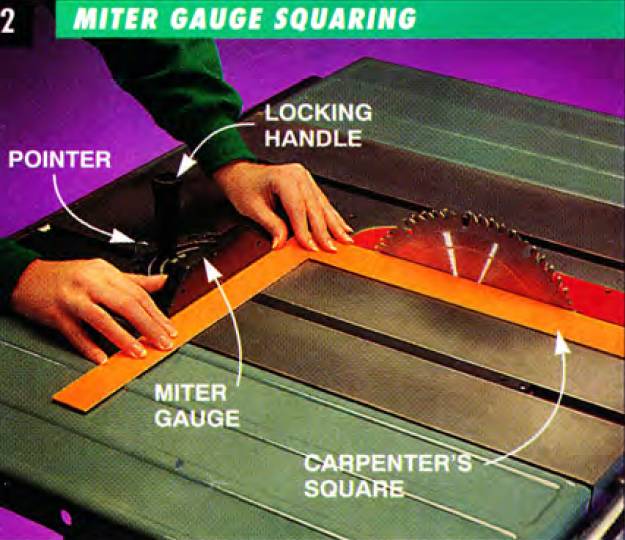
How do I square my miter gauge?
Rest one leg of a carpenter’s square against the blade, the other against the miter gauge (loosen the locking handle of the gauge first). If the arrow on the gauge doesn’t point to “0,” loosen the screw that secures the pointer, move it to the “0” position, then retighten the screw.
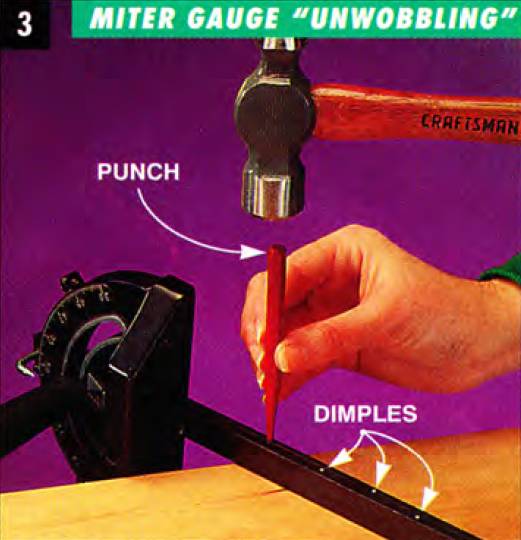
How do I adjust my miter gauge to a snug fit in my table saw slot?
If the gauge wiggles side-to-side in the slot, remove it and dimple one edge with a center punch in a zigzag pattern. Deepen each dimple until it fits snugly. If this creates too tight a fit, flatten the dimples with a metal file until the gauge slides freely, but firmly, in the slot.
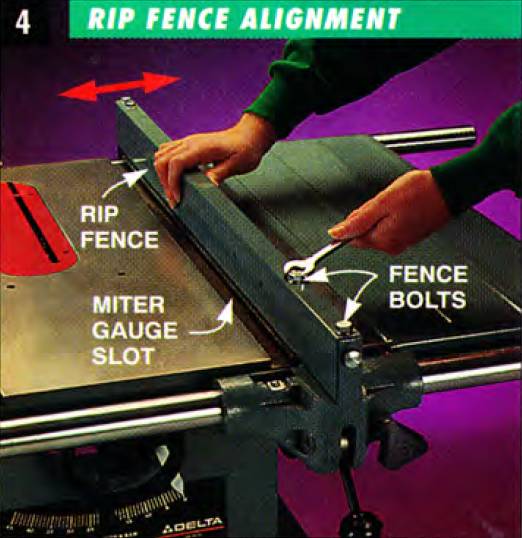
How do I align my rip fence?
Position it next to one of the miter gauge slots and lock it in position. If it doesn’t align itself parallel to the slot, loosen the two fence bolts or screws, realign it, then retighten the bolts or screws.
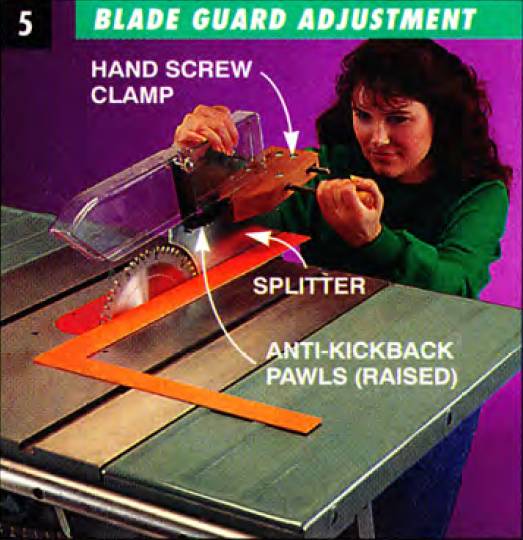
How do I adjust my table saw blade guard?
Place a square alongside the blade and splitter. Use a hand screw-type clamp to gently bend the splitter in line with the blade. For major adjustments, add or subtract a washer where the guard fastens to the saw.
I give up. Which blade should I buy?
Yeah, it’s a jungle out there. When you go shopping, consider:
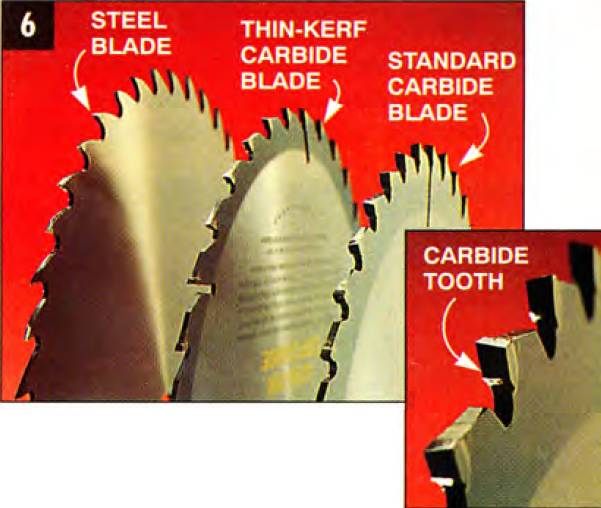
Blade and tooth composition
Steel blades are inexpensive but need to be replaced or re-sharpened frequently. They dull quickly when cutting particle board or tough woods like oak and birch.
A sharp steel blade can cut softwoods as cleanly as a carbide-tipped blade, but the advantages of carbide are overwhelming.
Carbide-tipped blades last 50 to 60 times longer than steel blades. They can cut particle board, hardwoods, plastic laminates, even some metals.
Carbide teeth come in varying qualities; you’ll get what you pay for.
Blade thickness
Carbide blades are available in standard and thin-kerf styles. Thin-kerf blades remove less wood per cut and create less drag on a motor — making them a good choice for the less powerful, benchtop-type saws.
On the downside, thin-kerf blades tend to become distorted when hot and have shorter lifespans than standard blades.
Number and pattern of teeth
Saw blades will have anywhere from 20 to 100 teeth, arranged in any number of ways, with a variety of tip angles and bevels.
- For cutting boards to length or mitering across the grain, use a blade with 60 or more teeth.
- For ripping boards to width, where speed is more important than smoothness, use a blade with fewer teeth.

My advice for the do-a-little-of-everything homeowner is to buy this Freud Diablo D1050X. It’s a great 50-tooth tungsten carbide combination blade; it has 10 groupings of 5 closely spaced teeth (for crisp cross-cuts) separated by a larger gap (for easy ripping). The Amazon price offers great benefit for its low cost, click here and check it out yourself.

If you own a benchtop saw, buy a thin-kerf blade such as the Freud LU83R010. The thin kerf requires less power from your saw and allows for faster feed rate as well. This blade has great Amazon reviews, click here and read them yourself.
Table saw safety
How much time should I spend fiddling around with blade guards, push sticks and other safety stuff?
Well, how long does it take your fingers to grow back?
The hybrid table saw is one of the most dangerous tools in the workshop; accidents multiply when people remove guards and take risks.
Being cut by the blade and getting hit by kicked-back boards are the two most obvious dangers.
But stay alert to another frequent creator of accidents — boards that are wet or green, twisted, bowed, or contain splits and loose knots. Such boards are more likely to pinch the blade, wedge against the rip fence and kick back unpredictably.
Actions to protect your fingers
Protect your fingers by following these precautions:
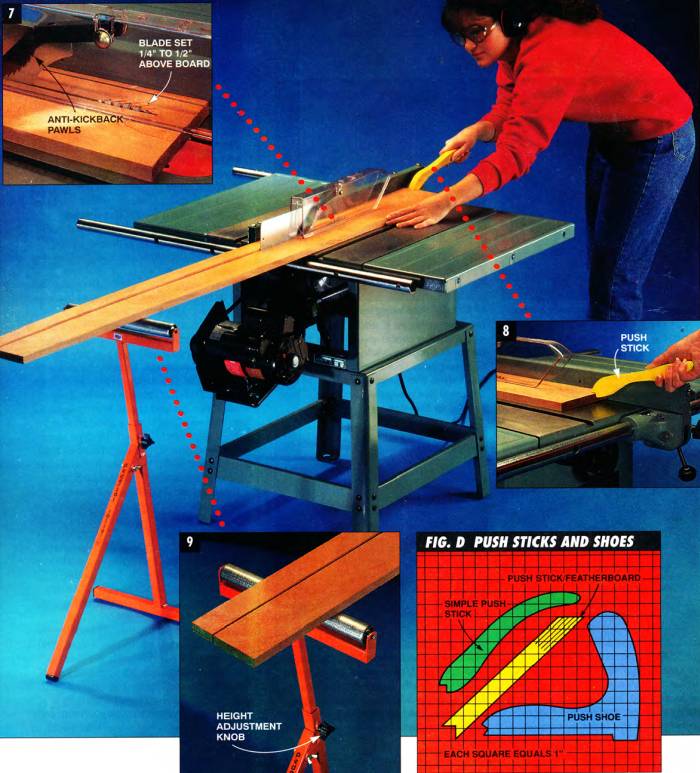
- Set your blade so it protrudes only about 1/4 in. above the wood being cut (Photo 7). Some pros swear that setting their carbide-tipped blades so the entire tooth clears the work produces a cleaner cut — but that should be the limit. Setting the blade higher exposes more of it for potential accidents, creates more strain on the blade and motor, and leaves a rougher cut.
- Use your blade guard. Most guards contain three safety features: the “plastic shroud,” which keeps fingers away from the blade and prevents splinters or loose knots from flying back at you; the “splitter,” which keeps the cut open after it passes the blade to prevent pinching; and the “anti-kickback pawls” (shown in Photo 7), which have little teeth that allow the board to pass in the cutting direction, but bite into it in case it tries to kick back. If you remove the guard for dadoing (Photo 12) or some other operation, replace it as soon as possible.
- Use a push stick (Photo 8) any time your fingers must pass within 4 in. of the blade. Push sticks (Fig. D) help you hold thin boards flat against the table surface while they’re sawn. Buy or make your push sticks (it’s an ideal way to use up scrap material) but by all means, use them. Keep them handy — in your back pocket or on the opposite side of the rip fence from the blade.
- Use common sense. Never reach over a spinning blade. Don’t wear loose clothing. Unplug the saw when making adjustments or changing blades.
How to avoid kickback on the table saw
“Kickback,” another real danger, occurs when the part of the board between the fence and blade gets pinched (or drifts away from the fence as you’re cutting) and the blade, spinning toward you, catches it and hurls it back at you.
The anti-kickback pawls don’t always prevent this, especially if the wood is very hard or you’re cutting skinny strips. The best defense is to stay out of the path of any possible kickback.
Use push sticks to extend your reach. Featherboards (Photo 12) also help prevent kickback.
“Outfeed rollers” help support long boards, stifling your impulse to reach over the blade to catch long boards as they fall off the table at the end of a cut.
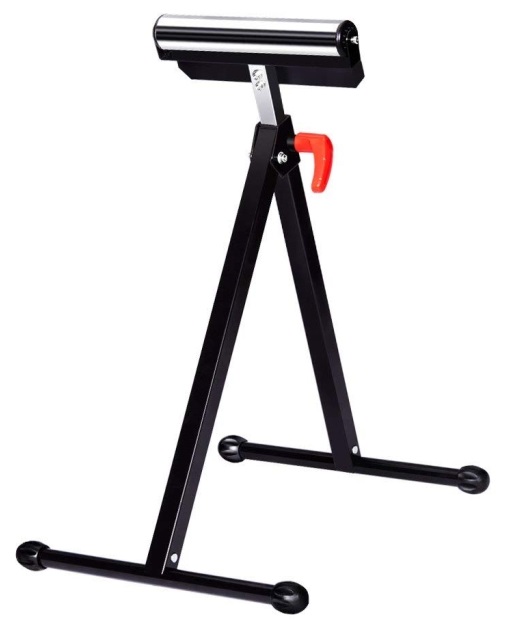
Rollers complete with stands are cheap. Side and front rollers make handling large pieces of plywood easier. The Finether rolling stand is foldable, its height can be adjusted from 26 to 43-3/8 inches, and it supports up to 132 lbs. Plus, it’s dirt cheap at Amazon. Click here to buy it now.
This should go without saying: always wear sight and hearing protection, and use a dust mask when cutting pressure-treated wood.
What do featherboards do? Can I make them?
Featherboards are basically fingers of wood, used to press boards firmly against the rip fence. They can also be clamped to a wood auxiliary fence (Photo 12) to hold boards down against the hybrid table saw’s surface.
Since featherboards take the place of fingers, they also minimize accidents; especially important when blade guards are removed. Made and secured properly, they create a one-way door, allowing boards to pass in one direction (forward), but preventing kickback. Featherboards always must be clamped firmly, immovably in place.
You can buy featherboards from woodworking stores for cheap or make them yourself as I show below.
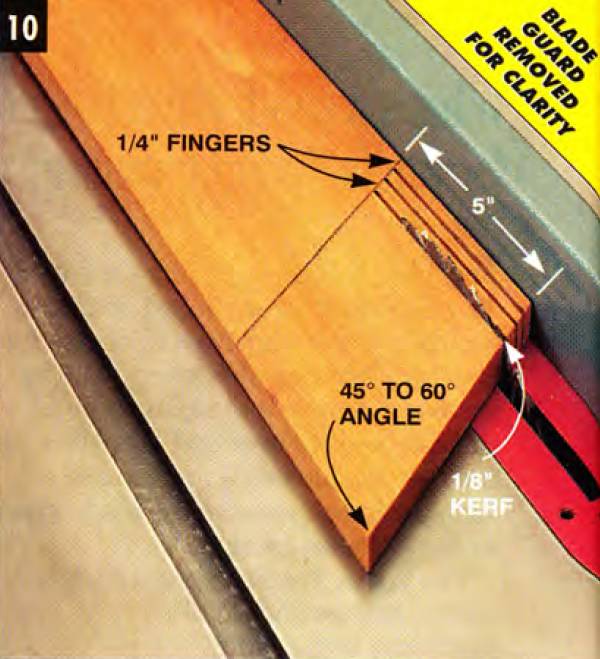
Cut short slits (kerfs) into the end of a 5/4-in. thick hoard that’s been cut to a 45- to 60-degree angle. Keep the back of the board pressed firmly against the rip fence while cutting.
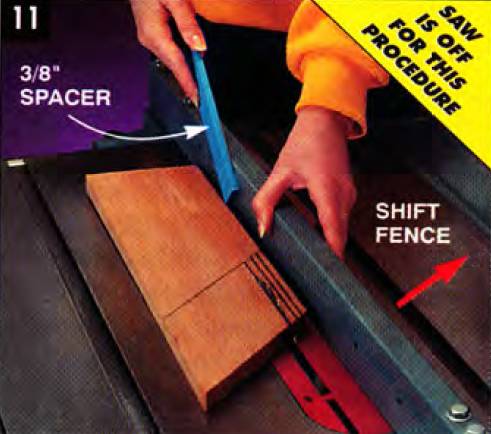
Adjust the rip fence. Turn off the saw, move the fence over the thickness of the 3/8-in. spacer (one 1/4-in. finger plus a 1/8-in. kerf). Then retighten it, back the board out and make the next cut.

Featherboards help hold the workpiece firmly against both the fence and the table top, a great safety feature during operations like dadoing where the blade guards must be removed.
How can I make a simple table saw fingerjoint jig?
Fingerjoints — sort of a simplified dovetail. Their strength and simple beauty make them a natural choice for furniture, boxes, and drawers.
The jig you use is simple and cheap to build and can be used over and over. To make and use this jig, you’ll need to use a dado blade and remove the blade guard, so use extreme caution.
The key is making the alternately-spaced fingers and notches exactly the same width. You can make them any width you want; this project used 1/2 in.
With a 1/2-in. dado blade stack (set 1/2 in. high) I used the miter gauge to guide a 1x3 over the dado blade to create a 1/2-in. x 1/2-in. notch (Fig. E).
Then I glued a 1/2-in. x 1/2-in. x 2-in. “pin” into this notch.
I then raised the blade to 7/8 in. (slightly higher than the width of my 3/4-in. boards) and cut another notch exactly 1/2 in. away from the pin; then screwed the 1x3 to the miter gauge (Photo 13) in that exact position; most gauges have holes for this.
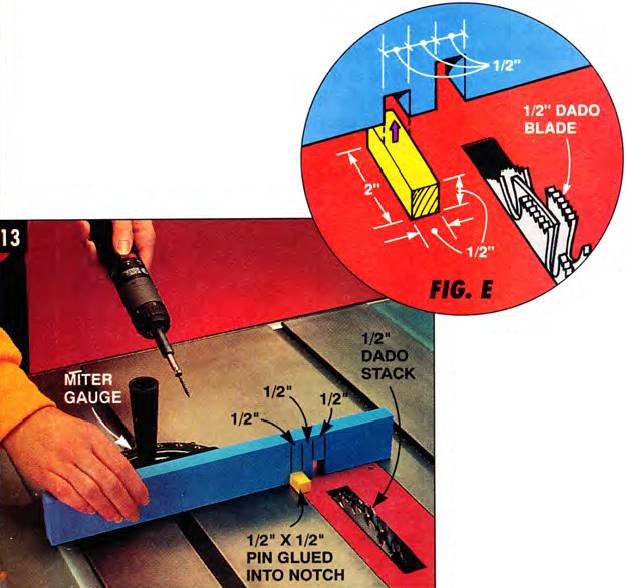
Screw the jig to the miter gauge, making sure the 1/2-in. pin is exactly 1/2 in. away from the 1/2-in. dado blade.
Grab some scrap 1x6s or 1x8s for practice. Stand a scrap on end, bump one edge against the pin, then push the board with the jig and miter gauge across the dado blade to cut your first notch.
Leapfrog this first notch over onto the pin and cut your second notch; this will create a 1/2 in. wide notch exactly 1/2 in away from the first notch.
Repeat this over and over to create a series of fingers (Photo 14). Do this on another board, then interlock the two ends to check the fit; you may need to slightly reposition your 1x3 on the miter gauge.
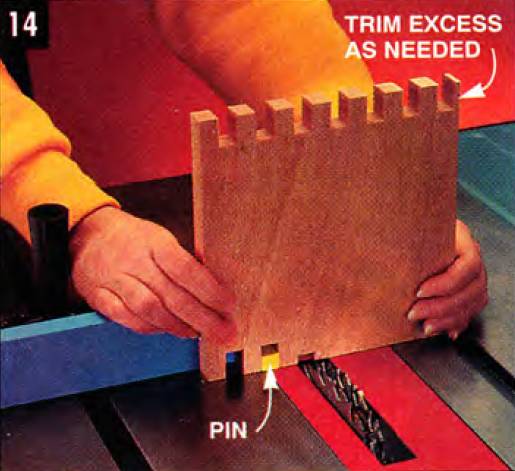
Cut the notches by leapfrogging the most recently cut notch onto the pin, then cutting the next one.
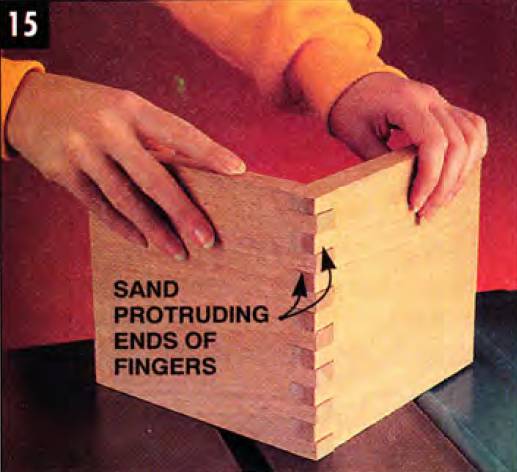
On actual boxes, two of the sides will start with a finger, two with a notch (Photo 15), so make your first cut accordingly.
After you’ve glued your finger jointed box together and let it dry, use a power sander to remove the little finger ends that protrude past the corners of the box.
Assemble and check the test pieces for a tight fit. The jig may need to be slightly shifted in the miter gauge.
How do I use my table saw to cut plywood?
Plywood is unwieldy to cut on a hybrid table saw; it’s heavy, sometimes warped and can be difficult to guide along the rip fence.
Use support tables and rollers (front, sides, and back) to help hold the wood.
When possible, first rough-cut the sheet about an inch oversize with a circular saw, then make the final cut on the hybrid table saw.
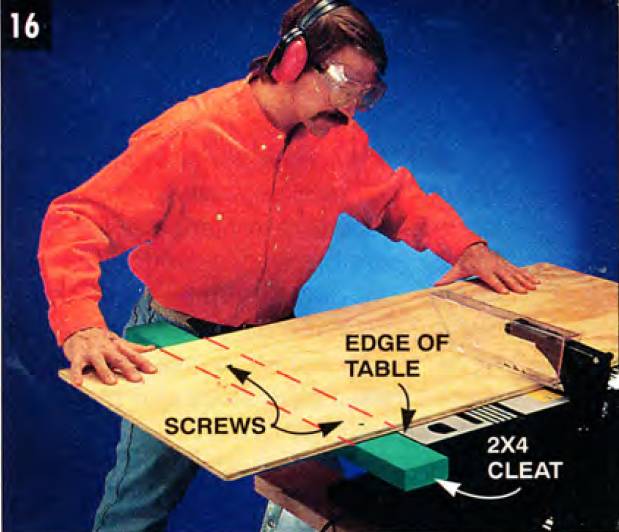
If you need to cut a sheet larger than your rip fence will allow, use the method shown above. A 2x4 cleat, temporarily screwed to the bottom side of the plywood, is guided along one edge of the saw’s table to create a straight cut.
By the way, always cut plywood and laminates “good side up” on a table saw; the blade tends to chip and splinter the bottom side.
Can I cut 45-degree miters with my table saw?
Yep — at least moldings up to about 3 ft. long for picture frames or other projects. Longer pieces will be awkward to handle, require more room to maneuver and will be less accurately cut on a table saw — use a miter saw instead.
For an occasional cut, simply set your miter gauge at 45 degrees and hold (or clamp) your board against it as you guide it past the blade.
But for lots of cuts, the miter jig I show below is more accurate, easier to guide and always set to make common 45-degree cuts.

Nail and glue a 3/8-in. particle board platform to two 3/8-in. x 3/4-in. runners resting in the miter gauge slots. Use the rip fence to position it square to the blade.
Mark two lines at a 45-degree angle to a slot cut in the platform by the saw blade. Use a Speed square to position the carpenter’s square for marking.

Screw 1x2 cleats along the 45-degree lines using drywall screws. Paste wax the runners and platform to reduce friction between the jig and the table saw top.
Cut 45-degree miters by firmly gripping the molding and pushing the platform across the table and blade. Sandpaper glued to the cleats prevents the molding from slipping.
How can I quickly cut fifty 1/4-in. strips?
Cutting thin strips safely on a table saw is tricky since the blade guard usually prevents you from positioning the rip fence closer than an inch or so from the blade.
You can cut strips from the edge of the board farthest from the fence by adjusting it, ripping a strip, moving it in a little, ripping another strip, and so on — but it takes forever and the results aren’t uniform.
The simplest solution is to build the jig I show. It’s simply a notched piece of plywood with a handle.
Adjust the fence so the distance between the edge of the jig and the blade is the width of the strip you want to be cut.
Then nestle the board in front of the notch and cut a strip; place the board back on the notch and rip again — and again.
The jig serves as a push stick and automatic spacer — and lets you keep your guard where it belongs.
Quick trick #1: create a measuring guide
Need to mass-produce a couple dozen checkers? 50 identical building blocks? A convoy of toy wheels?
Screw a 2x2 “stop block” to your rip fence to serve as an automatic measuring guide. Bump one end of your dowel or workpiece against the stop block, then use your miter gauge to move the dowel over the blade.
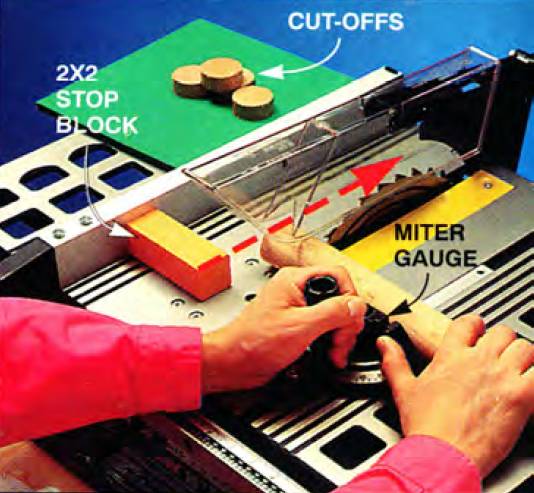
You’ll get perfect, uniform pieces every cut (plus avoid the inevitable kickback that would result if you were to guide the end of the piece directly along the rip fence as you cut).
To adjust the length of your pieces, move the rip fence left or right.
Quick trick #2: how to protect your table saw surface
A twice-a-year wax job will protect the surface of your saw from moisture and rust. As an added bonus, waxing it will reduce friction and help boards glide more easily across the top.
Lower the blade, then remove the blade guard, rip fence, and miter gauge. Apply a high-quality paste wax, let it dry, then buff thoroughly.

Try it — you’ll be amazed.
Quick trick #3: take care of your jigs
Most jigs, push sticks and featherboards are simply scraps of wood turned into something useful. To make certain I don’t toss them out with other scraps, I paint them with colorful paint. It protects them, helps me locate them, plus makes me think of them more as real tools.
Some woodworker folks glue small magnets to the push sticks and jigs they use most often and stick them to the side at their table saw — they’re out or the way but always ready to use.
Table saws are the center of most woodworking shops. Who doesn’t want a robust machine with a precise fence and a powerful motor? These are all important features that any woodworker can appreciate.
But what type of saw should you choose? If you are on a tighter budget or needs to move the saw around often, check my portable (jobsite) saw review and guide.
If you’d like to look at better options, you should definitely consider hybrid table saws. The name is a hint to what they offer: the lighter weight of a portable unit and the precision and size of a cabinet saw.
Their value is somewhere between both types of saws, too.
Jet ProShop II 708494K JPS/10TS Review - Best Hybrid Table Saw
The Jet ProShop II hybrid table saw offers the benefits of high-end cabinet saws. It packs them in the compact size of a portable machine. The cast iron table top gives extra stability for this saw, and the miter gauge slot has a T shape.
Popular Woodworking tested the ProShop II against other competitors in the market. They selected those with the same rated horsepower. The surprise was that Jet’s actual cutting capacity is higher. They made a test cut ripping down some oak lumber to simulate an increased demand in your workshop. The Jet hybrid saw had the fastest cutting rate speed.
The blade guard is transparent and the leaves on either side work independently. The riving knife is close to the blade, reducing the chances of kickback. Jet also includes a low-profile riving knife. You can install it when you need to make a non-through cut.
You change blades from the top and very fast. The blade guard and the riving knife have a quick release. So, mounting and removal require zero tools.
The fence system is also the best out of all the saws reviewed here. Sliding it along the rails is a simple operation and smooth glide. The aluminum faces have t-slots on the top edge for attaching jigs. How can’t you love that? It is available with a rip capacity of either 30 or 52 inches.
Speaking of dimensions, the table height is 34-3/4”. The table size without wings is 27” long by 20” wide, while the table with the standard extensions 27” long by 44” wide.
The sloped cabinet floor increases dust collection efficiency. This is good. The metal cabinet is on the smaller side, which demands dust collection to be on at all times.
The cabinet has powder-coated paint on all sides. This finish is chip-resistant and long-lasting.
It accepts dado stacks of 8 inches in diameter and 13/16” wide.
Quick Summary
- The Jet Proshop II has the most "actual" power when cutting materials.
- The ProShop fence system is the main star of the show.
- Smaller cabinet size requires dust collection during all cuts to avoid dust build-up.
- Click here to buy this Jet hybrid table saw
Ridgid R4512 Review - Best Hybrid Table Saw Under $1000
Are a hobbyist woodworker looking to upgrade from a benchtop saw? The Ridgid R4512 is a strong contender for your shop space.
This machine has a sturdy and spacious cast iron top. That reduces motor vibrations. It also adds a great deal of structural integrity to your machine. Finally, your table saw will remain flatter, rigid, and level.
Hybrid table saws with a cast iron top are heavy and hard to move around. The Ridgid is very portable and easy to maneuver because it has one caster and two fixed wheels. That allows you to park your car in your garage.
Its fan-cooled induction motor comes pre-wired for 110V. You can also rewire it for 220V. It runs at 13 Amps and 3,450 RPM, allowing you to use it in a normal 15A circuit.
The R4512 is a safe saw. It has a blade guard to help prevent accidental contact with the spinning blade. It also features a riving knife to help prevent kickback.
The Ridgid’s main negatives relate to assembly and setup. You need to be patient when assembling it at home for the first time. Fine tuning the saw to run parallel to the fence is also tricky. But we all want to avoid kickback and ensure precise cuts, right? The lateral trunnion setup is also complicated.
This saw compensates all that by being the cheapest hybrid saw on the market today.
Quick Summary
- The cast iron table adds stability to this machine.
- The adjustable fence and the t-slot miter gauge are both a great upgrade from contractor saws.
- The riving knife requires no tools for mounting or removal.
- Click here to see today's Amazon prices for yourself.
SawStop PCS175-TGP236 Review - Safest Hybrid Table Saw
SawStop sells the PCS175-TGP236 as a cabinet saw, but it is a hybrid saw.
They should instead emphasize their proprietary safety features. This is the safest hybrid table saw available on the market today. It stops and retracts the blade upon contact with the skin within 3 milliseconds.
How does it work? The blade carries a small electrical signal. Wood doesn’t conduct electricity. But as soon as the skin touches the blade, this signal changes. The human body conduces electricity. This signal change activates the blade brake, shuts off the motor, and drops the blade.
Resetting the system is simple and takes only 90 seconds.
The SawStop also offers tool-free blade guard and riving knife changes. The zero-clearance insert is also released without tools.
The SawStop safety proposition also reaches your lungs. Plywood and MDF generate carcinogenic sawdust. Exotic hardwoods are, often, allergenic and bring their own host of issues. SawStop has an (optional) overarm dust collection accessory. It collects 99% of all the dust created during operation. That’s a professional level of dust control for your home shop.
Also like the Jet ProShop II, the SawStop includes 2 riving knives for anti kickback. Switch between them as you make a full cut or a partial cut.
The SawStop also accepts dado blades. The only observation is that it requires a separate table insert and brake cartridge.
Quick Summary
- This is the safest hybrid table saw for your fingers and your lungs.
- Top-notch construction quality, easy assembly, and precision is on par with the competition.
- The main negative is the expensive price, but what is a finger worth to you?
- Check the updated prices on Amazon.
Boeshield 3-Pack Kit Review - Best Table Saw Maintenance Products
This Boeshield 3-pack kit is a great shop companion. These are safe to use in all your woodwork machinery.
- The first bottle is a cleaner. It works on saw blades, router bits, and all your cutting tools by removing resin, gum, and pitch. A spray or two, 3 min, and you're done.
- A second bottle removes rust and stains. It smells terrible but removes surface rust fast, and cleans up other oxidization reactions as well.
- The third bottle is the industry-leading Boeshield T-9. It offers rust and corrosion protection. Boeing developed it to prevent corrosion in hard-to-reach places. It is a superior rust preventative and it doesn't remain greasy after it dries.
Hybrid Table Saw Buying Guide
These machines have arrived to stay due to a great value proposition. They have the best from portable table saws, the best from cabinet table saws, and a price range between the two.
Most hybrid saws assemble trunnions on the table top, as a portable saw. Cabinet saws use the more robust trunnion assemblies on their cabinets. This is the most overlooked difference between both saw types.
Another important difference to their bigger sister saws is the power of the motor. Hybrid saws vary from 1-1/2 and 2 hp, while the cabinet table saws start from 3 hp.
You can use most hybrid saws them on 110-volt plugs. Most cabinet saws need a 220v. That could be a concern for your small shop. So, upgrading from a jobsite saw is easy.
Motors placed inside the cabinet need no exposed belts. That solves the problem of small cutoff pieces getting caught on the belts.
The enclosed base also improves your shop dust collection. Plus, a 4-inch dust collection hose works much better than a dust box under your old contractor saw.
There are two types of enclosed cabinets. Some are a partial height supported on legs. Others are a full cabinet from the table top to the floor.
Table Saw Safety
Like most workshop warriors, you probably know how to rip a board to width on your table saw. But perhaps you haven’t explored its other talents: creating woodworking joints, cutting grooves, mitering corners, mass-producing parts and cutting plywood.
The table saw can do all this and more, provided it’s accurately adjusted, used safely and is operated with the proper know-how.
I’ll explore this great tool by answering some common (and not so common) questions about hybrid table saws. Keep reading the article to find out all about it!
From safeguarding your fingers to creating finger joint jigs — getting better acquainted with your “big saw.”
Your table saw is (choose one):
- A convenient place to set my coffee mug while I work.
- A great tool for turning 2x4s into 2x2s.
- A machine I used a lot — until it launched a board through my garage wall.
- The next tool I'll purchase.
- A versatile saw I have mastered totally and completely.
Unless you chose the last one, read on.
What This Article Is And Isn’t About
I presume you know the basics:
- how to cut boards to width (rip) using the rip fence, and
- how to cut boards to length using the miter gauge.
I also presume you’ve developed a few sloppy work habits, maybe let your saw drift out of accuracy, and perhaps have begun thinking of it as a “one trick pony.” I’ll try to freshen your memory, review some basic tune-up and safety procedures, plus show you some new jigs and uses.
If you go right now to Amazon, there are 38 books devoted solely to table saws. There are accessories that can turn your table saw into a disc sander or molding cutter, and jigs that will help you create dovetail joints and perfect circles. I can’t possibly cover everything here.
Bear in mind, every type of saw is different, Some blades tilt left, others tilt right (some saws even have a table that tilts around a fixed blade). There are miniature “hobby” saws with 3-1/2 in. diameter blades and commercial varieties with blades 12 in. and larger.
I urge you to locate and review your owner’s manual; it will be more specific when it comes to the adjustments I describe below, and will also cover safety tips, maintenance, and accessories particular to your saw. Google your saw’s make and model if you can’t find the paper manual, chances are there’s a PDF somewhere on the internet.
How do I get my table saw to cut straight and square again?
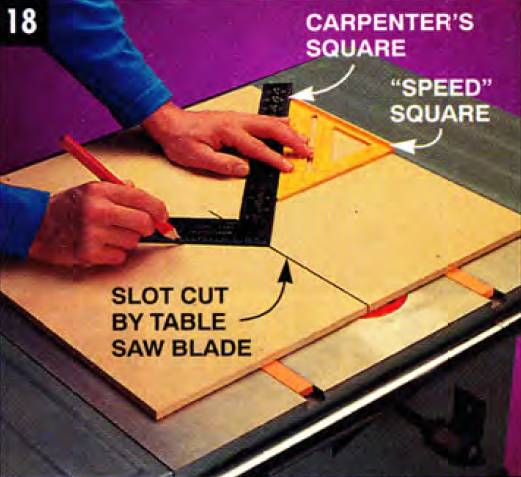
Start by conducting the simple test you see in Figs. A, B, and C.
Make an “X” on a 1x3 or 1x4, then cut it in half using the miter gauge as a guide (Fig A).
Flip one half over (Fig. B), butt the two cut ends together and view them from the side. If there’s a wedge-shaped gap where the cut ends meet, your blade isn’t square to your tabletop.
Keep the blocks in the same position, place a carpenter’s square along with their edges (Fig. C). and view them from the top. If you see wedge-shaped gaps, your miter gauge isn’t square to the saw blade.
You can readjust your saw to correct these and other problems, but first, check to make sure the blade is parallel to the miter gauge slots. It should be unless your saw’s been moved or banged around a lot, but check this first or some of the other adjustments will be useless.
Unplug the saw (as you should for all major adjustments) and crank the blade to its full height. Measure from the front and back of the blade over to one of the miter gauge slots.
If the measurements aren’t identical, loosen the bolts on the underside of the table that secure the blade “cradle” or carriage. then slightly reposition it. On saws with four bolts, loosen three of them and use the other as a pivot point. Consult your owner’s manual for the specific steps.
How do I adjust my table saw blade?
With the blade angle degree scale (usually on the front of the saw) set at “0” and the blade cranked to full height, rest one leg of a square on the table and the other 1/16 in. away from the blade. Sight between the square and body of the blade.
If you see a wedge, rather than a straight line, of daylight between blade and square, adjust the screw that stops the blade in the perpendicular position. On the Delta saw pictured here, this is a little hex screw on the table top.
Once the blade is perpendicular, readjust the arrow on the blade angle scale to “0” degrees. This is usually done by loosening a small screw and moving the pointer slightly. On some saws, you simply bend the pointer.
How do I square my miter gauge?
Rest one leg of a carpenter’s square against the blade, the other against the miter gauge (loosen the locking handle of the gauge first). If the arrow on the gauge doesn’t point to “0,” loosen the screw that secures the pointer, move it to the “0” position, then retighten the screw.
How do I adjust my miter gauge to a snug fit in my table saw slot?
If the gauge wiggles side-to-side in the slot, remove it and dimple one edge with a center punch in a zigzag pattern. Deepen each dimple until it fits snugly. If this creates too tight a fit, flatten the dimples with a metal file until the gauge slides freely, but firmly, in the slot.
How do I align my rip fence?
Position it next to one of the miter gauge slots and lock it in position. If it doesn’t align itself parallel to the slot, loosen the two fence bolts or screws, realign it, then retighten the bolts or screws.
How do I adjust my table saw blade guard?
Place a square alongside the blade and splitter. Use a hand screw-type clamp to gently bend the splitter in line with the blade. For major adjustments, add or subtract a washer where the guard fastens to the saw.
I give up. Which blade should I buy?
Yeah, it’s a jungle out there. When you go shopping, consider:
Blade and tooth composition
Steel blades are inexpensive but need to be replaced or re-sharpened frequently. They dull quickly when cutting particle board or tough woods like oak and birch.
A sharp steel blade can cut softwoods as cleanly as a carbide-tipped blade, but the advantages of carbide are overwhelming.
Carbide-tipped blades last 50 to 60 times longer than steel blades. They can cut particle board, hardwoods, plastic laminates, even some metals.
Carbide teeth come in varying qualities; you’ll get what you pay for.
Blade thickness
Carbide blades are available in standard and thin-kerf styles. Thin-kerf blades remove less wood per cut and create less drag on a motor — making them a good choice for the less powerful, benchtop-type saws.
On the downside, thin-kerf blades tend to become distorted when hot and have shorter lifespans than standard blades.
Number and pattern of teeth
Saw blades will have anywhere from 20 to 100 teeth, arranged in any number of ways, with a variety of tip angles and bevels.
- For cutting boards to length or mitering across the grain, use a blade with 60 or more teeth.
- For ripping boards to width, where speed is more important than smoothness, use a blade with fewer teeth.
My advice for the do-a-little-of-everything homeowner is to buy this Freud Diablo D1050X. It’s a great 50-tooth tungsten carbide combination blade; it has 10 groupings of 5 closely spaced teeth (for crisp cross-cuts) separated by a larger gap (for easy ripping). The Amazon price offers great benefit for its low cost, click here and check it out yourself.
If you own a benchtop saw, buy a thin-kerf blade such as the Freud LU83R010. The thin kerf requires less power from your saw and allows for faster feed rate as well. This blade has great Amazon reviews, click here and read them yourself.
Table saw safety
How much time should I spend fiddling around with blade guards, push sticks and other safety stuff?
Well, how long does it take your fingers to grow back?
The hybrid table saw is one of the most dangerous tools in the workshop; accidents multiply when people remove guards and take risks.
Being cut by the blade and getting hit by kicked-back boards are the two most obvious dangers.
But stay alert to another frequent creator of accidents — boards that are wet or green, twisted, bowed, or contain splits and loose knots. Such boards are more likely to pinch the blade, wedge against the rip fence and kick back unpredictably.
Actions to protect your fingers
Protect your fingers by following these precautions:
- Set your blade so it protrudes only about 1/4 in. above the wood being cut (Photo 7). Some pros swear that setting their carbide-tipped blades so the entire tooth clears the work produces a cleaner cut — but that should be the limit. Setting the blade higher exposes more of it for potential accidents, creates more strain on the blade and motor, and leaves a rougher cut.
- Use your blade guard. Most guards contain three safety features: the “plastic shroud,” which keeps fingers away from the blade and prevents splinters or loose knots from flying back at you; the “splitter,” which keeps the cut open after it passes the blade to prevent pinching; and the “anti-kickback pawls” (shown in Photo 7), which have little teeth that allow the board to pass in the cutting direction, but bite into it in case it tries to kick back. If you remove the guard for dadoing (Photo 12) or some other operation, replace it as soon as possible.
- Use a push stick (Photo 8) any time your fingers must pass within 4 in. of the blade. Push sticks (Fig. D) help you hold thin boards flat against the table surface while they’re sawn. Buy or make your push sticks (it’s an ideal way to use up scrap material) but by all means, use them. Keep them handy — in your back pocket or on the opposite side of the rip fence from the blade.
- Use common sense. Never reach over a spinning blade. Don’t wear loose clothing. Unplug the saw when making adjustments or changing blades.
How to avoid kickback on the table saw
“Kickback,” another real danger, occurs when the part of the board between the fence and blade gets pinched (or drifts away from the fence as you’re cutting) and the blade, spinning toward you, catches it and hurls it back at you.
The anti-kickback pawls don’t always prevent this, especially if the wood is very hard or you’re cutting skinny strips. The best defense is to stay out of the path of any possible kickback.
Use push sticks to extend your reach. Featherboards (Photo 12) also help prevent kickback.
“Outfeed rollers” help support long boards, stifling your impulse to reach over the blade to catch long boards as they fall off the table at the end of a cut.
Rollers complete with stands are cheap. Side and front rollers make handling large pieces of plywood easier. The Finether rolling stand is foldable, its height can be adjusted from 26 to 43-3/8 inches, and it supports up to 132 lbs. Plus, it’s dirt cheap at Amazon. Click here to buy it now.
This should go without saying: always wear sight and hearing protection, and use a dust mask when cutting pressure-treated wood.
What do featherboards do? Can I make them?
Featherboards are basically fingers of wood, used to press boards firmly against the rip fence. They can also be clamped to a wood auxiliary fence (Photo 12) to hold boards down against the hybrid table saw’s surface.
Since featherboards take the place of fingers, they also minimize accidents; especially important when blade guards are removed. Made and secured properly, they create a one-way door, allowing boards to pass in one direction (forward), but preventing kickback. Featherboards always must be clamped firmly, immovably in place.
You can buy featherboards from woodworking stores for cheap or make them yourself as I show below.
Cut short slits (kerfs) into the end of a 5/4-in. thick hoard that’s been cut to a 45- to 60-degree angle. Keep the back of the board pressed firmly against the rip fence while cutting.
Adjust the rip fence. Turn off the saw, move the fence over the thickness of the 3/8-in. spacer (one 1/4-in. finger plus a 1/8-in. kerf). Then retighten it, back the board out and make the next cut.
Featherboards help hold the workpiece firmly against both the fence and the table top, a great safety feature during operations like dadoing where the blade guards must be removed.
How can I make a simple table saw fingerjoint jig?
Fingerjoints — sort of a simplified dovetail. Their strength and simple beauty make them a natural choice for furniture, boxes, and drawers.
The jig you use is simple and cheap to build and can be used over and over. To make and use this jig, you’ll need to use a dado blade and remove the blade guard, so use extreme caution.
The key is making the alternately-spaced fingers and notches exactly the same width. You can make them any width you want; this project used 1/2 in.
With a 1/2-in. dado blade stack (set 1/2 in. high) I used the miter gauge to guide a 1x3 over the dado blade to create a 1/2-in. x 1/2-in. notch (Fig. E).
Then I glued a 1/2-in. x 1/2-in. x 2-in. “pin” into this notch.
I then raised the blade to 7/8 in. (slightly higher than the width of my 3/4-in. boards) and cut another notch exactly 1/2 in. away from the pin; then screwed the 1x3 to the miter gauge (Photo 13) in that exact position; most gauges have holes for this.
Screw the jig to the miter gauge, making sure the 1/2-in. pin is exactly 1/2 in. away from the 1/2-in. dado blade.
Grab some scrap 1x6s or 1x8s for practice. Stand a scrap on end, bump one edge against the pin, then push the board with the jig and miter gauge across the dado blade to cut your first notch.
Leapfrog this first notch over onto the pin and cut your second notch; this will create a 1/2 in. wide notch exactly 1/2 in away from the first notch.
Repeat this over and over to create a series of fingers (Photo 14). Do this on another board, then interlock the two ends to check the fit; you may need to slightly reposition your 1x3 on the miter gauge.
Cut the notches by leapfrogging the most recently cut notch onto the pin, then cutting the next one.
On actual boxes, two of the sides will start with a finger, two with a notch (Photo 15), so make your first cut accordingly.
After you’ve glued your finger jointed box together and let it dry, use a power sander to remove the little finger ends that protrude past the corners of the box.
Assemble and check the test pieces for a tight fit. The jig may need to be slightly shifted in the miter gauge.
How do I use my table saw to cut plywood?
Plywood is unwieldy to cut on a hybrid table saw; it’s heavy, sometimes warped and can be difficult to guide along the rip fence.
Use support tables and rollers (front, sides, and back) to help hold the wood.
When possible, first rough-cut the sheet about an inch oversize with a circular saw, then make the final cut on the hybrid table saw.
If you need to cut a sheet larger than your rip fence will allow, use the method shown above. A 2x4 cleat, temporarily screwed to the bottom side of the plywood, is guided along one edge of the saw’s table to create a straight cut.
By the way, always cut plywood and laminates “good side up” on a table saw; the blade tends to chip and splinter the bottom side.
Can I cut 45-degree miters with my table saw?
Yep — at least moldings up to about 3 ft. long for picture frames or other projects. Longer pieces will be awkward to handle, require more room to maneuver and will be less accurately cut on a table saw — use a miter saw instead.
For an occasional cut, simply set your miter gauge at 45 degrees and hold (or clamp) your board against it as you guide it past the blade.
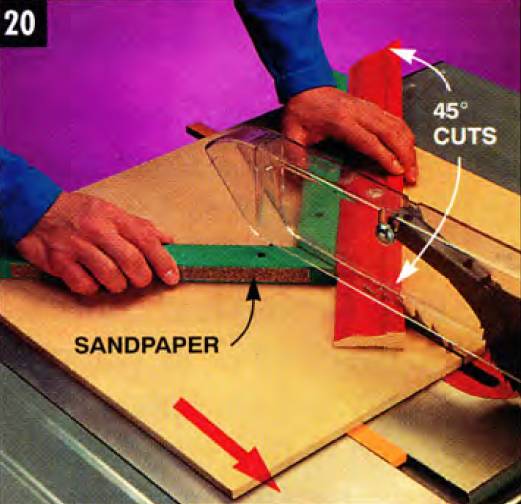
But for lots of cuts, the miter jig I show below is more accurate, easier to guide and always set to make common 45-degree cuts.
Nail and glue a 3/8-in. particle board platform to two 3/8-in. x 3/4-in. runners resting in the miter gauge slots. Use the rip fence to position it square to the blade.
Mark two lines at a 45-degree angle to a slot cut in the platform by the saw blade. Use a Speed square to position the carpenter’s square for marking.
Screw 1x2 cleats along the 45-degree lines using drywall screws. Paste wax the runners and platform to reduce friction between the jig and the table saw top.
Cut 45-degree miters by firmly gripping the molding and pushing the platform across the table and blade. Sandpaper glued to the cleats prevents the molding from slipping.
How can I quickly cut fifty 1/4-in. strips?
Cutting thin strips safely on a table saw is tricky since the blade guard usually prevents you from positioning the rip fence closer than an inch or so from the blade.
You can cut strips from the edge of the board farthest from the fence by adjusting it, ripping a strip, moving it in a little, ripping another strip, and so on — but it takes forever and the results aren’t uniform.
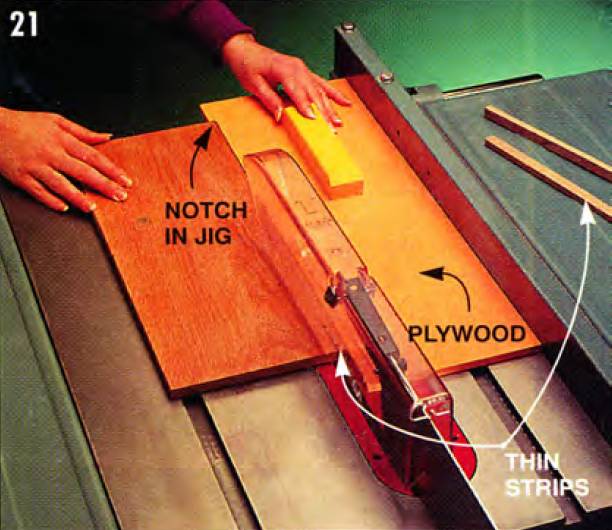
The simplest solution is to build the jig I show. It’s simply a notched piece of plywood with a handle.
Adjust the fence so the distance between the edge of the jig and the blade is the width of the strip you want to be cut.
Then nestle the board in front of the notch and cut a strip; place the board back on the notch and rip again — and again.
The jig serves as a push stick and automatic spacer — and lets you keep your guard where it belongs.
Quick trick #1: create a measuring guide
Need to mass-produce a couple dozen checkers? 50 identical building blocks? A convoy of toy wheels?
Screw a 2x2 “stop block” to your rip fence to serve as an automatic measuring guide. Bump one end of your dowel or workpiece against the stop block, then use your miter gauge to move the dowel over the blade.
You’ll get perfect, uniform pieces every cut (plus avoid the inevitable kickback that would result if you were to guide the end of the piece directly along the rip fence as you cut).
To adjust the length of your pieces, move the rip fence left or right.
Quick trick #2: how to protect your table saw surface
A twice-a-year wax job will protect the surface of your saw from moisture and rust. As an added bonus, waxing it will reduce friction and help boards glide more easily across the top.
Lower the blade, then remove the blade guard, rip fence, and miter gauge. Apply a high-quality paste wax, let it dry, then buff thoroughly.
Try it — you’ll be amazed.
Quick trick #3: take care of your jigs
Most jigs, push sticks and featherboards are simply scraps of wood turned into something useful. To make certain I don’t toss them out with other scraps, I paint them with colorful paint. It protects them, helps me locate them, plus makes me think of them more as real tools.
Some woodworker folks glue small magnets to the push sticks and jigs they use most often and stick them to the side at their table saw — they’re out or the way but always ready to use.