
DIY Toy Storage Box Build (FREE plans, instructions & pics)
Wow, a giant building block that rolls and has a drawer too! Not that your kids or grandkids will actually put their toys away, but with a storage box like this to tempt them, who knows what miracles might happen!

This is a fun project to build, but it does take some time and effort to get it to look really good. To make it user-friendly, it features rounded corners, self-balancing lid supports and an easy-on-the-fingers drawer that won’t slam shut.
Building this project takes about three weekends. All the hardware used is available online.
Tools Needed
You’ll need:
- a portable table saw or a hybrid table saw and dado blade,
- a router and a 1/4-in. dia. round-over bit, a 1/2-in. dia. round-over bit, and a 3/4-in. long flush-trimming bit,
- a belt sander and a 150-grit sanding belt,
- an random orbit sander,
- a drill/driver,
- a jigsaw,
- a hacksaw, and
- at least four 30-in. or longer bar or pipe clamps.
You will see pictures of a scroll saw to cut out the letters. But you can use a jigsaw too.
This project also uses a drill press and a 1-in. dia. sanding drum to smooth the sawn edges of the letters. A simple replacement is an ordinary electric drill to do the job. Or, obviously, an oscillating spindle sander.
Step-By-Step Instructions
1. Cut All Pieces
Cut all the pieces, A through U, to the dimensions given in the Cutting List below:
| KEY | PCS. | SIZE | DESCRIPTION |
|---|---|---|---|
| A | 2 | 3/4" x 22-1/2" x 22-1/2" | (birch plywood) Bottoms |
| B | 3 | 3/4" x 22-3/4" x 22-1/2" | (birch plywood) Sides and front |
| C | 1 | 3/4" x 19-3/4" x 22-1/2" | (birch plywood) Top |
| D | 1 | 3/4" x 12-3/8" x 22-1/2" | (birch plywood) Back |
| E | 1 | 1/4" x 21-5/8" x 21-5/8" | (hardboard) Drawer bottom |
| F | 3 | 1/4" x 16" x 16" | (hardboard) Letters |
| G | 6 | 1/4" x 2" x 22-1/2" | (hardboard) Letter frame tops & bottoms |
| H | 6 | 1/4" x 2" x 18-1/2" | (hardboard) Letter frame sides |
| J | 2 | 3/4" x 5-15/16" x 23" | (birch) Drawer sides |
| K | 1 | 3/4" x 5-15/16" x 22-3/8" | (birch) Drawer front |
| L | 1 | 3/4" x 5-3/16" x 21-3/8" | (birch) Drawer back |
| M | 1 | 3/4" x 3-9/16" x 24-1/2" | (birch) Top front* |
| N | 1 | 3/4" x 3-3/16" x 22-1/2" | (birch) Lower back |
| P | 2 | 3/4" x 1-9/16" x 22-1/2" | (birch) Cleats* |
| Q | 2 | 3/4" x 1-9/16" x 21" | (birch) Cleats* |
| R | 4 | 3/4" x 1" x 22-1/2" | (birch) Drawer runners |
| S | 5 | 3/4" x 1" x 21" | (birch) Drawer runners & drawer stop |
| T | 15 | 3/4" x 3/4" x 24-1/2" | (birch) Edging* |
| U | 1 | 1/4" x 3/4" x 3" | (birch) Drawer stop latch |
2. Glue & Clamp Solid Wood Edging Pieces To Plywood
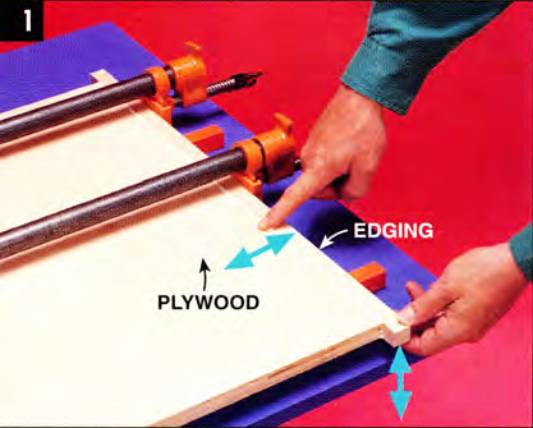
Glue and clamp the edging pieces T to the top and bottom edges of the sides, front and back (B and D), and to the sides of the top (C).
Before you assemble the box, there’s a lot of edge-gluing to do. Here’s how I like to do it:
- Cut the edging pieces so they're about 1/32 in. thicker and 1 in. longer than the plywood.
- Attach one edging piece at a time.
- Apply a bead of glue (about 1/8 in. dia.) near each edge of the piece being attached.
- Then align and clamp it to one end of the plywood piece.
- Put another clamp 4 to 6 in. away from the first clamp and apply a little pressure.
- Put your finger over the joint near the clamp.
- Grab the other end of the edging piece with your other hand.
- Move the end up or down until you feel with your finger that the edging piece is aligned with each face of the plywood, allowing for a little overhang, then tighten the clamp.
- Continue doing this all the way down the length of the edging piece.
- Dampen a rag with hot water, and wipe off the oozed-out glue.
- Let the glue joint dry, then attach the opposite edging piece.
- Trim off the overhanging ends, and attach the remaining edging pieces to the plywood.
- Use a 150-grit belt with your belt sander to sand the edging pieces flush with the plywood. Be careful; the plywood's veneer is very thin, and it's easy to sand right through it. To prevent this, draw zigzag pencil lines over the joints, and sand just until the lines disappear, or become faint.
- If you've never done this before, practice on a scrap first.
Trim off the overhanging ends, then glue and clamp the remaining edging pieces to the sides (B) and top (C).
Also, glue and clamp the top front (M) to the top. Then draw a pencil line even with the edge of the plywood and trim off the overhanging ends with your jigsaw.
Tip: Use only one bead of glue (about 1/8 in. dia.) near the outside edge of the joint when gluing the sides to the front and back. This will reduce the amount of glue that will ooze out on the inside corners when you clamp the pieces.
3. Sand Edging Pieces Flush
Use a belt sander with a 150-grit sanding belt to sand the edging pieces flush with the faces of the plywood.
4. Finish-Sand Inside Surfaces
Use an orbital sander to finish-sand the inside surfaces of the sides, front, back and top.
Start with 150-grit sandpaper, then use 180-grit.
5. Glue & Clamp Back, Lower Back, And Front To One Side
Glue and clamp the back (D), lower back (N). and front (B) to one side.
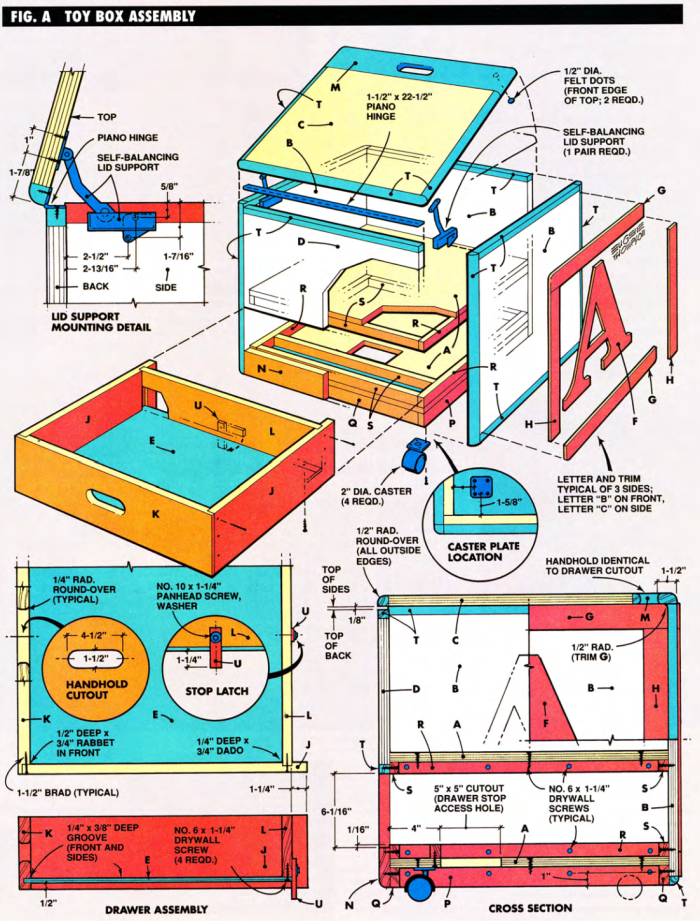
Make sure the top edge of the back is 1/8 in. below the top edge of the side, and that the drawer opening is 6 in. wide as shown in Fig. A.
After the glue is dry, glue, and clamp the other side in place.
6. Mark Location Of Drawer Stop Access
Mark the location of the drawer stop access hole in the lower bottom (A) and cut it out with a jigsaw.
7. Lay Out, Countersink, and Drill
Layout, countersink, and drill all the drywall screw holes in the bottoms (A), drawer bottom (E), cleats (P and Q), drawer runners (R and S) and drawer stop latch (U).
8. Mount The Lower Bottom
Mount the lower bottom next.
Start by trimming the width of the cleats (P and Q) so they’re equal to 2-1/4 in. minus the thickness of the lower bottom (see Fig. A).
Glue and screw the pieces to the inside of the box in this order: cleats (P) to the sides, cleats (Q) to the front and back, lower bottom (A) to cleats (P and Q), lower drawer runners (R) to the sides, lower drawer runners (S) to the front and back, and finally, the drawer stop (S) to the lower bottom (A).
9. Mount Upper Bottom
Mount the upper bottom next.
Glue and screw the upper drawer runners (R and S) in place (Photo 2).
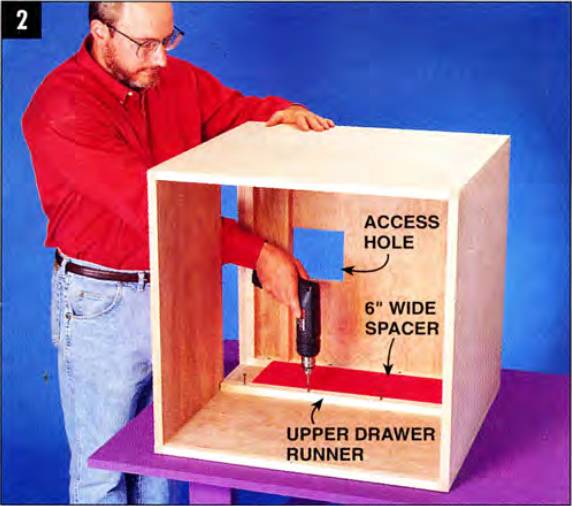
Use a 6-in. x 20-in. piece of 3/4-in. thick scrap plywood as a spacer to align the upper drawer runners as you glue and screw them to the box.
Finish-sand the top of the upper bottom, then glue and screw it to the upper drawer runners.
10. Mounting The Piano Hinge
This wouldn’t be much of a problem if we had mounted the hinge with the flaps on the outside of the top and box. But although it’s trickier, mounting the piano hinge so the flaps are concealed when the top is closed looks much neater. Here’s how.
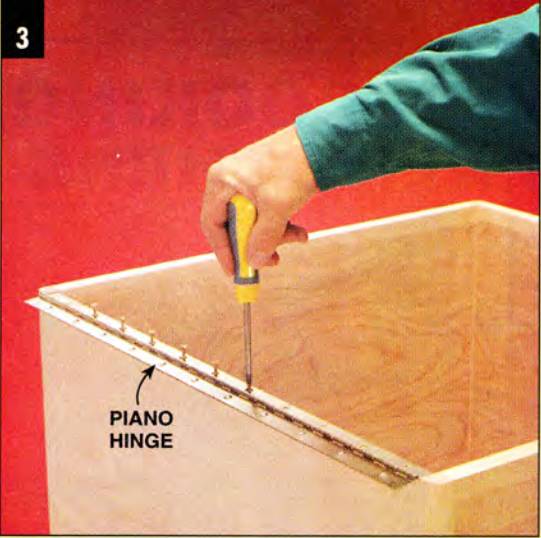
Use a hacksaw to cut the piano hinge to length so it fits on the top edge of the back. Smooth both ends of the hinge with a fine metal file.
Then, align the hinge so the bottoms of the hinge knuckle openings are flush with the outside edge of the back. Drill pilot holes, then screw the hinge in place (Photo 3).
Now it is time to screw the hinge to the top next (Photo 4).
When mounted properly, the edge of the top will slightly overhang the sides and front of the box. You’ll trim off these overhanging edges later.
Cut two 7/8-in. tall x 26-in. long riser blocks from scrap wood. Set the back of the box on the riser blocks and slide the top under the hinge.
Visually align the sides of the hinge. Visually align the sides of the top with the sides of the box, and the bottoms of the hinge knuckle openings with the back edge of the top.
Drill a pilot hole and insert a screw at one end of the hinge. Close the top and check its alignment. If it needs adjusting, remove the screw, adjust the top and insert a screw in the next hole.
When you get that side aligned, do the other side. Fill any unused screw holes with short pieces of toothpicks and glue. Then insert the rest of the hinge screws.
11. Round The Corners Of The Top
Clamp the top down to the box.
Using a router and a flush-trimming bit, trim off the edges of the top that over-hang the sides and front. Remove the piano hinge because it will interfere with routing the back edges. Then align and clamp the top to the box again, and round the top’s corners with a router and a 1/2-in. dia. round-over bit (Photo 5).
Remove the top and round over the outside edges of the top and box.
Round the corners of the top this way to avoid accidentally rounding over the bottom edges of the top, and to avoid tearing out the wood.
12. Layout & Cut Hand Holes
Layout and cut out the hand holes in the top front (M) and drawer front (IQ. Use a 1-1/2 in. dia. hole saw to cut open the ends of the hand holes for the lid and the drawer front.
Then use a file to smooth the sawn edges, then round over the edges with a router and a 1/4-in. round-over bit.
13. Making The Drawers
Cut the rabbets and dado grooves in the drawer sides (J) and front (K).
Finish-sand the insides of the drawer sides, front and back, then glue and clamp the pieces together.
Drill pilot holes and hammer in the 1-1/2 in. brads, then fill the brad holes with putty, and finish-sand the rest of the drawer.
Don’t put the drawer bottom in just yet, because you’ll want to apply the finish before you attach it.
14. Round-Overs & Smoothing The Edges
Shaping the rounded corners of the letter frame tops and bottoms would take a lot of time if you did them individually. “Gang” routing them is quick, and all of the pieces end up exactly the same shape.
Align and sandwich the hardboard pieces between two pieces of scrap wood cut the same size as the hardboard pieces.
Then clamp the whole thing to your work table and rout the frame ends all at once using a 1/2-in. dia. round-over bit.
Round the outside corners of the letter frame tops and bottoms (G), as shown in Photo 6.
Transfer and enlarge the letter shapes from our grids in Fig. B to your pieces of hardboard.
Cut out the letters (Photo 7).
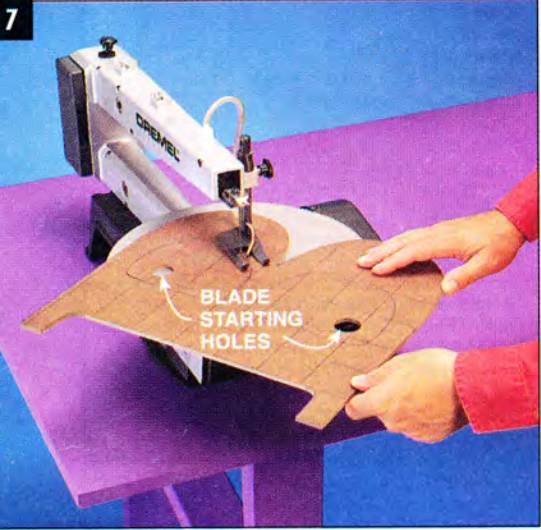
Cut out the shapes of the letters using a scroll saw. Drill holes in the “A” and “B” to get the blade through to cut the inside shapes.
Now it is time to sand the sawn edges smooth (Photo 8).

Smooth the scroll-sawn edges of the letters with a drill press and a 1-in. dia. sanding drum.
15. Finish-Sanding
To make the toy box more user-friendly, finish-sand the letter surfaces and all of the exposed sharp edges.
16. Prepare For Painting
Don’t paint the underside of the letters and frames because you’ll need to apply glue to them later.
Align the letter frame pieces and letters on the box and trace around them with a pencil.
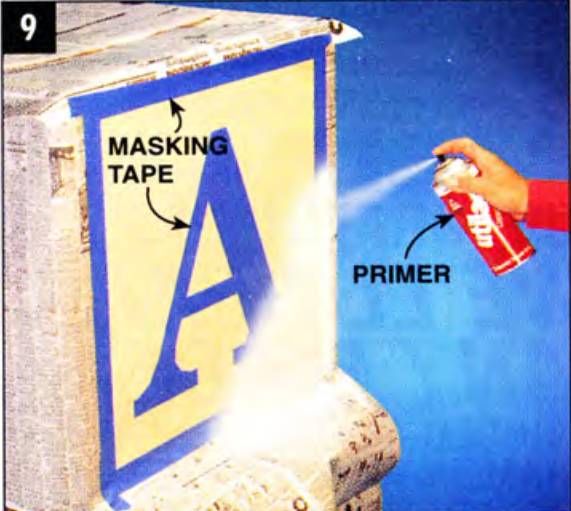
Cover the areas inside the letter tracings with masking tape about 1/4 in. in from the pencil lines.
Tip: Cover the letter and frame areas on the box with masking tape before spraying with primer. This ensures that the glue will bond the hardboard letters and frame pieces to the plywood sides and back.
Use newspaper and masking tape to cover the other unpainted surfaces of the box, then apply the spray primer (Photo 9).
Cover the unpainted birch surfaces with masking tape and newspaper. Apply the primer, let it dry, then apply the white enamel. For an even more colorful toy box, you can vary the color scheme for each lettered side.
Apply the primer to the tops and edges of the letters and letter frame pieces too. Apply at least two coats to the hardboard edges because they really soak up the primer.
17. Spray Painting & Assembly
Apply the white spray enamel to the box once the primer has dried, then spray the red enamel on the letters and letter frame pieces. When the spray paint is dry, remove all of the masking tape and newspaper.
Now, align and glue the letter frames and letters on the box. Do one side at a time with the side you’re working on facing up. Apply glue to the back of one letter frame top piece. Align it and press it in place with your hands; no clamping is necessary.
Attach the other three frame pieces, then glue the letter to the box. Let the glue dry, then do the other letter frames and letters the same way, one side at a time.
18. Apply Finishing
Brush two coats of polyurethane on all the unpainted birch surfaces and let it dry. Next, apply the spray polyurethane to the painted surfaces. Do one side face up at a time.
Let the finish dry before doing the next side. Spray light coats of the finish to avoid drips. Let the finish cure for at least one week before using the project.
19. Mount Casters & Lid Supports
Mount the casters to the bottom.
Remount the top and mount the lid supports, using the lid support mounting dimensions given in Fig. A to prevent pinched fingers. Adjust the tension of the lid supports so they hold the top open in any position.
Stick felt dots on the front corners of the top.
Tip: To help make this toy storage box safe, use the type of lid supports displayed in the photos. These self-balancing lid supports keep the top open in any position to prevent entrapment, and help protect little fingers as well.
20. Mount The Drawer
Mount the drawer bottom and drawer stop. Rub a little paraffin on the drawer runners for a smooth-running drawer.
Now, insert the drawer in its opening, reach underneath and through the access hole, and turn the drawer stop latch down so it hits the drawer stop.
Now you’re ready to start picking up the toys.
Shopping List
| ITEM | QTY |
|---|---|
| 1x6 birch | 15 board ft. |
| 3/4" x 48" x 96" birch plywood | 1 sheet |
| 1/4" x 24" x 96" birch plywood | 1 sheet |
| No. 6 x 1-1/4" drywall screws | 79 |
| 1-1/2" brad | 12 |
| 2" diam. casters | 4 |
| 1-1/2" x 36" brushed brass piano hinge | 1 |
| Self-balancing llid supports | 1 pair |
| 1/2" diam. felt dots | 2 |
| Spray primer | 2 cans |
| Red spray enamel | 1 can |
| White spray enamel | 1 can |
| Polyurethane clear satin finish | 1 pint |
| Polyurethane clear satin spray finish | 1 can |
| 1" diam. drum sander w/ 80-grit sanding sleeves | 1 |
Wow, a giant building block that rolls and has a drawer too! Not that your kids or grandkids will actually put their toys away, but with a storage box like this to tempt them, who knows what miracles might happen!
This is a fun project to build, but it does take some time and effort to get it to look really good. To make it user-friendly, it features rounded corners, self-balancing lid supports and an easy-on-the-fingers drawer that won’t slam shut.
Building this project takes about three weekends. All the hardware used is available online.
Tools Needed
You’ll need:
- a portable table saw or a hybrid table saw and dado blade,
- a router and a 1/4-in. dia. round-over bit, a 1/2-in. dia. round-over bit, and a 3/4-in. long flush-trimming bit,
- a belt sander and a 150-grit sanding belt,
- an random orbit sander,
- a drill/driver,
- a jigsaw,
- a hacksaw, and
- at least four 30-in. or longer bar or pipe clamps.
You will see pictures of a scroll saw to cut out the letters. But you can use a jigsaw too.
This project also uses a drill press and a 1-in. dia. sanding drum to smooth the sawn edges of the letters. A simple replacement is an ordinary electric drill to do the job. Or, obviously, an oscillating spindle sander.
Step-By-Step Instructions
1. Cut All Pieces
Cut all the pieces, A through U, to the dimensions given in the Cutting List below:
| KEY | PCS. | SIZE | DESCRIPTION |
|---|---|---|---|
| A | 2 | 3/4" x 22-1/2" x 22-1/2" | (birch plywood) Bottoms |
| B | 3 | 3/4" x 22-3/4" x 22-1/2" | (birch plywood) Sides and front |
| C | 1 | 3/4" x 19-3/4" x 22-1/2" | (birch plywood) Top |
| D | 1 | 3/4" x 12-3/8" x 22-1/2" | (birch plywood) Back |
| E | 1 | 1/4" x 21-5/8" x 21-5/8" | (hardboard) Drawer bottom |
| F | 3 | 1/4" x 16" x 16" | (hardboard) Letters |
| G | 6 | 1/4" x 2" x 22-1/2" | (hardboard) Letter frame tops & bottoms |
| H | 6 | 1/4" x 2" x 18-1/2" | (hardboard) Letter frame sides |
| J | 2 | 3/4" x 5-15/16" x 23" | (birch) Drawer sides |
| K | 1 | 3/4" x 5-15/16" x 22-3/8" | (birch) Drawer front |
| L | 1 | 3/4" x 5-3/16" x 21-3/8" | (birch) Drawer back |
| M | 1 | 3/4" x 3-9/16" x 24-1/2" | (birch) Top front* |
| N | 1 | 3/4" x 3-3/16" x 22-1/2" | (birch) Lower back |
| P | 2 | 3/4" x 1-9/16" x 22-1/2" | (birch) Cleats* |
| Q | 2 | 3/4" x 1-9/16" x 21" | (birch) Cleats* |
| R | 4 | 3/4" x 1" x 22-1/2" | (birch) Drawer runners |
| S | 5 | 3/4" x 1" x 21" | (birch) Drawer runners & drawer stop |
| T | 15 | 3/4" x 3/4" x 24-1/2" | (birch) Edging* |
| U | 1 | 1/4" x 3/4" x 3" | (birch) Drawer stop latch |
2. Glue & Clamp Solid Wood Edging Pieces To Plywood
Glue and clamp the edging pieces T to the top and bottom edges of the sides, front and back (B and D), and to the sides of the top (C).
Before you assemble the box, there’s a lot of edge-gluing to do. Here’s how I like to do it:
- Cut the edging pieces so they're about 1/32 in. thicker and 1 in. longer than the plywood.
- Attach one edging piece at a time.
- Apply a bead of glue (about 1/8 in. dia.) near each edge of the piece being attached.
- Then align and clamp it to one end of the plywood piece.
- Put another clamp 4 to 6 in. away from the first clamp and apply a little pressure.
- Put your finger over the joint near the clamp.
- Grab the other end of the edging piece with your other hand.
- Move the end up or down until you feel with your finger that the edging piece is aligned with each face of the plywood, allowing for a little overhang, then tighten the clamp.
- Continue doing this all the way down the length of the edging piece.
- Dampen a rag with hot water, and wipe off the oozed-out glue.
- Let the glue joint dry, then attach the opposite edging piece.
- Trim off the overhanging ends, and attach the remaining edging pieces to the plywood.
- Use a 150-grit belt with your belt sander to sand the edging pieces flush with the plywood. Be careful; the plywood's veneer is very thin, and it's easy to sand right through it. To prevent this, draw zigzag pencil lines over the joints, and sand just until the lines disappear, or become faint.
- If you've never done this before, practice on a scrap first.
Trim off the overhanging ends, then glue and clamp the remaining edging pieces to the sides (B) and top (C).
Also, glue and clamp the top front (M) to the top. Then draw a pencil line even with the edge of the plywood and trim off the overhanging ends with your jigsaw.
Tip: Use only one bead of glue (about 1/8 in. dia.) near the outside edge of the joint when gluing the sides to the front and back. This will reduce the amount of glue that will ooze out on the inside corners when you clamp the pieces.
3. Sand Edging Pieces Flush
Use a belt sander with a 150-grit sanding belt to sand the edging pieces flush with the faces of the plywood.
4. Finish-Sand Inside Surfaces
Use an orbital sander to finish-sand the inside surfaces of the sides, front, back and top.
Start with 150-grit sandpaper, then use 180-grit.
5. Glue & Clamp Back, Lower Back, And Front To One Side
Glue and clamp the back (D), lower back (N). and front (B) to one side.
Make sure the top edge of the back is 1/8 in. below the top edge of the side, and that the drawer opening is 6 in. wide as shown in Fig. A.
After the glue is dry, glue, and clamp the other side in place.
6. Mark Location Of Drawer Stop Access
Mark the location of the drawer stop access hole in the lower bottom (A) and cut it out with a jigsaw.
7. Lay Out, Countersink, and Drill
Layout, countersink, and drill all the drywall screw holes in the bottoms (A), drawer bottom (E), cleats (P and Q), drawer runners (R and S) and drawer stop latch (U).
8. Mount The Lower Bottom
Mount the lower bottom next.
Start by trimming the width of the cleats (P and Q) so they’re equal to 2-1/4 in. minus the thickness of the lower bottom (see Fig. A).
Glue and screw the pieces to the inside of the box in this order: cleats (P) to the sides, cleats (Q) to the front and back, lower bottom (A) to cleats (P and Q), lower drawer runners (R) to the sides, lower drawer runners (S) to the front and back, and finally, the drawer stop (S) to the lower bottom (A).
9. Mount Upper Bottom
Mount the upper bottom next.
Glue and screw the upper drawer runners (R and S) in place (Photo 2).
Use a 6-in. x 20-in. piece of 3/4-in. thick scrap plywood as a spacer to align the upper drawer runners as you glue and screw them to the box.
Finish-sand the top of the upper bottom, then glue and screw it to the upper drawer runners.
10. Mounting The Piano Hinge
This wouldn’t be much of a problem if we had mounted the hinge with the flaps on the outside of the top and box. But although it’s trickier, mounting the piano hinge so the flaps are concealed when the top is closed looks much neater. Here’s how.
Use a hacksaw to cut the piano hinge to length so it fits on the top edge of the back. Smooth both ends of the hinge with a fine metal file.
Then, align the hinge so the bottoms of the hinge knuckle openings are flush with the outside edge of the back. Drill pilot holes, then screw the hinge in place (Photo 3).
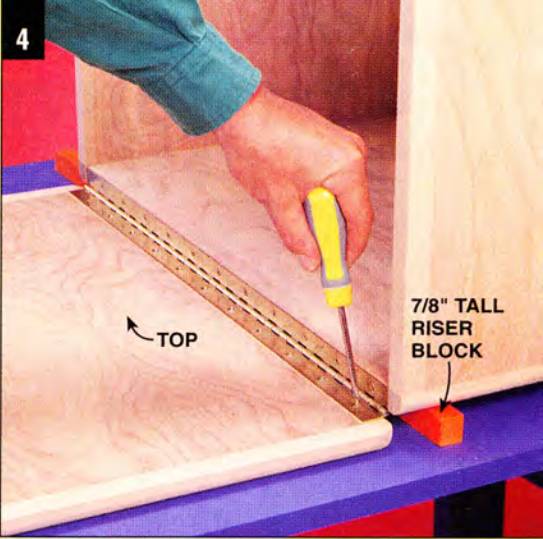
Now it is time to screw the hinge to the top next (Photo 4).
When mounted properly, the edge of the top will slightly overhang the sides and front of the box. You’ll trim off these overhanging edges later.
Cut two 7/8-in. tall x 26-in. long riser blocks from scrap wood. Set the back of the box on the riser blocks and slide the top under the hinge.
Visually align the sides of the hinge. Visually align the sides of the top with the sides of the box, and the bottoms of the hinge knuckle openings with the back edge of the top.
Drill a pilot hole and insert a screw at one end of the hinge. Close the top and check its alignment. If it needs adjusting, remove the screw, adjust the top and insert a screw in the next hole.
When you get that side aligned, do the other side. Fill any unused screw holes with short pieces of toothpicks and glue. Then insert the rest of the hinge screws.
11. Round The Corners Of The Top
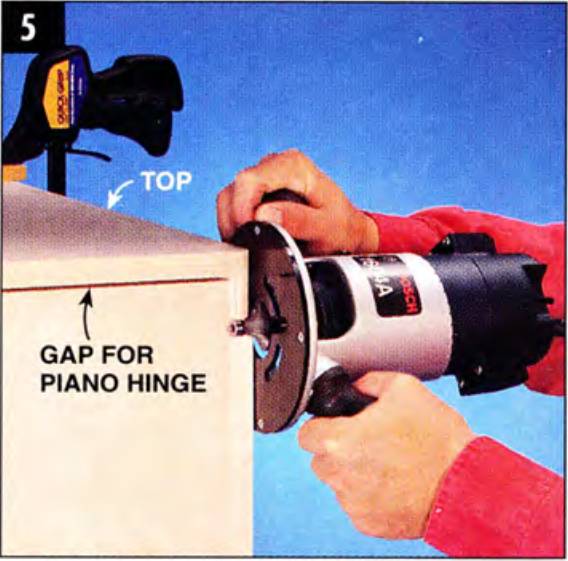
Clamp the top down to the box.
Using a router and a flush-trimming bit, trim off the edges of the top that over-hang the sides and front. Remove the piano hinge because it will interfere with routing the back edges. Then align and clamp the top to the box again, and round the top’s corners with a router and a 1/2-in. dia. round-over bit (Photo 5).
Remove the top and round over the outside edges of the top and box.
Round the corners of the top this way to avoid accidentally rounding over the bottom edges of the top, and to avoid tearing out the wood.
12. Layout & Cut Hand Holes
Layout and cut out the hand holes in the top front (M) and drawer front (IQ. Use a 1-1/2 in. dia. hole saw to cut open the ends of the hand holes for the lid and the drawer front.
Then use a file to smooth the sawn edges, then round over the edges with a router and a 1/4-in. round-over bit.
13. Making The Drawers
Cut the rabbets and dado grooves in the drawer sides (J) and front (K).
Finish-sand the insides of the drawer sides, front and back, then glue and clamp the pieces together.
Drill pilot holes and hammer in the 1-1/2 in. brads, then fill the brad holes with putty, and finish-sand the rest of the drawer.
Don’t put the drawer bottom in just yet, because you’ll want to apply the finish before you attach it.
14. Round-Overs & Smoothing The Edges
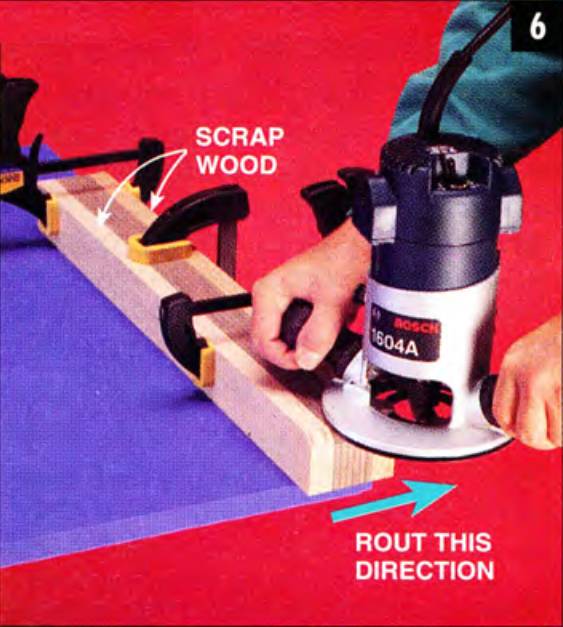
Shaping the rounded corners of the letter frame tops and bottoms would take a lot of time if you did them individually. “Gang” routing them is quick, and all of the pieces end up exactly the same shape.
Align and sandwich the hardboard pieces between two pieces of scrap wood cut the same size as the hardboard pieces.
Then clamp the whole thing to your work table and rout the frame ends all at once using a 1/2-in. dia. round-over bit.
Round the outside corners of the letter frame tops and bottoms (G), as shown in Photo 6.
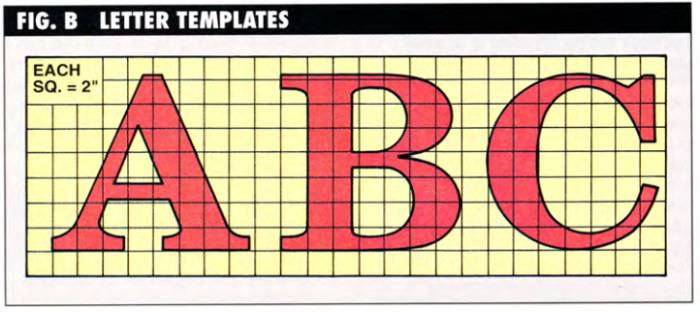
Transfer and enlarge the letter shapes from our grids in Fig. B to your pieces of hardboard.
Cut out the letters (Photo 7).
Cut out the shapes of the letters using a scroll saw. Drill holes in the “A” and “B” to get the blade through to cut the inside shapes.
Now it is time to sand the sawn edges smooth (Photo 8).
Smooth the scroll-sawn edges of the letters with a drill press and a 1-in. dia. sanding drum.
15. Finish-Sanding
To make the toy box more user-friendly, finish-sand the letter surfaces and all of the exposed sharp edges.
16. Prepare For Painting
Don’t paint the underside of the letters and frames because you’ll need to apply glue to them later.
Align the letter frame pieces and letters on the box and trace around them with a pencil.
Cover the areas inside the letter tracings with masking tape about 1/4 in. in from the pencil lines.
Tip: Cover the letter and frame areas on the box with masking tape before spraying with primer. This ensures that the glue will bond the hardboard letters and frame pieces to the plywood sides and back.
Use newspaper and masking tape to cover the other unpainted surfaces of the box, then apply the spray primer (Photo 9).
Cover the unpainted birch surfaces with masking tape and newspaper. Apply the primer, let it dry, then apply the white enamel. For an even more colorful toy box, you can vary the color scheme for each lettered side.
Apply the primer to the tops and edges of the letters and letter frame pieces too. Apply at least two coats to the hardboard edges because they really soak up the primer.
17. Spray Painting & Assembly
Apply the white spray enamel to the box once the primer has dried, then spray the red enamel on the letters and letter frame pieces. When the spray paint is dry, remove all of the masking tape and newspaper.
Now, align and glue the letter frames and letters on the box. Do one side at a time with the side you’re working on facing up. Apply glue to the back of one letter frame top piece. Align it and press it in place with your hands; no clamping is necessary.
Attach the other three frame pieces, then glue the letter to the box. Let the glue dry, then do the other letter frames and letters the same way, one side at a time.
18. Apply Finishing
Brush two coats of polyurethane on all the unpainted birch surfaces and let it dry. Next, apply the spray polyurethane to the painted surfaces. Do one side face up at a time.
Let the finish dry before doing the next side. Spray light coats of the finish to avoid drips. Let the finish cure for at least one week before using the project.
19. Mount Casters & Lid Supports
Mount the casters to the bottom.
Remount the top and mount the lid supports, using the lid support mounting dimensions given in Fig. A to prevent pinched fingers. Adjust the tension of the lid supports so they hold the top open in any position.
Stick felt dots on the front corners of the top.
Tip: To help make this toy storage box safe, use the type of lid supports displayed in the photos. These self-balancing lid supports keep the top open in any position to prevent entrapment, and help protect little fingers as well.
20. Mount The Drawer
Mount the drawer bottom and drawer stop. Rub a little paraffin on the drawer runners for a smooth-running drawer.
Now, insert the drawer in its opening, reach underneath and through the access hole, and turn the drawer stop latch down so it hits the drawer stop.
Now you’re ready to start picking up the toys.
Shopping List
| ITEM | QTY |
|---|---|
| 1x6 birch | 15 board ft. |
| 3/4" x 48" x 96" birch plywood | 1 sheet |
| 1/4" x 24" x 96" birch plywood | 1 sheet |
| No. 6 x 1-1/4" drywall screws | 79 |
| 1-1/2" brad | 12 |
| 2" diam. casters | 4 |
| 1-1/2" x 36" brushed brass piano hinge | 1 |
| Self-balancing llid supports | 1 pair |
| 1/2" diam. felt dots | 2 |
| Spray primer | 2 cans |
| Red spray enamel | 1 can |
| White spray enamel | 1 can |
| Polyurethane clear satin finish | 1 pint |
| Polyurethane clear satin spray finish | 1 can |
| 1" diam. drum sander w/ 80-grit sanding sleeves | 1 |