
The Best Of Weekend Woodworking By Wood Magazine - 26 Selected Projects To Inspire You
Weekend Woodworking was a sister publication to Wood Magazine. During 9 years they have published projects that could be build using minimal tools, little time, and just a few materials.
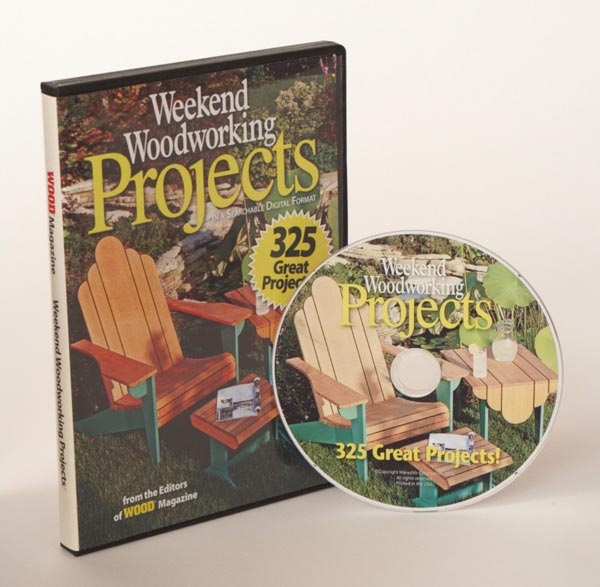
They have gathered all the issues, transformed them in PDF form, and released a DVD, which is available for sale at Amazon. I have these projects and I am showing the first page of my 26 favorite plans here, so you can have an idea of what you could expect if you bought this bundle.
Why 26? Oh, that is such a simple answer. 52 weeks, so half the time you are in your shop making dust, and half the time you are thinking about all the cool things you will build when you get back to it!
High-Rise Basket – #05, page 12
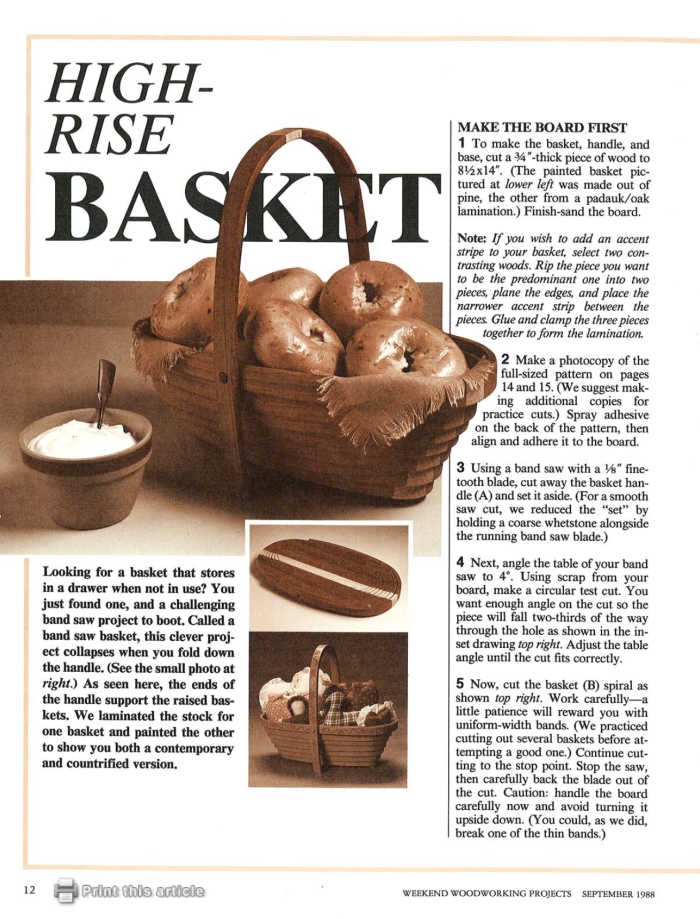
Most people call it a collapsible basket, but some people also refer to it as a bandsaw basket, or a scroll saw basket – referring to the power tools used to make this basket.
No matter if you prefer potaytos or potahtos, it is hard to ignore the beauty and the practicality of the basket – after all, you can store it flat for storage by simply folding down the handle. You can also use it as a trivet or hang it on your wall as décor.
You can use a collapsible wooden basket at your home, campsite, RV, you name it. You can serve bread at your dinner table (or tailgating, camping, boating, picnicking), use it as a fruit basket,
All these uses are strong reasons that make this basket a great gift for friends and family alike.
Other than the tools themselves, remember you might need a special blade for the curved sections.
As for the woods you need, you have plenty of freedom in that department, because you can simply laminate a bunch of scraps together and make your own board. As a bonus, you reduce clutter and clean up your shop in the process.
Armored-Car Bank – #08, page 14
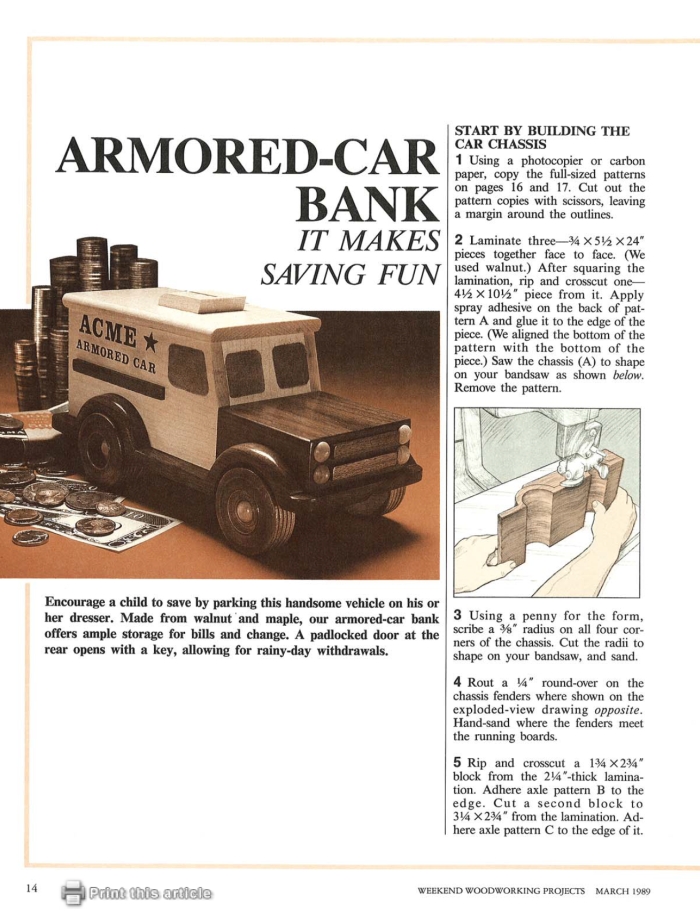
This is a super cool twist to the classic piggy bank. Saving money and financial responsibility are healthy habits that can be encouraged by simple actions.
While a Chinese piggy bank made of plastic can also achieve the same goal, a handcrafted toy made of wood can potentially become a family heirloom to be appreciated for many years to come.
Hot-Shot Clothes Tree – #15, page 18
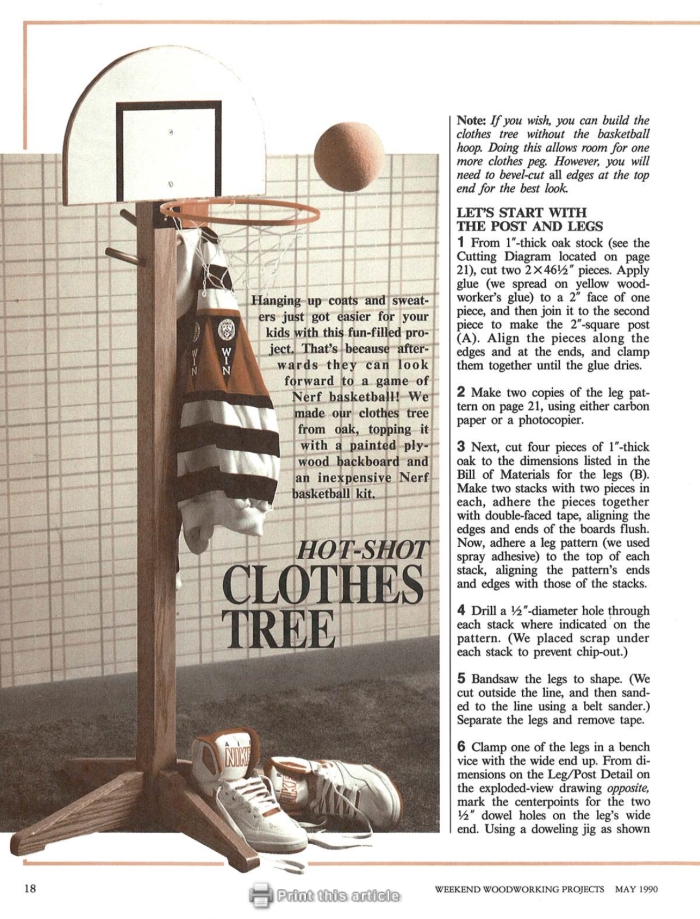
This is another twist on a classic piece of furniture, this time it is the clothes tree with an inexpensive Nerf basketball kit. What I like the most about this project is how it can positively reinforce simple organization in your kid’s room, and tie it up with playing sports – much better than staying stuck the entire day on online games such as Fortnite.
This project uses oak for the post and plywood for the backboard. You will need a bandsaw to cut the legs to rough shape, a belt sander or a disc sander to sand them to the line, a doweling jig and a drill to attach the legs to the post, and a router to chamfer the post. For the plywood backboard, you can either repeat the bandsaw cutting and the belt sander to final shape the accurate lines or use a router jig and a stop block to create the half-circle shape for the backboard.
Alpine-Ride Action Toy – #16, page 10 & #19, page 28
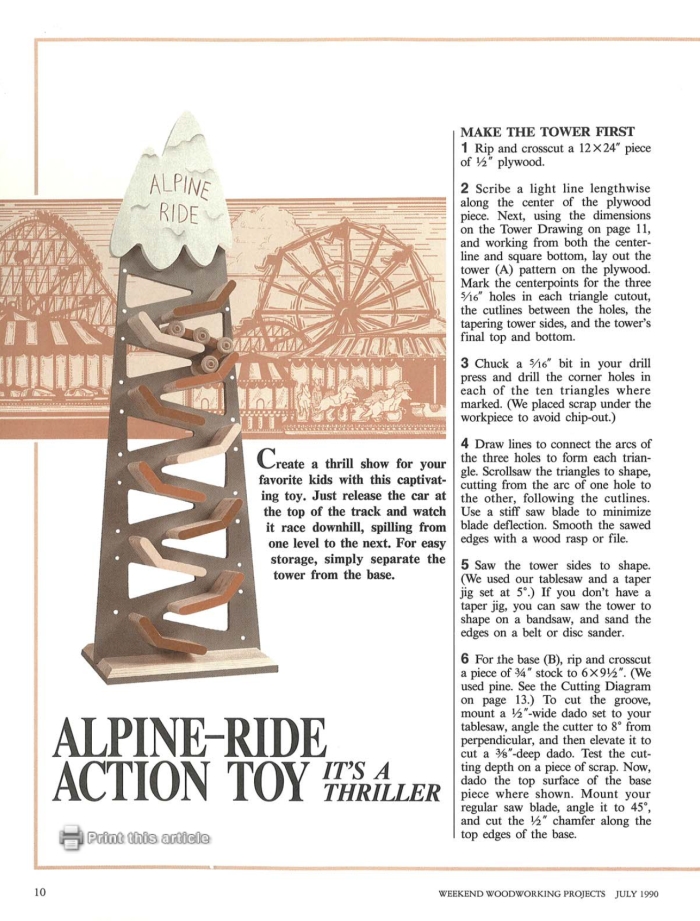
Some people also refer to this toy as a click clack track, wooden vertical track, zig-zag racing set, or even as wooden ramp racer cars. There is something special to such a simple idea that can hypnotize children for hours on end.
Made of fir plywood (1/2”) and pine, this is an easy project that you can store flat by simply separating the tower track and the base. Cut the plywood to size with a table saw and use a tapering jig for shaping the tower sides. You can cut the plywood holes with a scroll saw, or a jigsaw. The ramp pieces are assembled with a hot glue gun.
Make sure to follow the instructions on Weekend Woodworking #16, but get the revised dimensions from #19 on page 28.
King Arthur's Castle – #16, page 18
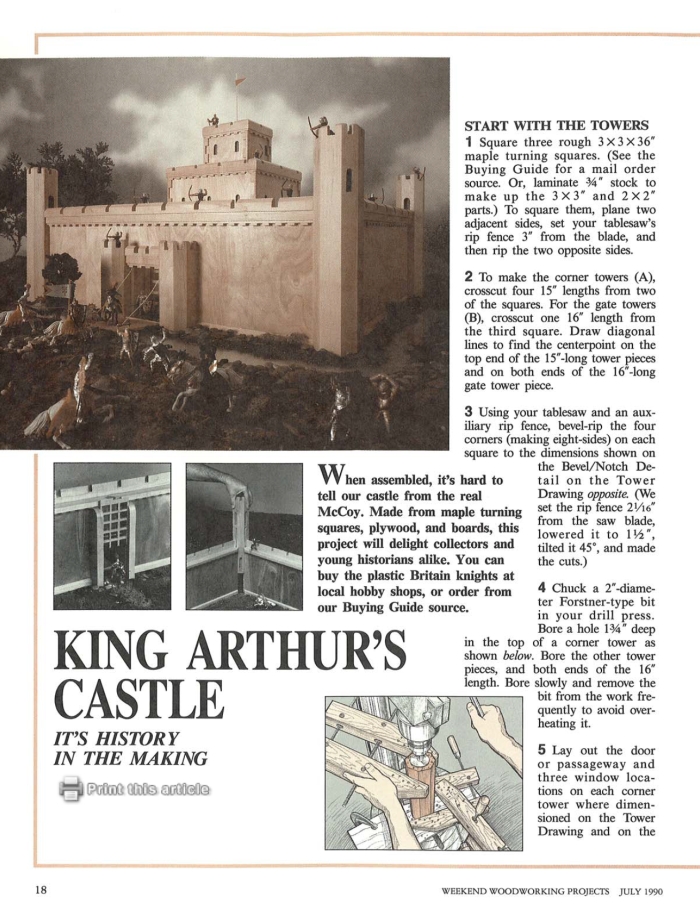
This is a project that makes for a great gift for collectors and History nuts – like myself.
The towers are made of maple turning squares, which you can also laminate from maple stock; the walls are made of maple plywood; and the gate parts, battlements, and drawbridge are made of maple boards.
And you know what is the coolest thing about this build article? The Toy Soldier Company is still in business and it is still owned by the same family since it began operating in 1984. Unfortunately, they do not have a retail store, but you can buy your toy soldiers online (NOT an affiliate link).
Crumb-Box Cutting Board – #16, page 28
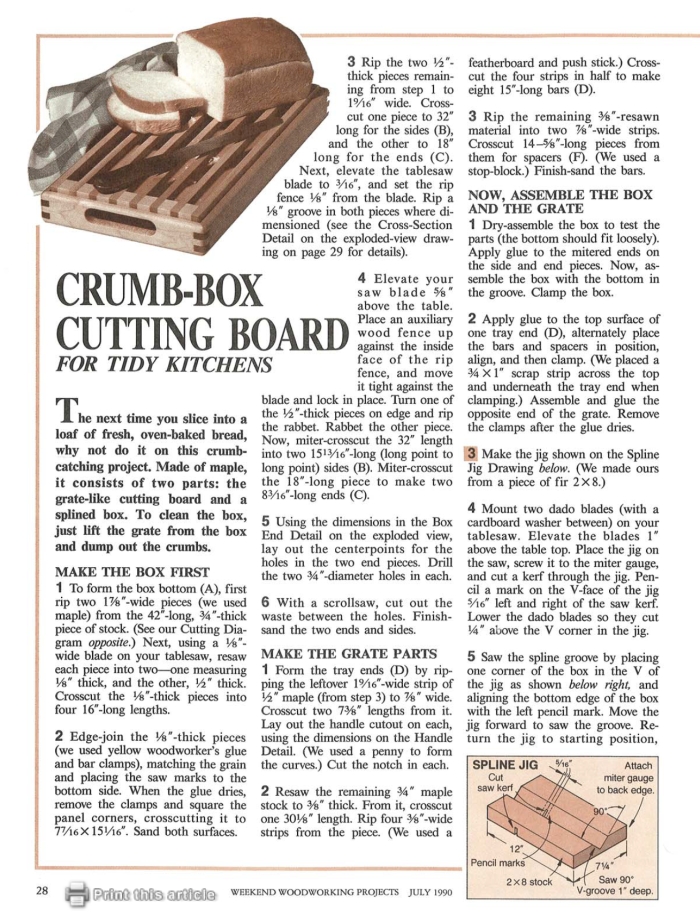
Build this project and be on the way to having a crumb-free kitchen countertop. This is a cutting board with a grate, with a splined box to catch crumbs. All parts can be made from one 1”x6” maple board, cherry for the splines, and finished with two coats of vegetable oil.
Big-League Organizer – #20, page 18
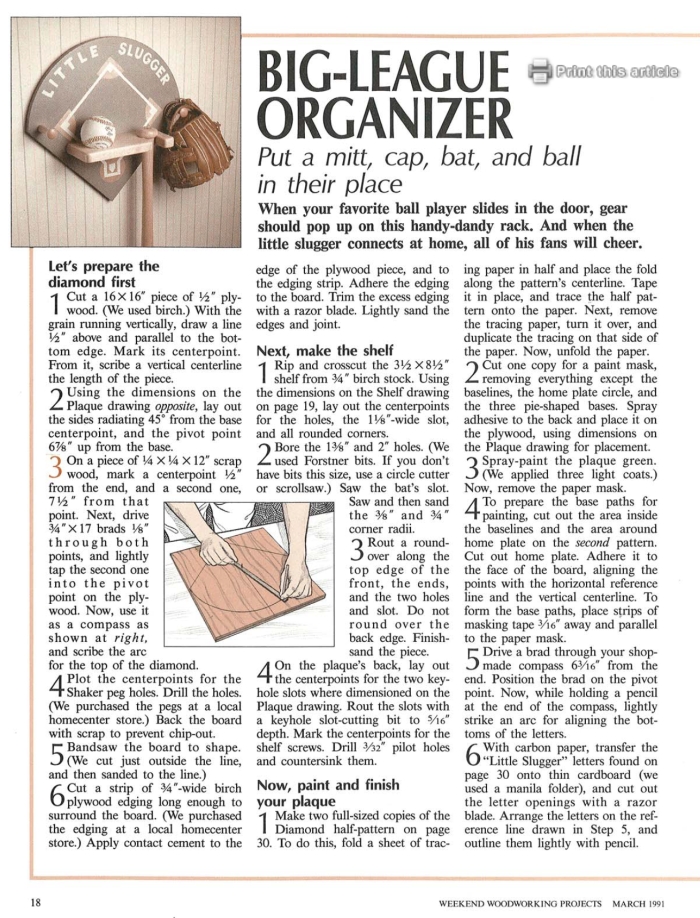
This is a wall rack for organizing your kid’s baseball gear – mitt, cap, bat, and ball. When everything has a place to go, it is easy and simple to keep a bedroom organized and instill good habits from a young age.
This project uses birch plywood for the diamond and birch stock for the shelf, as well a couple of Shaker pegs for the hooks – which can be easily found at any big box store.
Harbor Light – #21, page 10
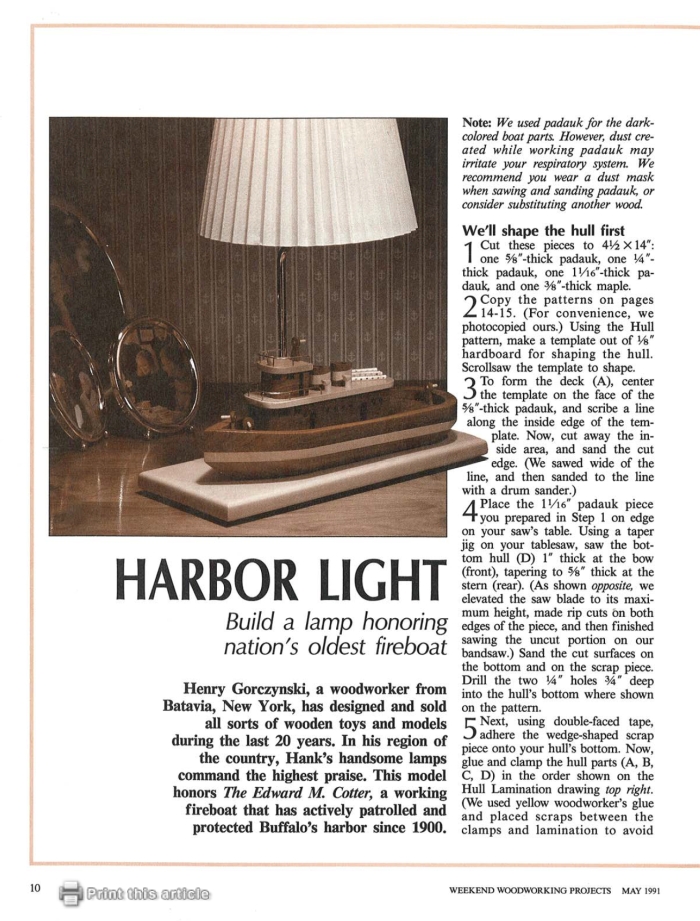
This is certainly a different build! This desk lamp is a model of The Edward M. Cotter, America’s oldest working fireboat, located in Buffalo’s harbor since 1900.
It is made of padauk and maple, so wearing a dust mask is a must when sawing and sanding parts because padauk might irritate your respiratory system.
Toddler Town Car – #21, page 20
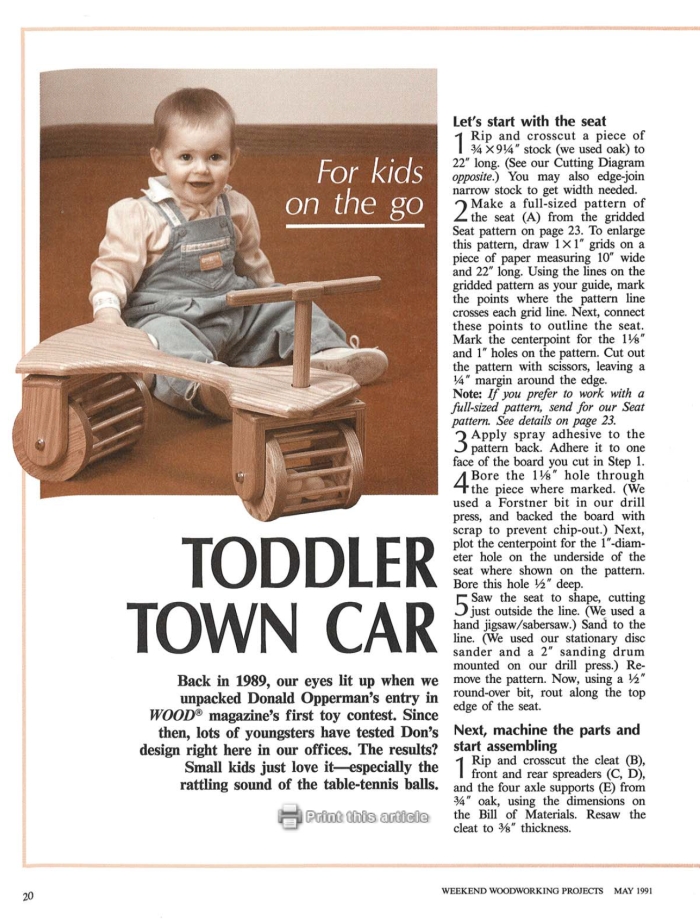
As I mentioned previously, Weekend Woodworking was a sister to Wood Magazine. This project comes from an entry made to Wood Magazine’s first toy contest, 30 (!!) years ago.
Young children will love this project, especially the rattling sound coming from the 10 ping-pong balls inside the wheels. All parts are made of oak – one board measuring 3/4 x 9-1/4 x 48” for most parts and another board of 3/4 x 7-1/4 x 24” for the four wheels.
Shadow Box – #21, page 28
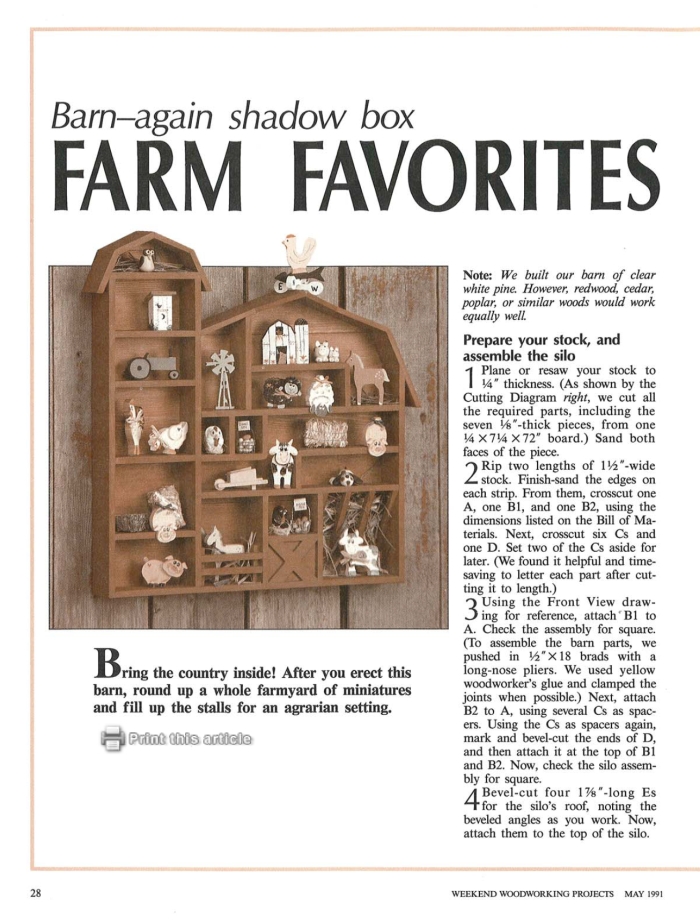
This shadow box is themed after a farm, with a silo and a barn. It is a nice project to teach city kids that the milk does not come from the supermarket – unfortunately, I actually heard a child asking that to her mother.
The entire project, including the back, was made from a single board of clear white pine, dimensions 1/4 x 7-1/4 x 72”, however, you can also use other woods such as redwood, cedar, poplar, and so on. You can make animals and props yourself or buy miniatures.
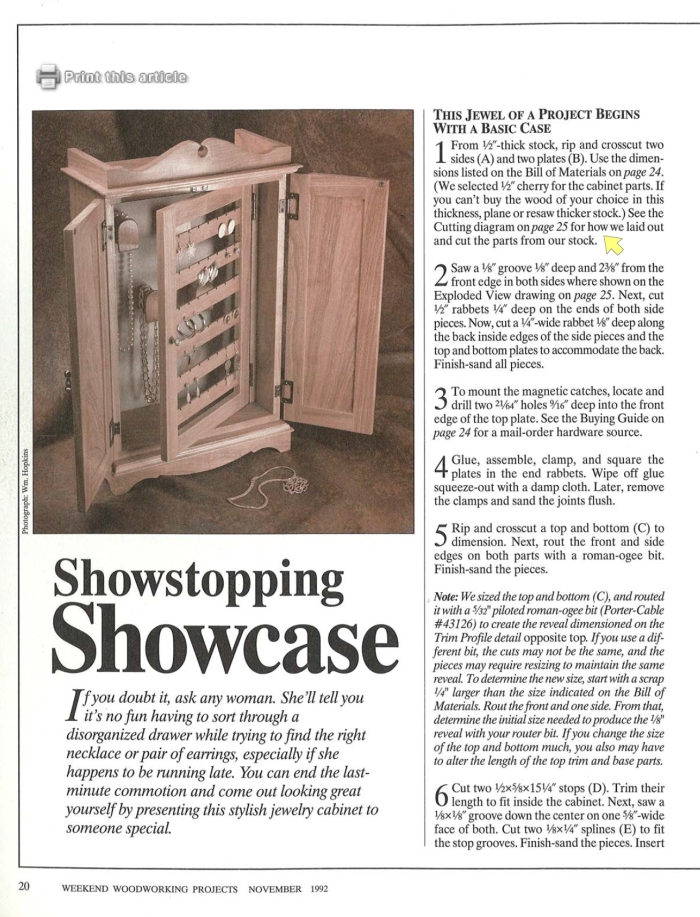
Jewelry Case – #22, page 24
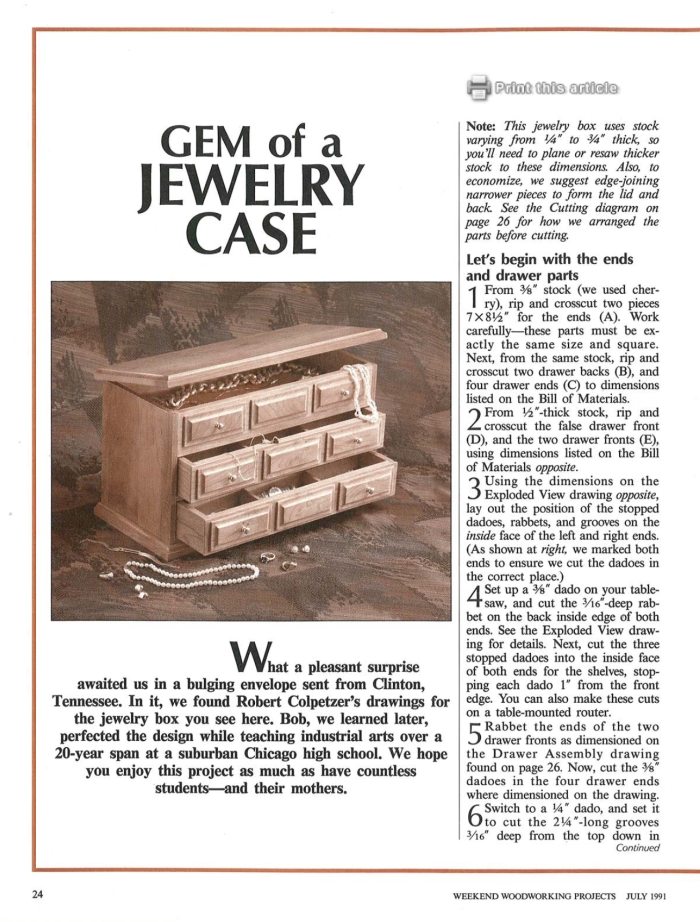
A reader sent this project to Weekend Woodworking. He was an industrial arts teacher in Chicago and perfected the design throughout 20 years of teaching it to his students.
The lid and the back being edge-jointed for saving some money on lumber. All parts are made of cherry, except the hardboard drawer bottoms. The box build instructions call for a table saw with dado blades and a router. The two hinges and the six knobs are made of brass.
One interesting finishing technique they teach in this article is how they use lye (sodium hydroxide) to bring out the reddish/brown cherry color, which is an interesting challenge by itself. Needless to say, it is a caustic product, so you need to read and follow carefully the container direction, as well as use proper eye protection, gloves, and clothing.
Aromatic Red Cedar Coat Hangers – #25, page 10
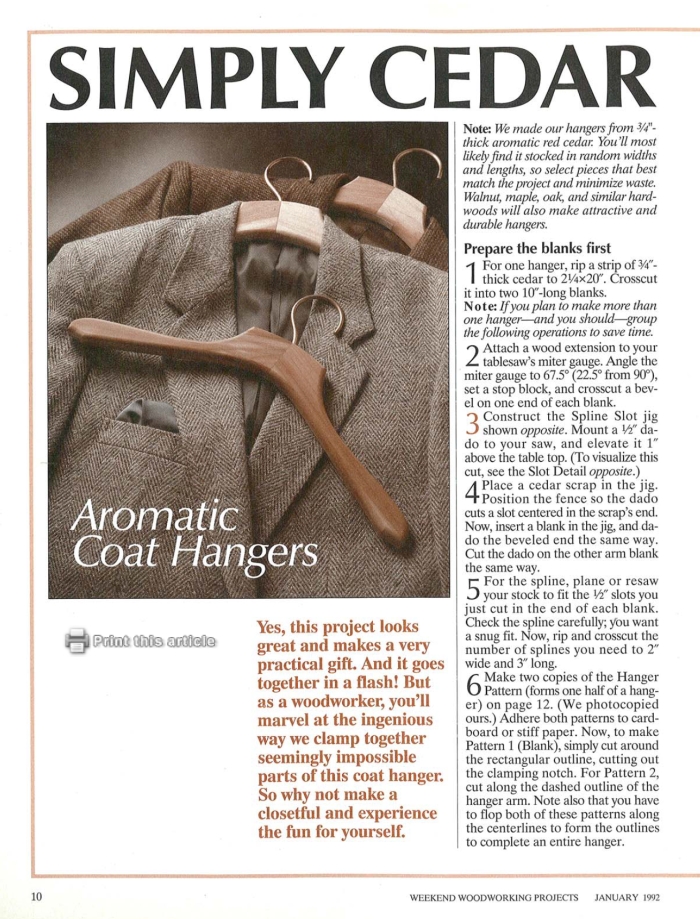
This is a practical gift that you can make by the dozens – simply group the operations. Cut your hanger blanks, make a dedicated jig for cutting the spline slot, cut your hook bending form, assemble, and you’re done!
Leave it unfinished if you want to preserve the cedar aroma, or apply something durable if you decide to use hardwoods such as walnut, maple, oak, and so on.
Organized-Cook's Companion – #26, page 22
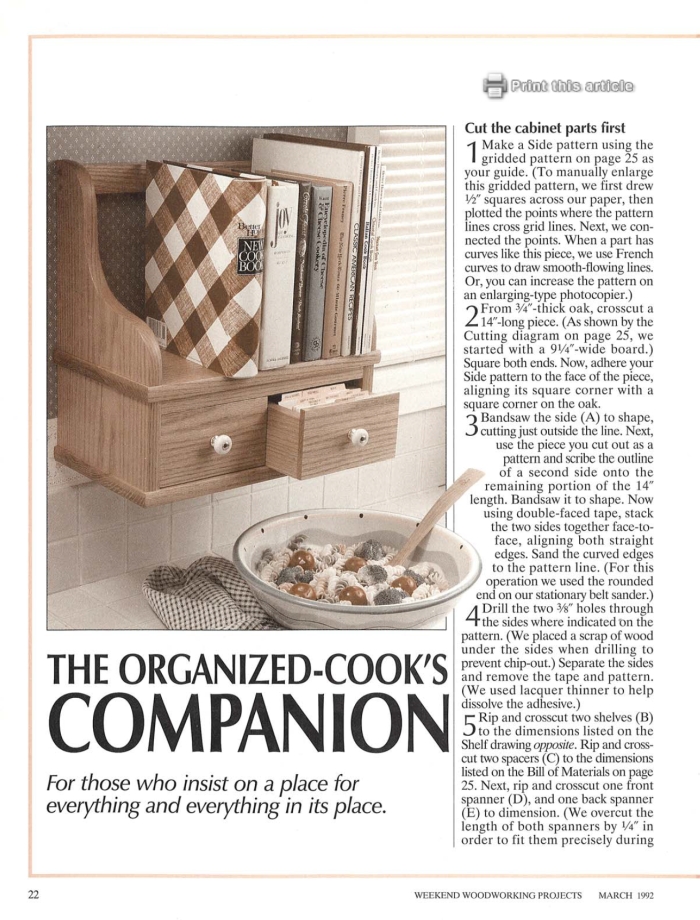
In simple English, this is a recipe box that is also a bookshelf and a decorative furniture piece for your kitchen.
What I really like about this project are the two drawers that make the recipe box. Whenever my grandma was given a new recipe, she always wrote the name of the person who gave her the recipe. My own twist is to have the person write the recipe as well, for two reasons:
- because I love seeing other people’s handwriting, just as much as I love listening to other people’s accents, and
- with mobile phones, texting, computers, emails, we simply don’t handwrite anything anymore, not even a paper note, and I think that makes the world a little poorer of personal experiences.
For me, having a recipe box with handwritten recipes is closer to my heart than simply going to YouTube and searching for a video recipe – although I have to admit that going to YouTube is faster and more convenient.
Anyways, back to the build - the entire project can be made with one board of oak, with dimensions of 3/4 x 9-1/4 x 96”. You will make the straight cuts on a table saw, the rough curved cuts on the bandsaw, and sand these to the line with a belt sander.
Classic Spool Rack – #29, page 6
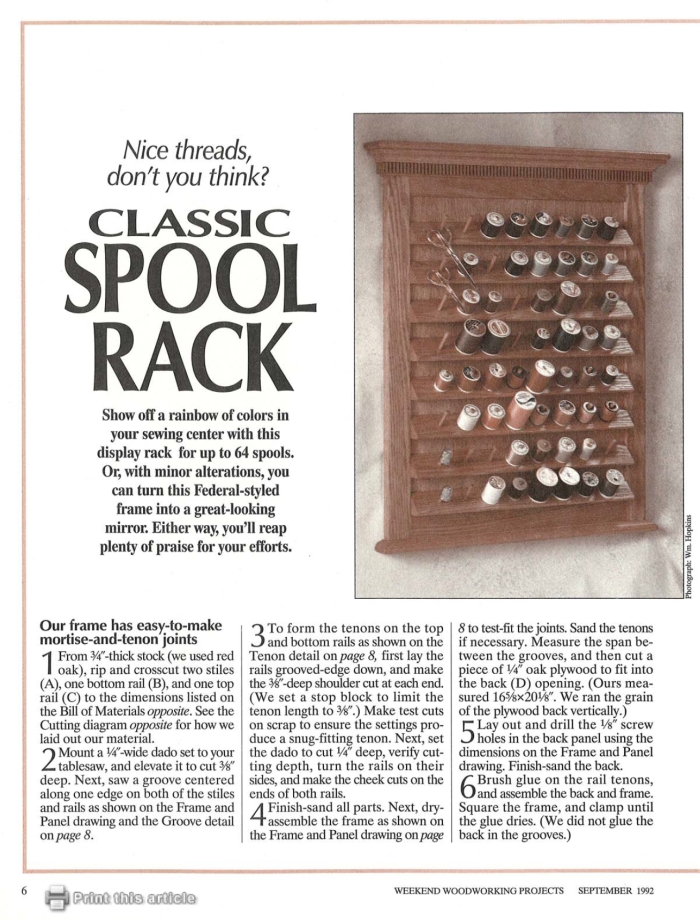
This display rack holds 64 spools and it is a great addition to any sewing center.
The Federal-style frame uses simple mortise-and-tenon joinery, however, the upper dentils provide a different touch to the design and a challenge for expanding your woodworking skills.
You can also make slight changes to the frame design and build yourself a great mirror.
Two-Stepper Simplicity – #29, page 26
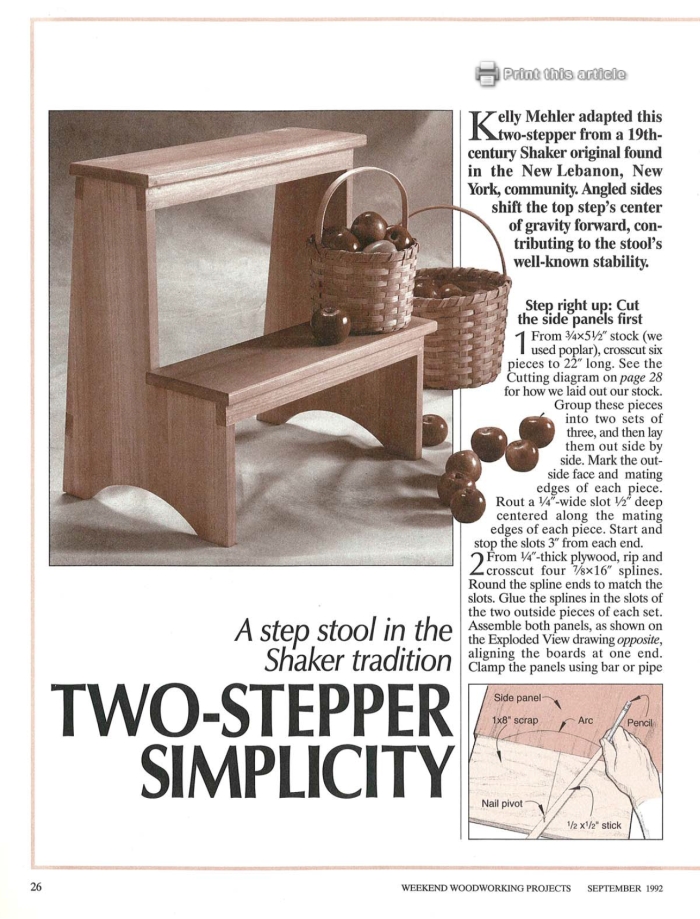
This Shaker step stool is based on an original 19th-century design. The sides are angled and contribute to the stool’s stability. The entire stool is made of poplar.
As an alternative, you could also close the back and the bottom of the stool and build yourself a small tool tote for carrying tools around the house for small repairs.
Christmas Tree Tray – #30, page 14
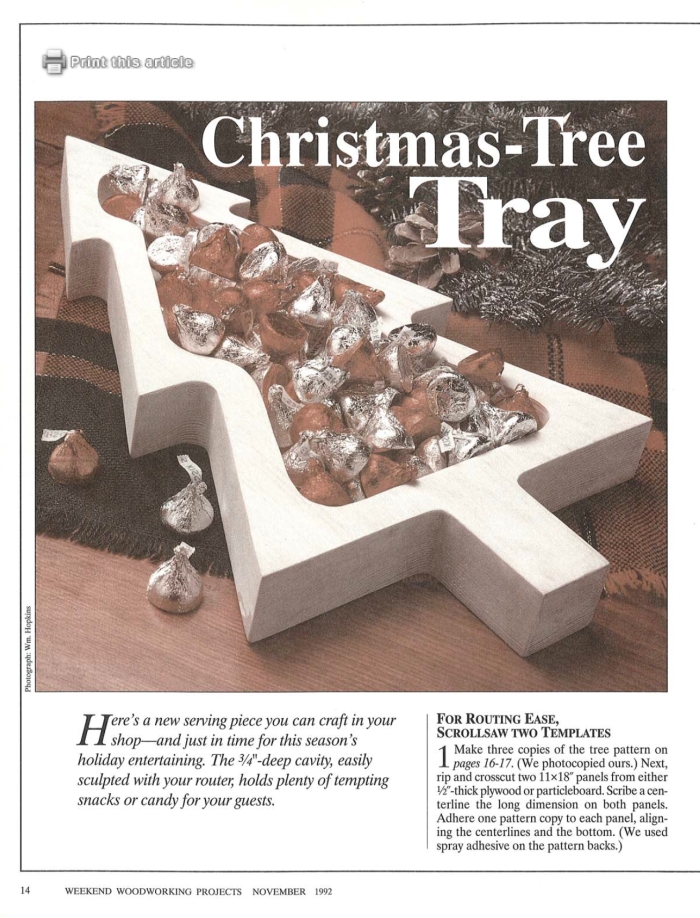
This is a simple router tray that can add an extra layer of season’s décor while you entertain your guests.
The materials you will need are 1/2” plywood for the templates and a 2x10 pine for the tray itself. The tools you need for this project are a router, a bowl and tray router bit, and a coping saw or a scroll saw for removing the excess material from the templates and the blanks.
Jewelry Showcase Cabinet – #30, page 20
This jewelry cabinet could have been designed by Marie Kondo in 1992 because it approaches jewelry storage vertically and everything can be organized and found very quickly.
The necklace rack and the earring bar can be easily customized according to your own needs, so take these parts as more of an inspiration than anything else. In other words, you are more than welcome to look at what you want to place inside this cabinet and come up with your own storage solutions – which should challenge the interaction between your creativity and your woodworking skills.
All parts are made of 1/2” cherry, except for the hardboard back.
"Cow Palace" Toy Barn – #38, page 5
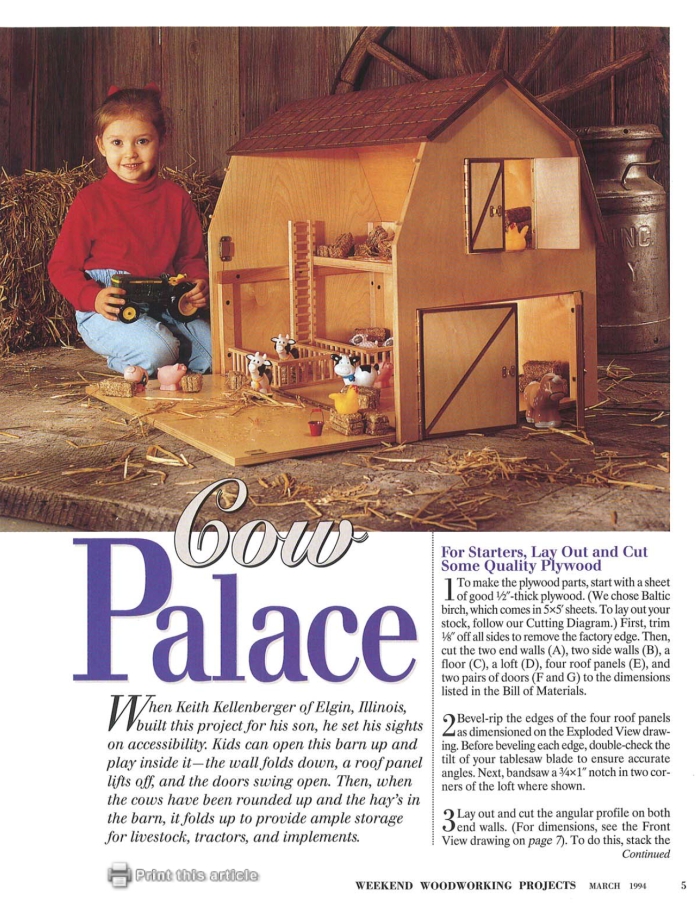
This is probably due to being born and raised in a big city – the truth is that I can’t resist a project that promotes kids interacting with animals. This toy barn has a removable roof section and a wall that folds down, allowing kids to play inside it. The removable roof helps avoid small fingers getting pinched between the panels.
All parts are a 5x5 sheet of birch plywood, a 3/4” x 5-1/2” x 36” maple board, and 1/4” dowel stock for the pens and ladder. The windows and the shingles are routed using a template, while the barn doors are dadoed on your table saw.
Daredevil’s Delight – #42, page 20
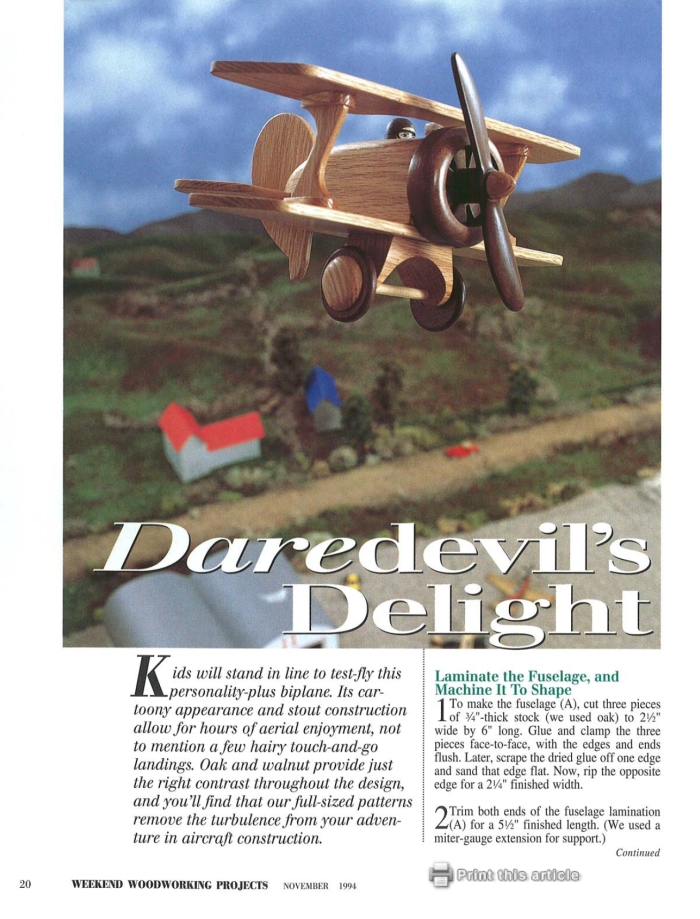
This toy biplane will provide countless hours of fun for kids. The classic design surely invites the imagination to work! Its contrasting colors come from oak and walnut, laminated or resawn as per the plan’s description – plus a toy person or some maple for the pilot. The tools you will need are a table saw, a dado blade set, a bandsaw, a router table, and a drill press.
Off-The-Wall Fruit Trivets – #43, page 20
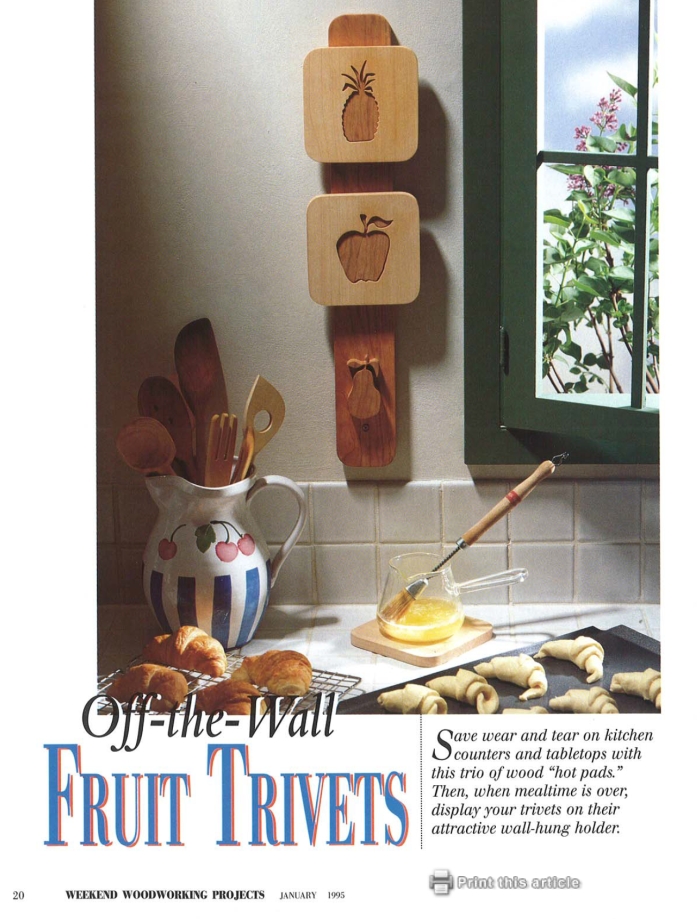
I was born and raised in a developing country, where the bigger emphasis is on “function” rather than in “form.” As a young adult, I lived in Japan for 4 years for my Master’s Degree. If I had to choose one single element that changed my life in Japan, it would be how they manage to create highly beautiful and functional things.
This trivet project reminds me of that.
When in use, they fulfill its main task of reducing wear and tear in kitchen countertops and tabletops. When not in use, they have the right place to go back to and become part of the kitchen décor.
The trivets are made first and use maple stock. Then it’s time for the backboard, which uses cherry.
Tie Valet Foldaway Organizer – #45, page 22
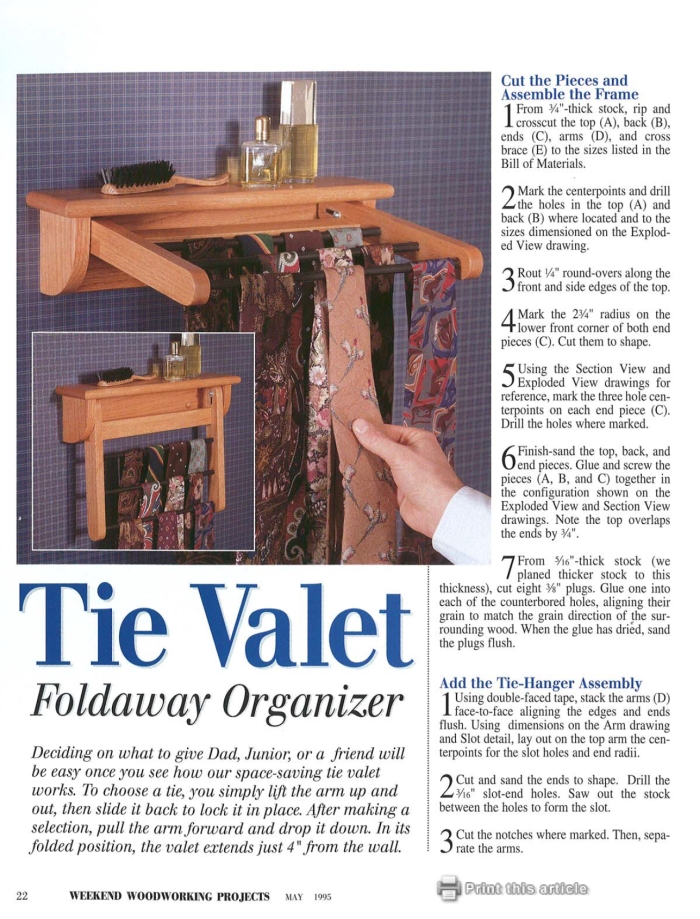
This is another project that would go well with the Konmari organization method. Each tie is easy to find, each tie also has a dedicated place to go back to, and the valet uses very little space – only 4” from the wall in the folded position. All parts are oak, plus some dowels for the tie rack.
Earring Display – #45, page 24
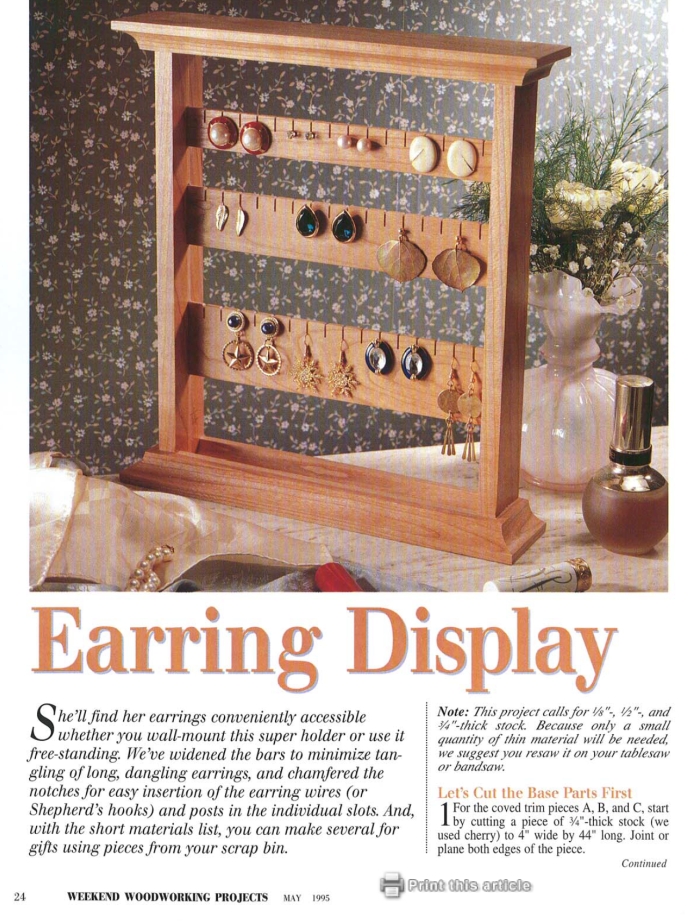
This earring display uses few materials and makes for a great gift. The bars have different widths, so they can accommodate longer or shorter earrings. The entire build was designed to use only a single board of cherry, 3/4” x 7-1/4” x 48”, however, you can plan it around pieces from your scrap bin as well.
Four-Seater Children's Picnic Table – #46, page 20
Although the picture suggests an indoors use in a playroom, the project calls for exterior-grade plywood for the tabletop and the seats and cedar for the base – so it is perfectly suitable for your backyard or patio.
All projects in these magazines come with the expected cutting diagrams, list of materials, and detailed instructions. This PDF also comes with full-sized drawings of the legs, tabletop supports, and crossarms on the final pages, so they are very beginner-friendly.
Even though this is a beginner-friendly project, they don’t call for a pocket-hole jig. You may like them or not, but one thing is for sure – this project, just as all the others I have selected for this list, will teach you actual, time-tested woodworking joinery and techniques, which will expand your knowledge and capabilities.
Dovetailed Jewelry Box – #48, page 26
This is a basic box, with all parts made from birds-eye maple. The dovetail slots are cut using a router table jig, and you will cut the dovetail blanks from walnut.
The dovetail jig can later be used for reinforcing basically any box or drawer you build in the future, so I would consider building the jig with good materials and quality plywood, as well as taking your time to line everything just right. The technique behind it is simple enough to make these machined dovetails a staple in your shop
Butcher's Chopping Block – #49, page 22
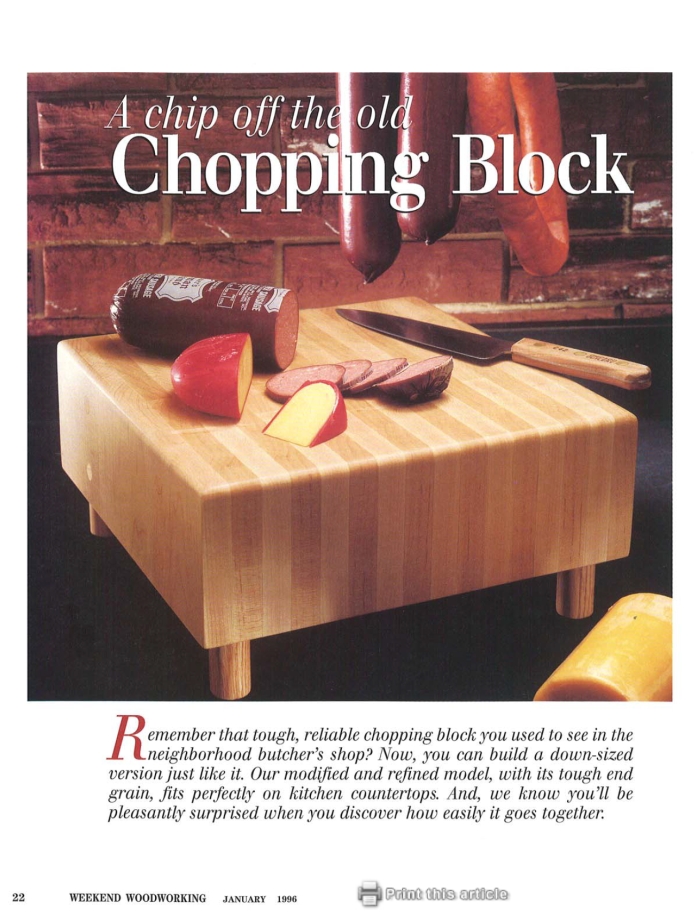
This is a downsized version of the old-fashioned chopping block from the butcher’s shop. It is entirely made of maple laminations and final dimensions are a 12” square, 6-3/4” high – the butcher block itself is 4” thick.
The magazine teaches a trick here to ensure the laminations don’t move while you are adding clamping pressure.
Remember to use Titebond II glue for your laminations, because it is food safe – click here to find today’s discount.
Perpetual Calendar – #50, page 22
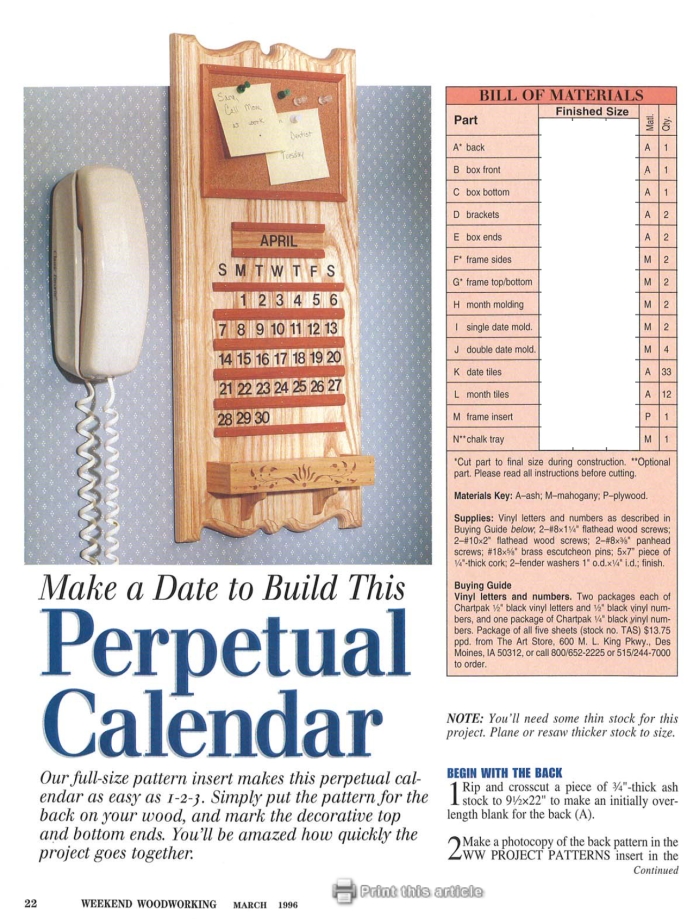
Landlines nowadays are closer to an internet broadband service provider, being rarely used. However, the perpetual calendar idea itself looks quite neat in my opinion. I am not a fan of that design where you slide a square and reveal the entire month, I think the extra numbers hanging on the sides are quite an eyesore.
I like this design instead with all the individual numbers that can be rearranged in any way you like. The upper board can be substituted with a whiteboard for a grocery list, or simply be scrapped altogether.
Remember you can buy the plans for these 26 selected projects, plus another 299 for a total of 325 projects available for sale at Amazon.
Weekend Woodworking was a sister publication to Wood Magazine. During 9 years they have published projects that could be build using minimal tools, little time, and just a few materials.
They have gathered all the issues, transformed them in PDF form, and released a DVD, which is available for sale at Amazon. I have these projects and I am showing the first page of my 26 favorite plans here, so you can have an idea of what you could expect if you bought this bundle.
Why 26? Oh, that is such a simple answer. 52 weeks, so half the time you are in your shop making dust, and half the time you are thinking about all the cool things you will build when you get back to it!
High-Rise Basket – #05, page 12
Most people call it a collapsible basket, but some people also refer to it as a bandsaw basket, or a scroll saw basket – referring to the power tools used to make this basket.
No matter if you prefer potaytos or potahtos, it is hard to ignore the beauty and the practicality of the basket – after all, you can store it flat for storage by simply folding down the handle. You can also use it as a trivet or hang it on your wall as décor.
You can use a collapsible wooden basket at your home, campsite, RV, you name it. You can serve bread at your dinner table (or tailgating, camping, boating, picnicking), use it as a fruit basket,
All these uses are strong reasons that make this basket a great gift for friends and family alike.
Other than the tools themselves, remember you might need a special blade for the curved sections.
As for the woods you need, you have plenty of freedom in that department, because you can simply laminate a bunch of scraps together and make your own board. As a bonus, you reduce clutter and clean up your shop in the process.
Armored-Car Bank – #08, page 14
This is a super cool twist to the classic piggy bank. Saving money and financial responsibility are healthy habits that can be encouraged by simple actions.
While a Chinese piggy bank made of plastic can also achieve the same goal, a handcrafted toy made of wood can potentially become a family heirloom to be appreciated for many years to come.
Hot-Shot Clothes Tree – #15, page 18
This is another twist on a classic piece of furniture, this time it is the clothes tree with an inexpensive Nerf basketball kit. What I like the most about this project is how it can positively reinforce simple organization in your kid’s room, and tie it up with playing sports – much better than staying stuck the entire day on online games such as Fortnite.
This project uses oak for the post and plywood for the backboard. You will need a bandsaw to cut the legs to rough shape, a belt sander or a disc sander to sand them to the line, a doweling jig and a drill to attach the legs to the post, and a router to chamfer the post. For the plywood backboard, you can either repeat the bandsaw cutting and the belt sander to final shape the accurate lines or use a router jig and a stop block to create the half-circle shape for the backboard.
Alpine-Ride Action Toy – #16, page 10 & #19, page 28
Some people also refer to this toy as a click clack track, wooden vertical track, zig-zag racing set, or even as wooden ramp racer cars. There is something special to such a simple idea that can hypnotize children for hours on end.
Made of fir plywood (1/2”) and pine, this is an easy project that you can store flat by simply separating the tower track and the base. Cut the plywood to size with a table saw and use a tapering jig for shaping the tower sides. You can cut the plywood holes with a scroll saw, or a jigsaw. The ramp pieces are assembled with a hot glue gun.
Make sure to follow the instructions on Weekend Woodworking #16, but get the revised dimensions from #19 on page 28.
King Arthur's Castle – #16, page 18
This is a project that makes for a great gift for collectors and History nuts – like myself.
The towers are made of maple turning squares, which you can also laminate from maple stock; the walls are made of maple plywood; and the gate parts, battlements, and drawbridge are made of maple boards.
And you know what is the coolest thing about this build article? The Toy Soldier Company is still in business and it is still owned by the same family since it began operating in 1984. Unfortunately, they do not have a retail store, but you can buy your toy soldiers online (NOT an affiliate link).
Crumb-Box Cutting Board – #16, page 28
Build this project and be on the way to having a crumb-free kitchen countertop. This is a cutting board with a grate, with a splined box to catch crumbs. All parts can be made from one 1”x6” maple board, cherry for the splines, and finished with two coats of vegetable oil.
Big-League Organizer – #20, page 18
This is a wall rack for organizing your kid’s baseball gear – mitt, cap, bat, and ball. When everything has a place to go, it is easy and simple to keep a bedroom organized and instill good habits from a young age.
This project uses birch plywood for the diamond and birch stock for the shelf, as well a couple of Shaker pegs for the hooks – which can be easily found at any big box store.
Harbor Light – #21, page 10
This is certainly a different build! This desk lamp is a model of The Edward M. Cotter, America’s oldest working fireboat, located in Buffalo’s harbor since 1900.
It is made of padauk and maple, so wearing a dust mask is a must when sawing and sanding parts because padauk might irritate your respiratory system.
Toddler Town Car – #21, page 20
As I mentioned previously, Weekend Woodworking was a sister to Wood Magazine. This project comes from an entry made to Wood Magazine’s first toy contest, 30 (!!) years ago.
Young children will love this project, especially the rattling sound coming from the 10 ping-pong balls inside the wheels. All parts are made of oak – one board measuring 3/4 x 9-1/4 x 48” for most parts and another board of 3/4 x 7-1/4 x 24” for the four wheels.
Shadow Box – #21, page 28
This shadow box is themed after a farm, with a silo and a barn. It is a nice project to teach city kids that the milk does not come from the supermarket – unfortunately, I actually heard a child asking that to her mother.
The entire project, including the back, was made from a single board of clear white pine, dimensions 1/4 x 7-1/4 x 72”, however, you can also use other woods such as redwood, cedar, poplar, and so on. You can make animals and props yourself or buy miniatures.
Jewelry Case – #22, page 24
A reader sent this project to Weekend Woodworking. He was an industrial arts teacher in Chicago and perfected the design throughout 20 years of teaching it to his students.
The lid and the back being edge-jointed for saving some money on lumber. All parts are made of cherry, except the hardboard drawer bottoms. The box build instructions call for a table saw with dado blades and a router. The two hinges and the six knobs are made of brass.
One interesting finishing technique they teach in this article is how they use lye (sodium hydroxide) to bring out the reddish/brown cherry color, which is an interesting challenge by itself. Needless to say, it is a caustic product, so you need to read and follow carefully the container direction, as well as use proper eye protection, gloves, and clothing.
Aromatic Red Cedar Coat Hangers – #25, page 10
This is a practical gift that you can make by the dozens – simply group the operations. Cut your hanger blanks, make a dedicated jig for cutting the spline slot, cut your hook bending form, assemble, and you’re done!
Leave it unfinished if you want to preserve the cedar aroma, or apply something durable if you decide to use hardwoods such as walnut, maple, oak, and so on.
Organized-Cook's Companion – #26, page 22
In simple English, this is a recipe box that is also a bookshelf and a decorative furniture piece for your kitchen.
What I really like about this project are the two drawers that make the recipe box. Whenever my grandma was given a new recipe, she always wrote the name of the person who gave her the recipe. My own twist is to have the person write the recipe as well, for two reasons:
- because I love seeing other people’s handwriting, just as much as I love listening to other people’s accents, and
- with mobile phones, texting, computers, emails, we simply don’t handwrite anything anymore, not even a paper note, and I think that makes the world a little poorer of personal experiences.
For me, having a recipe box with handwritten recipes is closer to my heart than simply going to YouTube and searching for a video recipe – although I have to admit that going to YouTube is faster and more convenient.
Anyways, back to the build - the entire project can be made with one board of oak, with dimensions of 3/4 x 9-1/4 x 96”. You will make the straight cuts on a table saw, the rough curved cuts on the bandsaw, and sand these to the line with a belt sander.
Classic Spool Rack – #29, page 6
This display rack holds 64 spools and it is a great addition to any sewing center.
The Federal-style frame uses simple mortise-and-tenon joinery, however, the upper dentils provide a different touch to the design and a challenge for expanding your woodworking skills.
You can also make slight changes to the frame design and build yourself a great mirror.
Two-Stepper Simplicity – #29, page 26
This Shaker step stool is based on an original 19th-century design. The sides are angled and contribute to the stool’s stability. The entire stool is made of poplar.
As an alternative, you could also close the back and the bottom of the stool and build yourself a small tool tote for carrying tools around the house for small repairs.
Christmas Tree Tray – #30, page 14
This is a simple router tray that can add an extra layer of season’s décor while you entertain your guests.
The materials you will need are 1/2” plywood for the templates and a 2x10 pine for the tray itself. The tools you need for this project are a router, a bowl and tray router bit, and a coping saw or a scroll saw for removing the excess material from the templates and the blanks.
Jewelry Showcase Cabinet – #30, page 20
This jewelry cabinet could have been designed by Marie Kondo in 1992 because it approaches jewelry storage vertically and everything can be organized and found very quickly.
The necklace rack and the earring bar can be easily customized according to your own needs, so take these parts as more of an inspiration than anything else. In other words, you are more than welcome to look at what you want to place inside this cabinet and come up with your own storage solutions – which should challenge the interaction between your creativity and your woodworking skills.
All parts are made of 1/2” cherry, except for the hardboard back.
"Cow Palace" Toy Barn – #38, page 5
This is probably due to being born and raised in a big city – the truth is that I can’t resist a project that promotes kids interacting with animals. This toy barn has a removable roof section and a wall that folds down, allowing kids to play inside it. The removable roof helps avoid small fingers getting pinched between the panels.
All parts are a 5x5 sheet of birch plywood, a 3/4” x 5-1/2” x 36” maple board, and 1/4” dowel stock for the pens and ladder. The windows and the shingles are routed using a template, while the barn doors are dadoed on your table saw.
Daredevil’s Delight – #42, page 20
This toy biplane will provide countless hours of fun for kids. The classic design surely invites the imagination to work! Its contrasting colors come from oak and walnut, laminated or resawn as per the plan’s description – plus a toy person or some maple for the pilot. The tools you will need are a table saw, a dado blade set, a bandsaw, a router table, and a drill press.
Off-The-Wall Fruit Trivets – #43, page 20
I was born and raised in a developing country, where the bigger emphasis is on “function” rather than in “form.” As a young adult, I lived in Japan for 4 years for my Master’s Degree. If I had to choose one single element that changed my life in Japan, it would be how they manage to create highly beautiful and functional things.
This trivet project reminds me of that.
When in use, they fulfill its main task of reducing wear and tear in kitchen countertops and tabletops. When not in use, they have the right place to go back to and become part of the kitchen décor.
The trivets are made first and use maple stock. Then it’s time for the backboard, which uses cherry.
Tie Valet Foldaway Organizer – #45, page 22
This is another project that would go well with the Konmari organization method. Each tie is easy to find, each tie also has a dedicated place to go back to, and the valet uses very little space – only 4” from the wall in the folded position. All parts are oak, plus some dowels for the tie rack.
Earring Display – #45, page 24
This earring display uses few materials and makes for a great gift. The bars have different widths, so they can accommodate longer or shorter earrings. The entire build was designed to use only a single board of cherry, 3/4” x 7-1/4” x 48”, however, you can plan it around pieces from your scrap bin as well.
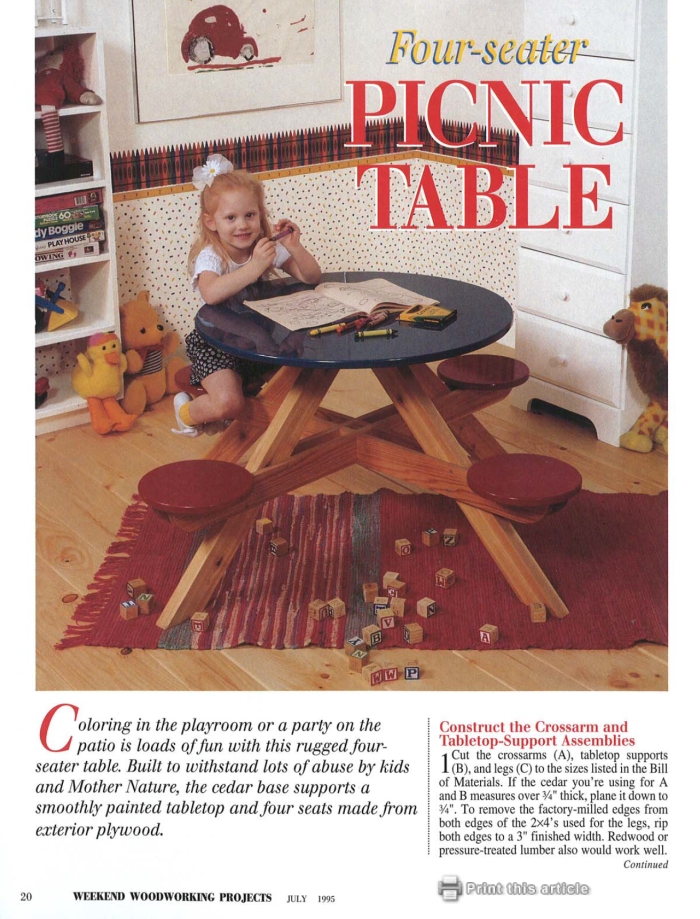
Four-Seater Children's Picnic Table – #46, page 20
Although the picture suggests an indoors use in a playroom, the project calls for exterior-grade plywood for the tabletop and the seats and cedar for the base – so it is perfectly suitable for your backyard or patio.
All projects in these magazines come with the expected cutting diagrams, list of materials, and detailed instructions. This PDF also comes with full-sized drawings of the legs, tabletop supports, and crossarms on the final pages, so they are very beginner-friendly.
Even though this is a beginner-friendly project, they don’t call for a pocket-hole jig. You may like them or not, but one thing is for sure – this project, just as all the others I have selected for this list, will teach you actual, time-tested woodworking joinery and techniques, which will expand your knowledge and capabilities.
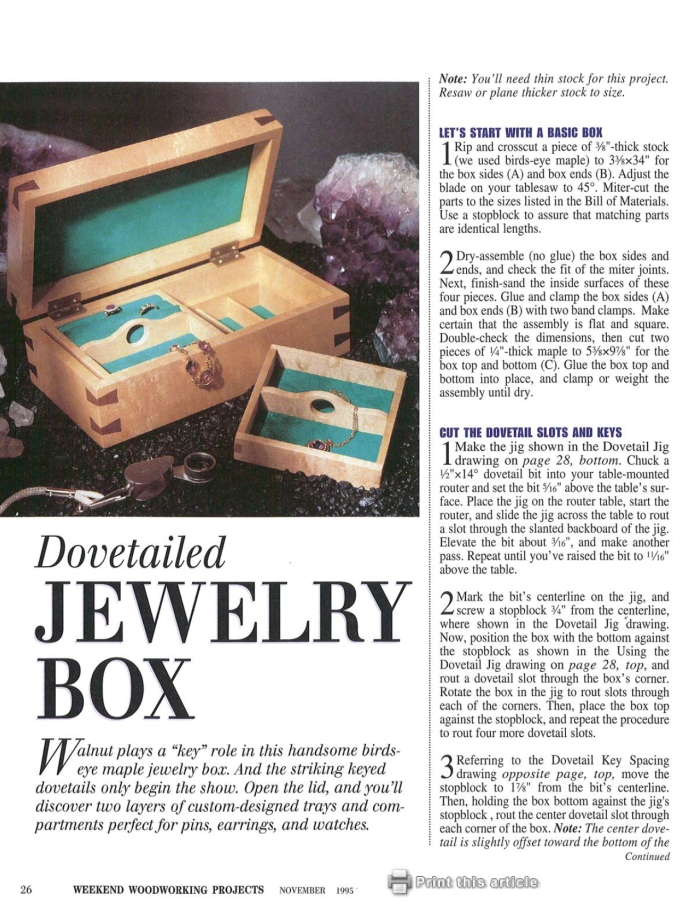
Dovetailed Jewelry Box – #48, page 26
This is a basic box, with all parts made from birds-eye maple. The dovetail slots are cut using a router table jig, and you will cut the dovetail blanks from walnut.
The dovetail jig can later be used for reinforcing basically any box or drawer you build in the future, so I would consider building the jig with good materials and quality plywood, as well as taking your time to line everything just right. The technique behind it is simple enough to make these machined dovetails a staple in your shop
Butcher's Chopping Block – #49, page 22
This is a downsized version of the old-fashioned chopping block from the butcher’s shop. It is entirely made of maple laminations and final dimensions are a 12” square, 6-3/4” high – the butcher block itself is 4” thick.
The magazine teaches a trick here to ensure the laminations don’t move while you are adding clamping pressure.
Remember to use Titebond II glue for your laminations, because it is food safe – click here to find today’s discount.
Perpetual Calendar – #50, page 22
Landlines nowadays are closer to an internet broadband service provider, being rarely used. However, the perpetual calendar idea itself looks quite neat in my opinion. I am not a fan of that design where you slide a square and reveal the entire month, I think the extra numbers hanging on the sides are quite an eyesore.
I like this design instead with all the individual numbers that can be rearranged in any way you like. The upper board can be substituted with a whiteboard for a grocery list, or simply be scrapped altogether.
Remember you can buy the plans for these 26 selected projects, plus another 299 for a total of 325 projects available for sale at Amazon.