
Simple Adirondack Chair Plans (Weekend Build)
Meet the “weekend chair” — it takes just a weekend to build, and you’ll spend many a weekend in it afterward.
This chair is built for comfort, with wide arms, a curved back (unlike many commercial Adirondack chairs), and a deeply scooped seat that’ll make you say “ahhh” every time you sink down into it.
It’s a cinch to build, too, a great project for the beginning woodworker. All you do is cut out the pieces, drill some holes and screw the chair together — no messing around with glue and no fussy joints to cut. The only power tools you’ll need are a jigsaw and a drill. You do need to use one specialized woodworking technique: transferring the shapes of the curved parts from the grids in the drawings to your wood. You’ll see how to do this later, but if you don’t even want to bother with that, you can send for full-size patterns for the parts.
This chair was made from cedar, because it’s naturally rot resistant and has a rich color. Cypress, heart redwood, or treated pine would also be good choices, and pine or oak would be acceptable if the chair is protected from moisture, as on a porch. To make this chair completely weatherproof, I recommend galvanized deck screws and stainless steel carriage bolts, nuts, and washers. Ordinary steel screws and bolts rust and discolor the wood.
Cedar is a soft wood. It mars easily, so take care not to dent the pieces when you cut and assemble them. Cedar also weathers to a gray color, so if you want to keep your chair looking golden brown, give it a coat of water-repellent preservative every year or so. Ask your paint store for a finish suitable for cedar decks.
Enough said. Let’s build the chair.
Cutting out the pieces
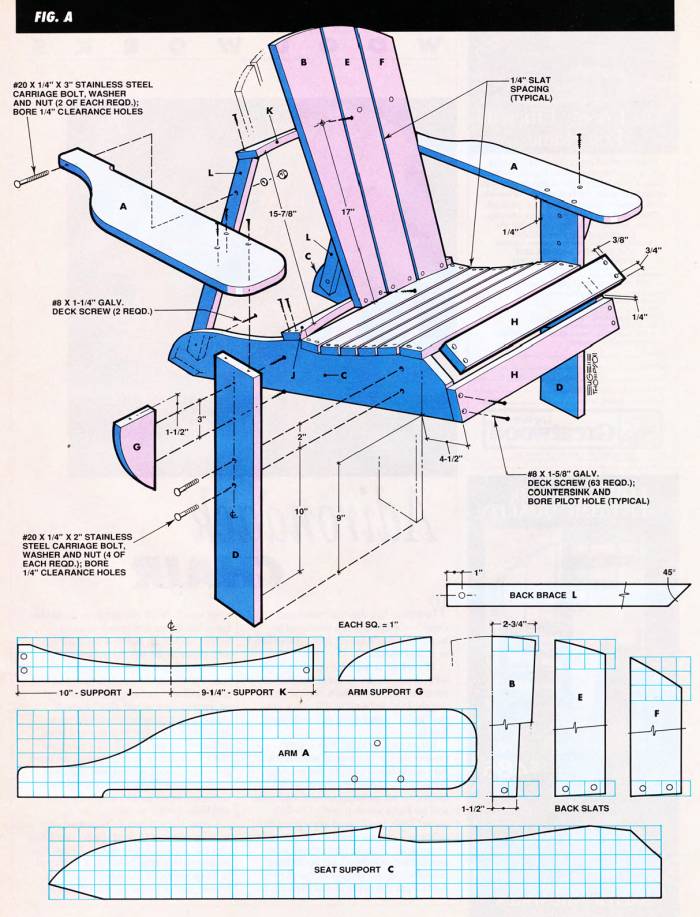
Begin by cutting all the pieces (A-L) to the sizes given in the Cutting List below.
Then cut the curved edges on the parts that need it. To do this, you must transfer the shape of the parts from the grids on the drawing (Fig. A) to the wood rectangles you just cut. Here’s how.
The arms, seat supports, back slats and arm supports (A, C, E, F, and G) come in pairs — two identical parts are required for each. The back supports (J and K) are also the same shape, just different lengths. To save work, transfer the grid shapes for the curved parts to only one of each piece Cut that part out and use it as a template to mark the remaining piece or pieces
To transfer a shape, draw a grid of 1-in. by 1-in. squares as shown in Fig. A onto the rectangular part. Working on one square at a time, copy by eye the curved line from our drawing to the grid on your wood. Use a pencil, lightly.
The trick is to do one square at a time, rather than trying to make the whole curve at once.
Once you’re done, connect the whole thing into a smooth curve.
Since a pencil tends to follow the grain of the wood, giving you an uneven curve, use a fine-tip felt marker for the final line.
After you’ve transferred the shapes, cut them out and sand the sawn edges (Photos 1 and 2). Notice that the center back slat (B) is tapered on both sides. Now trace and cut the remaining curved pieces, Also cut the 45-degree upper ends of the back braces (L).

Saw the curved parts with a jigsaw and a fine-tooth blade. Go slowly and cut right on the lines. This part is the seat support.

Sand the sawn edges with 80-grit sandpaper and a sanding block. Cedar is a soft wood, so only a little sanding is needed.
Drill the holes
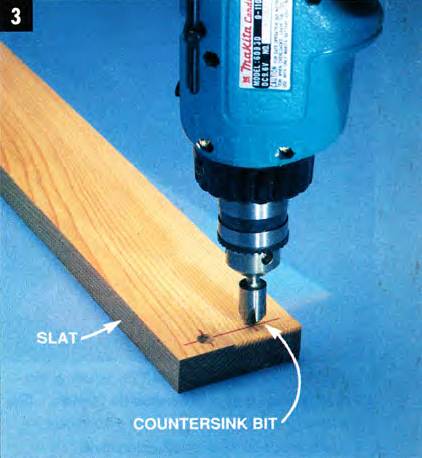
All the screws that hold this chair together have their heads countersunk so they’re flush with the wood surface.
Sometimes beginning woodworkers have trouble getting a smooth, chatter-free countersink hole. The trick is to drill the countersink first (Photo 3), then the hole for the shank of the screw.
Don’t get mixed up when you drill the countersink holes in the two back braces (L); there must be a right and a left one. Make them mirror images instead of identical.
Once you’ve drilled the countersink holes, go back and drill a 1/8-in. “clearance hole” through every countersink hole. A clearance hole is the same diameter as the screw, as opposed to a pilot hole, which is narrower.
Drill the bolt holes in the legs (D) and the back ends of the arms (A). The remaining bolt holes in the seat supports (C) and back braces (L) will be drilled during the assembly.
Countersink the screw holes before you drill them for smoothest, splinter-free results. Then screw these slats on to form the seat.
Assemble the seat
Start assembling the seat by screwing the front and rear seat slats (H) to the seat supports. Cedar splits easily so you should drill a 1/16-in. pilot hole for each screw as you assemble the chair. This will keep the wood from splitting.

The above photo shows the best pilot hole and countersink drill bit set. It’s the Snappy 40030, American made and a great quality. It’s fully compatible with quick-change chucks (1/4 hex shank), very practical, and offer great value for your money. Click here to see the price at Amazon.
Now line up the remaining seat slats on the seat supports and screw them on. Use a Phillips head driver bit in your drill to speed this up. Some 1/4-in. thick spacers placed between the seat slats will help you align them.
Attach the legs
Clamp the legs (D) to the assembled seat at the location shown in Fig. A.
Use a square to adjust the legs so they are perpendicular to your work surface. When the chair is resting on four points and the legs are square and in the right location, drill bolt holes through the legs and seat supports (Photo 4). Bolt the legs and seat supports together.
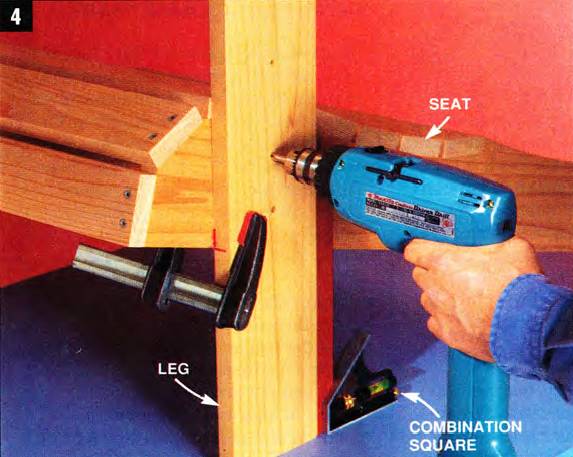
Drill bolt holes through the leg while it’s clamped to the seat in the proper position. Then bolt them together with galvanized or stainless steel bolts.
Assemble the back
Line up the center of the center back slat (B) with the center of the lower back support (J), then screw these pieces together Now cut four 1/4-in. thick x 30-in. long wood spacers.
Arrange the remaining back slats (E and F) on the lower back support with the 1/4-in. spacers placed between them. Screw the slats on.
Now set the upper back support (K) in position, line up the outer slats so they’re flush with the ends of the support, and screw the pieces together (Photo 5).
Finally, screw the assembled back onto the seat through the lower support.

Thin spacers made of scrap wood will help you get the slats perfectly aligned while you screw them to the back supports.
Attach the arms and braces
Screw the arm supports (G) to the legs, then screw the arms to the legs and arm supports Then screw the back braces (L) to the upper back support, but don’t screw them to the seat supports yet.
Align the back edges of the arms with the back braces. drill the bolt holes through them both (Photo 6), and attach the carriage bolts Now screw the back braces to the seat supports.

Drill the bolt holes through the arms and back braces at once, rather than trying to get holes to line up. Make sure the back edges are flush.
Apply the exterior finish
I know this sounds crazy, but the best way to apply wood preservative or another finish to your chair is to take it completely apart — it doesn’t take that long — and finish the parts separately.
This allows the finish to penetrate evenly and thoroughly, especially the end grain, which is most subject to rot.
With the chair disassembled, sand the parts, especially the exposed edges, and apply the wood preservative following the directions on the can. Be sure to rest the pieces on their backsides or unexposed edges so the finish will dry evenly and not leave marks.
Apply at least two coats of finish. When it’s dry, reassemble the chair, sit back and relax!

Cutting list
| Key | Pcs. | Size | Description |
|---|---|---|---|
| A | 2 | 3/4" x 6" x 30" cedar | Arms |
| B | 1 | 3/4" x 5-1/2" x 29" cedar | Center back slat |
| C | 2 | 3/4" x 5" x 40" cedar | Seat supports |
| D | 2 | 3/4" x 4-1/2" x 20" cedar | Legs |
| E | 2 | 3/4" x 3-1/4" x 28-3/4" cedar | Back slats |
| F | 2 | 3/4" x 3-1/4" x 27-1/2" cedar | Back slats |
| G | 2 | 3/4" x 3" x 6" cedar | Arm supports |
| H | 8 | 3/4" x 2-1/2" x 20" cedar | Seat slats |
| J | 1 | 3/4" x 2-1/2" x 20" cedar | Lower back support |
| K | 1 | 3/4" x 2-1/2" x 18-1/2" cedar | Upper back support |
| L | 2 | 3/4" x 1-1/2" x 25" cedar | Back braces |
Shopping list
| Item | Qty. |
|---|---|
| 1" x 8" x 8' cedar | 1 |
| 1" x 6" x 8' cedar | 3 |
| 1" x 4" x 8' cedar | 2 |
| No. 8 x 1-5/8" galvanized deck screws | 63 |
| No. 20 x 1-1/4" x 2" stainless steel carriage bolts, flat and lock washers and nuts | 2 |
| No. 20 x 1-1/4" x 3" stainless steel carriage bolts, flat and lock washers and nuts | 42 |
| Wood preservative | 1 quart |
Meet the “weekend chair” — it takes just a weekend to build, and you’ll spend many a weekend in it afterward.
This chair is built for comfort, with wide arms, a curved back (unlike many commercial Adirondack chairs), and a deeply scooped seat that’ll make you say “ahhh” every time you sink down into it.
It’s a cinch to build, too, a great project for the beginning woodworker. All you do is cut out the pieces, drill some holes and screw the chair together — no messing around with glue and no fussy joints to cut. The only power tools you’ll need are a jigsaw and a drill. You do need to use one specialized woodworking technique: transferring the shapes of the curved parts from the grids in the drawings to your wood. You’ll see how to do this later, but if you don’t even want to bother with that, you can send for full-size patterns for the parts.
This chair was made from cedar, because it’s naturally rot resistant and has a rich color. Cypress, heart redwood, or treated pine would also be good choices, and pine or oak would be acceptable if the chair is protected from moisture, as on a porch. To make this chair completely weatherproof, I recommend galvanized deck screws and stainless steel carriage bolts, nuts, and washers. Ordinary steel screws and bolts rust and discolor the wood.
Cedar is a soft wood. It mars easily, so take care not to dent the pieces when you cut and assemble them. Cedar also weathers to a gray color, so if you want to keep your chair looking golden brown, give it a coat of water-repellent preservative every year or so. Ask your paint store for a finish suitable for cedar decks.
Enough said. Let’s build the chair.
Cutting out the pieces
Begin by cutting all the pieces (A-L) to the sizes given in the Cutting List below.
Then cut the curved edges on the parts that need it. To do this, you must transfer the shape of the parts from the grids on the drawing (Fig. A) to the wood rectangles you just cut. Here’s how.
The arms, seat supports, back slats and arm supports (A, C, E, F, and G) come in pairs — two identical parts are required for each. The back supports (J and K) are also the same shape, just different lengths. To save work, transfer the grid shapes for the curved parts to only one of each piece Cut that part out and use it as a template to mark the remaining piece or pieces
To transfer a shape, draw a grid of 1-in. by 1-in. squares as shown in Fig. A onto the rectangular part. Working on one square at a time, copy by eye the curved line from our drawing to the grid on your wood. Use a pencil, lightly.
The trick is to do one square at a time, rather than trying to make the whole curve at once.
Once you’re done, connect the whole thing into a smooth curve.
Since a pencil tends to follow the grain of the wood, giving you an uneven curve, use a fine-tip felt marker for the final line.
After you’ve transferred the shapes, cut them out and sand the sawn edges (Photos 1 and 2). Notice that the center back slat (B) is tapered on both sides. Now trace and cut the remaining curved pieces, Also cut the 45-degree upper ends of the back braces (L).
Saw the curved parts with a jigsaw and a fine-tooth blade. Go slowly and cut right on the lines. This part is the seat support.
Sand the sawn edges with 80-grit sandpaper and a sanding block. Cedar is a soft wood, so only a little sanding is needed.
Drill the holes
All the screws that hold this chair together have their heads countersunk so they’re flush with the wood surface.
Sometimes beginning woodworkers have trouble getting a smooth, chatter-free countersink hole. The trick is to drill the countersink first (Photo 3), then the hole for the shank of the screw.
Don’t get mixed up when you drill the countersink holes in the two back braces (L); there must be a right and a left one. Make them mirror images instead of identical.
Once you’ve drilled the countersink holes, go back and drill a 1/8-in. “clearance hole” through every countersink hole. A clearance hole is the same diameter as the screw, as opposed to a pilot hole, which is narrower.
Drill the bolt holes in the legs (D) and the back ends of the arms (A). The remaining bolt holes in the seat supports (C) and back braces (L) will be drilled during the assembly.
Countersink the screw holes before you drill them for smoothest, splinter-free results. Then screw these slats on to form the seat.
Assemble the seat
Start assembling the seat by screwing the front and rear seat slats (H) to the seat supports. Cedar splits easily so you should drill a 1/16-in. pilot hole for each screw as you assemble the chair. This will keep the wood from splitting.
The above photo shows the best pilot hole and countersink drill bit set. It’s the Snappy 40030, American made and a great quality. It’s fully compatible with quick-change chucks (1/4 hex shank), very practical, and offer great value for your money. Click here to see the price at Amazon.
Now line up the remaining seat slats on the seat supports and screw them on. Use a Phillips head driver bit in your drill to speed this up. Some 1/4-in. thick spacers placed between the seat slats will help you align them.
Attach the legs
Clamp the legs (D) to the assembled seat at the location shown in Fig. A.
Use a square to adjust the legs so they are perpendicular to your work surface. When the chair is resting on four points and the legs are square and in the right location, drill bolt holes through the legs and seat supports (Photo 4). Bolt the legs and seat supports together.
Drill bolt holes through the leg while it’s clamped to the seat in the proper position. Then bolt them together with galvanized or stainless steel bolts.
Assemble the back
Line up the center of the center back slat (B) with the center of the lower back support (J), then screw these pieces together Now cut four 1/4-in. thick x 30-in. long wood spacers.
Arrange the remaining back slats (E and F) on the lower back support with the 1/4-in. spacers placed between them. Screw the slats on.
Now set the upper back support (K) in position, line up the outer slats so they’re flush with the ends of the support, and screw the pieces together (Photo 5).
Finally, screw the assembled back onto the seat through the lower support.
Thin spacers made of scrap wood will help you get the slats perfectly aligned while you screw them to the back supports.
Attach the arms and braces
Screw the arm supports (G) to the legs, then screw the arms to the legs and arm supports Then screw the back braces (L) to the upper back support, but don’t screw them to the seat supports yet.
Align the back edges of the arms with the back braces. drill the bolt holes through them both (Photo 6), and attach the carriage bolts Now screw the back braces to the seat supports.
Drill the bolt holes through the arms and back braces at once, rather than trying to get holes to line up. Make sure the back edges are flush.
Apply the exterior finish
I know this sounds crazy, but the best way to apply wood preservative or another finish to your chair is to take it completely apart — it doesn’t take that long — and finish the parts separately.
This allows the finish to penetrate evenly and thoroughly, especially the end grain, which is most subject to rot.
With the chair disassembled, sand the parts, especially the exposed edges, and apply the wood preservative following the directions on the can. Be sure to rest the pieces on their backsides or unexposed edges so the finish will dry evenly and not leave marks.
Apply at least two coats of finish. When it’s dry, reassemble the chair, sit back and relax!
Cutting list
| Key | Pcs. | Size | Description |
|---|---|---|---|
| A | 2 | 3/4" x 6" x 30" cedar | Arms |
| B | 1 | 3/4" x 5-1/2" x 29" cedar | Center back slat |
| C | 2 | 3/4" x 5" x 40" cedar | Seat supports |
| D | 2 | 3/4" x 4-1/2" x 20" cedar | Legs |
| E | 2 | 3/4" x 3-1/4" x 28-3/4" cedar | Back slats |
| F | 2 | 3/4" x 3-1/4" x 27-1/2" cedar | Back slats |
| G | 2 | 3/4" x 3" x 6" cedar | Arm supports |
| H | 8 | 3/4" x 2-1/2" x 20" cedar | Seat slats |
| J | 1 | 3/4" x 2-1/2" x 20" cedar | Lower back support |
| K | 1 | 3/4" x 2-1/2" x 18-1/2" cedar | Upper back support |
| L | 2 | 3/4" x 1-1/2" x 25" cedar | Back braces |
Shopping list
| Item | Qty. |
|---|---|
| 1" x 8" x 8' cedar | 1 |
| 1" x 6" x 8' cedar | 3 |
| 1" x 4" x 8' cedar | 2 |
| No. 8 x 1-5/8" galvanized deck screws | 63 |
| No. 20 x 1-1/4" x 2" stainless steel carriage bolts, flat and lock washers and nuts | 2 |
| No. 20 x 1-1/4" x 3" stainless steel carriage bolts, flat and lock washers and nuts | 42 |
| Wood preservative | 1 quart |