
DIY, Free Wooden Outdoor Furniture Plans, How-To, & Pictures
No fancy joinery in this furniture, no complicated techniques. You don’t even need a portable table saw or a hybrid table saw — just a circular saw and hand tools.
This outdoor furniture is just what you need to help you catch up on your relaxing this summer. Just imagine — summer afternoons, an ice-cold drink, cool shade and a comfortable wood chair that you built yourself. Plastic and metal just wouldn’t feel the same.
This furniture was designed so that you can build it even without the luxury of a home wood shop. There’s no fancy joinery — most parts are just screwed together — so even if you don’t have a lot of tools, this outdoor set is easily within your grasp.
Each piece will take only a day or so for you to make — even if you’re a beginner to woodworking.
What Wood To Use In Outdoor Furniture?
You have a number of choices:
- Personally, I’d choose western cedar for its natural beauty and resistance to decay.
- Cypress is another excellent choice if it’s available in your area.
- Pine is good, but be sure to treat it with a preservative.
- Pressure-treated pine will work, but you must seal it well with an oil-based stain or outdoor deck sealer to prevent irritation to the skin. You’ll also have to wait a couple of weeks for pressure-treated pine to dry sufficiently before you apply a finish.
- Redwood is a good choice, but it’s expensive.
If you decide to use cedar, the boards may only be available smooth on one side and rough on the other. Your lumberyard or a local cabinet shop may be able to plane the rough side for you; if not, use a belt sander and a 36-grit belt to smooth the rough side.
Tools Needed And Material Costs
The only tools you need for this project are:
- circular saw,
- drill and driver kit,
- tape measure,
- steel square,
- straightedge,
- hammer, and
- side cutter (a heavy wire cutter).
If you’re a beginner with the circular saw, watch the video below for a better understanding on how to use it safely:
If you have a router, you can use it to round over some of the edges, but a simple wood file and sandpaper will work. If you don’t have a combination pilot-and-countersink drill bit for No. 6 screws (35), pick one up — you’ll be glad you did.
For gluing parts, I suggest you use construction adhesive or a water-resistant glue like Titebond II. Also wear safety glasses when cutting and nailing.
The lumber for this chair cost around $90, plus about $11 for screws, glue, and nails. Total cost for the love seat was about $130, and the table was about $50.
Before You Start
Below you will find complete step-by-step directions for building only the chair.
To build the love seat and the table, use the respective plans, shopping and cutting lists, and the same techniques described for the chair.
If you haven’t built anything in a while, you should reacquaint yourself with your tools. A few practice cuts with your circular saw will remind you if the blade is dull or if you’re cutting on the correct side of your marks.
Outdoor Chair
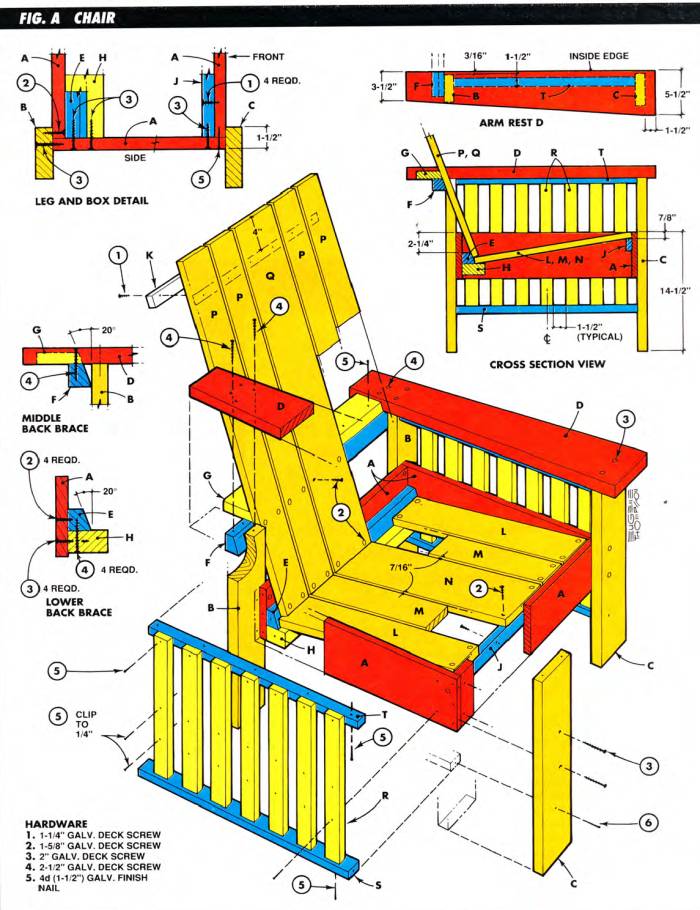
Cutting List
| KEY | PCS. | SIZE | DESCRIPTION |
|---|---|---|---|
| A | 4 | 3/4" x 5-1/2" x 22" | Seat box members |
| B | 2 | 1-1/16" x 3-1/2" x 21-1/2" | Back legs |
| C | 2 | 1-1/16" x 4" x 21-1/2" | Front legs |
| D | 2 | 1-1/16" x 5-1/2" x 30" | Arms |
| E | 1 | 1-1/2" x 1-1/2" x 22" | Lower back brace |
| F | 1 | 1-1/2" x 1-1/2" x 25" | Middle back brace |
| G | 1 | 3/4" x 3" x 20-1/2" | Back stiffener |
| H | 1 | 1-1/2" x 2-3/4" x 22" | Rear seat brace |
| J | 1 | 3/4" x 1-1/2" x 22" | Front seat brace |
| K | 1 | 3/4" x 1-1/2" x 22" | Upper back brace |
| L | 2 | 3/4" x 3-1/2" x 19-1/4" | Seat slats |
| M | 2 | 3/4" x 3" x 19-1/4" | Seat slats |
| N | 1 | 3/4" x 5-1/2" x 19-1/4" | Seat slat |
| P | 4 | 3/4" x 3" x 31-7/8" | Back slats |
| Q | 1 | 3/4" x 5-1/2" x 31-7/8" | Back slat |
| R | 14 | 3/4" x 1-1/2" x 16" | Side slats |
| S | 2 | 3/4" x 1-1/2" x 22" | Lower side slat rail |
| T | 2 | 3/4" x 1" x 22" | Under arm cleat |
Shopping List
| DIMENSIONS | ITEM | QTY |
|---|---|---|
| 1" x 6" x 8' | cedar | 2 |
| 1" x 4" x 8' | cedar | 3 |
| 1" x 2" x 8' | cedar | 5 |
| 5/4" x 6" x 8' | cedar decking | 2 |
| 2" x 4" x 8' | cedar | 1 |
| 1-1/4" | galvanized deck screws | 22 |
| 1-5/8" | galvanized deck screws | 64 |
| 2" | galvanized deck screws | 22 |
| 2-1/2" | galvanized deck screws | 4 |
| 4d | galvanized finish nails | 1/2 lb. |
| 6d | galvanized finish nails | 1/4 lb. |
| Construction adhesive | 1 tube |
Cutting All The Parts
Begin by cutting all of the pieces listed in the Cutting List, with the exception of parts G, S and T. These parts must be cut later to fit the chair when it’s partially assembled.
Take particular care to cut the side slats (R) so they’re exactly the same length. These slats have to fit against a rail (S), and any differences in the length of the slats will result in gaps.
While you’re sawing, cut the arms of the chair and love seat (Photo 1) with a 2-in. taper from front to back. When cutting parts E, F, and G, set the angle of your circular saw to 20 degrees.
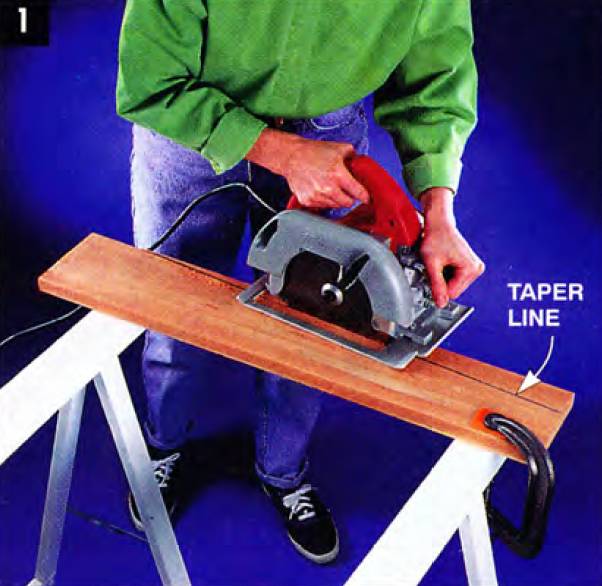
Cut the chair parts with your circular saw. Make tapered cuts for the arms of the chair.
Start With A Simple Box
You can see from the photos (especially Photo 2) that the whole chair is built around a simple box, with the legs, seat and back all attached to it.
To start assembly, nail parts A together with 4d galvanized finish nails (Photo 2). Notice that the sides overlap the ends of the front and back boards.
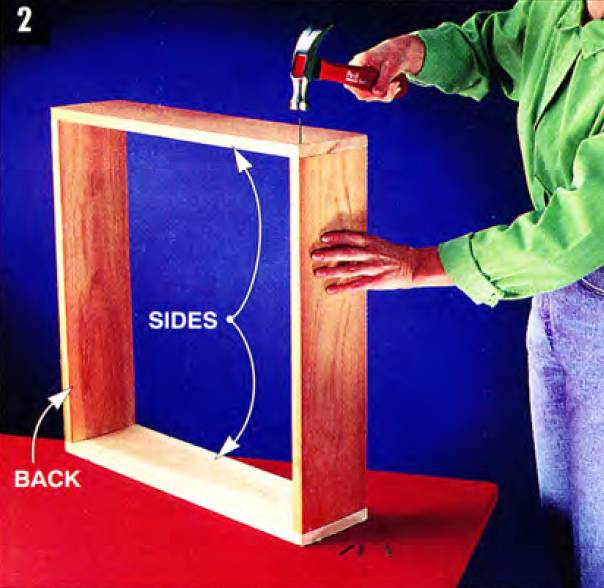
Nail together a box to begin the chair assembly. Nail through the sides and into the front and back pieces.
Each of the legs gets glued and screwed onto the box you’ve just built. The box overlaps each leg 1-1/2 in. and the top of the box is 14-1/2 in. from the bottom of the legs.
To make juggling these parts a little easier, try marking a line exactly where the box will go onto each leg.
To assemble these parts. lay the back legs flat on the floor and align the box with the marks on the legs. Drill pilot holes and glue and screw the box to the back legs, as shown in Fig. A
To finish attaching the legs, turn this assembly around and fasten the box to the front legs the same way.
Whenever you screw wood pieces together, always drill a pilot and countersink hole first (a combination bit is the best tool), to prevent splitting the wood.
To complete this part of the assembly, screw through each leg into the corners of the box as shown in Fig. A.
Attaching Arms And Seat Braces
The chair really starts to take shape when the arms get screwed into place (Photo 3). Be sure that each arm overhangs the front and back legs as shown in Fig. A. Predrill and then screw the arms into the legs.
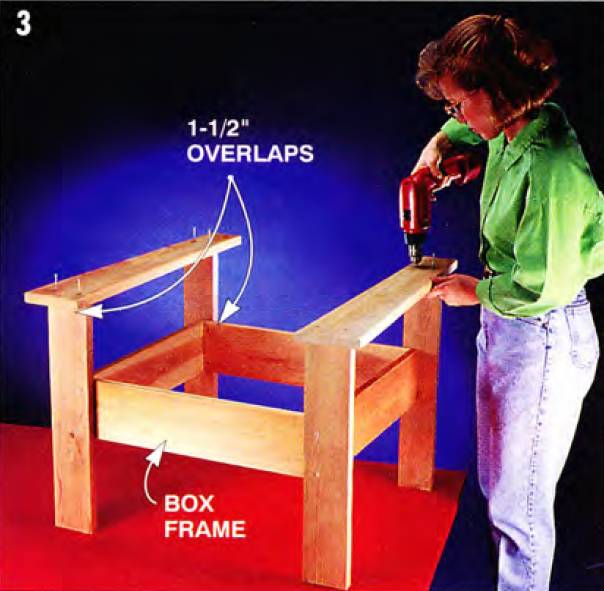
Screw the arms to the tops of the legs after attaching the legs to the box frame.
Glue and screw on parts E, F, and H as shown in Fig. A Be sure that E, H, and J are screwed from the sides of the chair box as well as the front and back.
All this gluing and screwing may seem like overkill to you, but leaving screws and glue out of an area can put stress on other joints.
Next, measure and cut part G to fit between the back of the arms and onto F as shown below, then glue and nail G into E
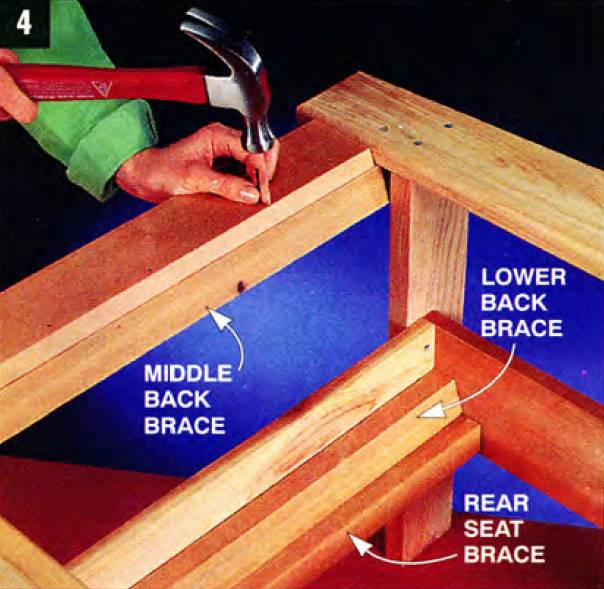
Glue and nail the back brace between the arms. Seat and back supports are glued and nailed inside the box frame.
Now’s a good time to relax and inspect the work you’ve just completed. Look over the chair to make sure the legs are all in contact with the floor.
Clean off any glue that’s oozing out of the joints, and check for any screws or nails that may have been left out — this is by far the easiest time to correct problems.
The Side Slats
These side slats give the chair its Mission style.
To install them, turn the chair upside down and cut the cleats (T) to fit under the arms, between the front and back legs (Photo 5). Glue and nail part T onto the underside of each arm, making sure it is 1-1/2 in. from the inside edge of the legs, just as the box was (Photo 5). The side of part T should line up with the side of the box, so the slats rest tightly on both of them
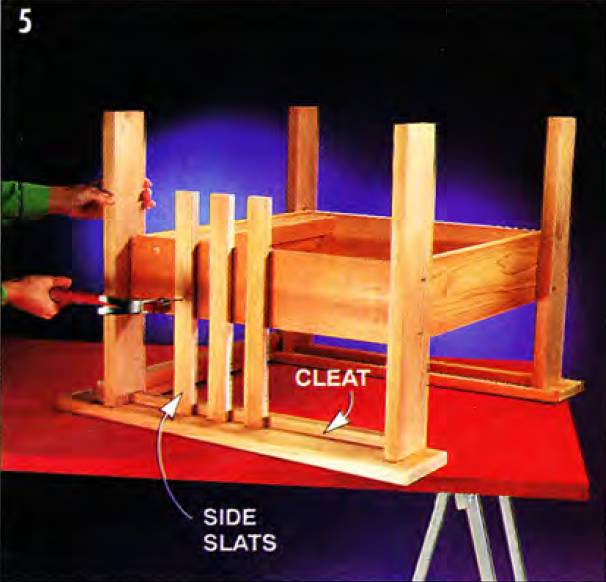
Attach the side slats with the chair upside down. Start in the middle, and leave a 1-1/2 in. space between each slat.
Before nailing on the side slats, clip about 1/8 in. off the ends of the 4d nails, using your side cutter. This keeps the ends of the nails from protruding through the inside of the box — where they’d scratch your fanny but good! Be sure to wear eye protection while cutting off the tips. I cut the nails into a paper bag to keep the tips from flying around and ending up in my tire or shoe.
Glue and nail the side slats into the box and under arm cleats (T), starting with the center slat positioned in the middle of the box. Then move out in each direction, leaving a 1-1/2 in. space between each slat. To finish up, measure the distance between the front and back leg and cut piece S to fit snugly into place. Center S over the slats and nail through the bottom of S into each slat. To finish, nail into S from the front and back legs with two 6d galvanized finish nails.
Seat And Back Slats
All that’s left is to attach the seat slats and back slats.
Start by centering seat slat N inside the box. Drill and screw it in place using two screws on each end. Then set the remaining slats, L and M, in position, leaving a 7/16-in. space between the slats. Screw them down.
Now you’re on the home stretch. Center Q on top of the center seat slat N and use a square (see below) to mark the correct vertical position so that all of the slats will be perfectly upright. Screw Q into place. Repeat the process for the remaining back slats.
Lastly, install the upper back brace K. Glue and screw K into the back slats using one screw in each narrow slat and two into the middle slat. Be sure to use 1-1/4 in. screws.

Add back and seat slats, starting in the middle and working out. Keep the back slats square to the frame.
Finishing
At this stage, you probably can’t wait to start using the chair. Go ahead – it’s a good way to reward yourself and put off the tedium of sanding.
However, don’t put off sanding and finishing too long. I made that mistake once, and the sun dried out the wood and left cracks at the ends of the boards. If you don’t have time to finish your furniture right away, store it in a shaded area.
To smooth the wood before finishing, use a sanding block and 100-grit paper. Then retrace your steps with 150-grit. If you have an electric finish sander, put it to work and you’ll get done in half the time.
Be particularly careful to remove saw marks from the edges of boards. Sand all the edges just enough to make them comfortable and to keep them from splintering.
To protect your labor of love, use one of the many wood sealers that protect decks and outdoor furniture from water and sun damage. Look for one that offers ultraviolet (UV) Protection.
You may want to match a particular wood tone that you already have on your house or deck. I used a mixture of a UV-blocking exterior deck sealer and boiled linseed oil in equal amounts. The sealer protects the wood and the linseed oil gives it a warm, natural glow.
You can also choose to let your chairs weather naturally. The advantage of doing this is that you avoid having to put a finish on at regular intervals, and you may prefer the gray, weathered look.
The disadvantages are that without a sealer, even a rot-resistant wood like cedar will crack and split from abrupt moisture changes, and the weathering may be uneven, so the chairs become mottled gray, brown, and black.
After finishing, wait at least 24 hours before relaxing in your chair. Put on another coat of finish after the first season of use, and as needed after that.
Outdoor Love Seat
The love seat is designed to seat two people comfortably, with enough room to cross your legs and talk to each other without feeling crowded.
Cutting List
| KEY | PCS. | SIZE | DESCRIPTION |
|---|---|---|---|
| A | 2 | 3/4" x 5-1/2" x 22" | Seat box members |
| AA | 2 | 3/4" x 5-1/2" x 47-3/4" | Seat box members |
| B | 2 | 1-1/16" x 3-1/2" x 21-1/2" | Back legs |
| C | 2 | 1-1/16" x 4" x 21-1/2" | Front legs |
| D | 2 | 1-1/16" x 5-1/2" x 30" | Arms |
| EE | 1 | 1-1/2" x 1-1/2" x 47-3/4" | Lower back brace |
| FF | 1 | 1-1/2" x 1-1/2" x 51-1/4" | Middle back brace |
| GG | 1 | 3/4" x 3" x 45-3/4" | Back stiffener |
| HH | 1 | 1-1/2" x 2-3/4" x 47-3/4" | Rear seat brace |
| JJ | 1 | 3/4" x 1-1/2" x 47-3/4" | Front seat brace |
| KK | 1 | 3/4" x 1-1/2" x 43-1/4" | Upper back brace |
| L | 2 | 3/4" x 3-1/2" x 19-1/4" | Seat slats |
| M | 6 | 3/4" x 3" x 19-1/4" | Seat slats |
| N | 3 | 3/4" x 5-1/2" x 19-1/4" | Seat slat |
| P | 8 | 3/4" x 3" x 31-7/8" | Back slats |
| Q | 3 | 3/4" x 5-1/2" x 31-7/8" | Back slat |
| R | 14 | 3/4" x 1-1/2" x 16" | Side slats |
| S | 2 | 3/4" x 1-1/2" x 22" | Lower side slat rail |
| T | 2 | 3/4" x 1" x 22" | Under arm cleat |
Shopping List
| DIMENSIONS | ITEM | QTY |
|---|---|---|
| 1" x 6" x 8' | cedar | 5 |
| 1" x 4" x 8' | cedar | 6 |
| 1" x 2" x 8' | cedar | 6 |
| 5/4" x 6" x 8' | cedar decking | 2 |
| 2" x 4" x 8' | cedar | 1 |
| 1-1/4" | galvanized deck screws | 10 |
| 1-5/8" | galvanized deck screws | 120 |
| 2" | galvanized deck screws | 20 |
| 2-1/2" | galvanized deck screws | 8 |
| 4d | galvanized finish nails | 1/2 lb. |
| 6d | galvanized finish nails | 1/4 lb. |
To build the love seat, follow exactly the same building steps as the chair:
- Build a box,
- Attach the legs,
- Then, the arms and sides,
- Finally, the seat and back.
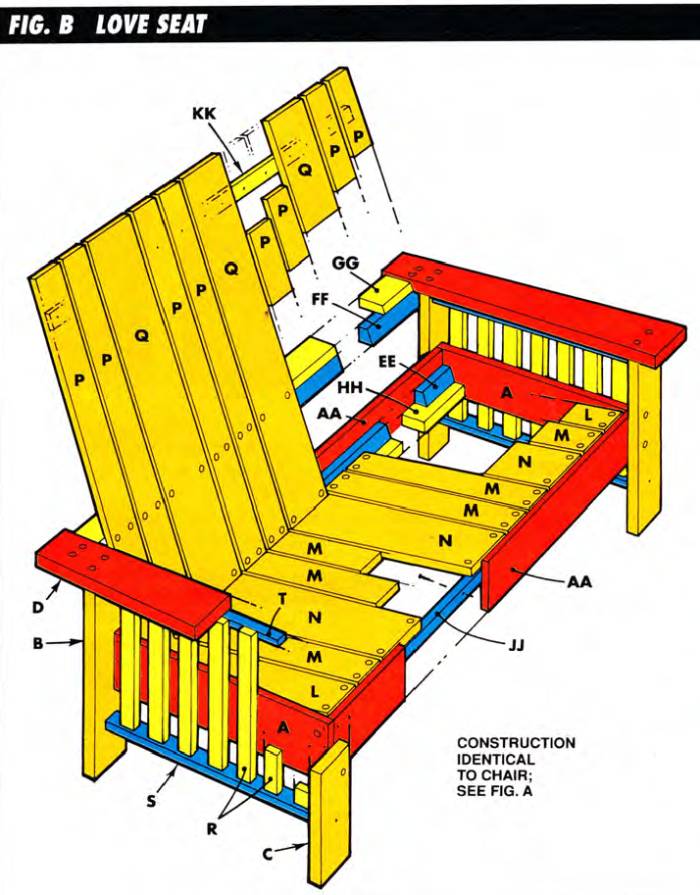
As you can see above, the only difference between the chair and the love seat is in the length of some of the parts, and the number of seat and back slats.
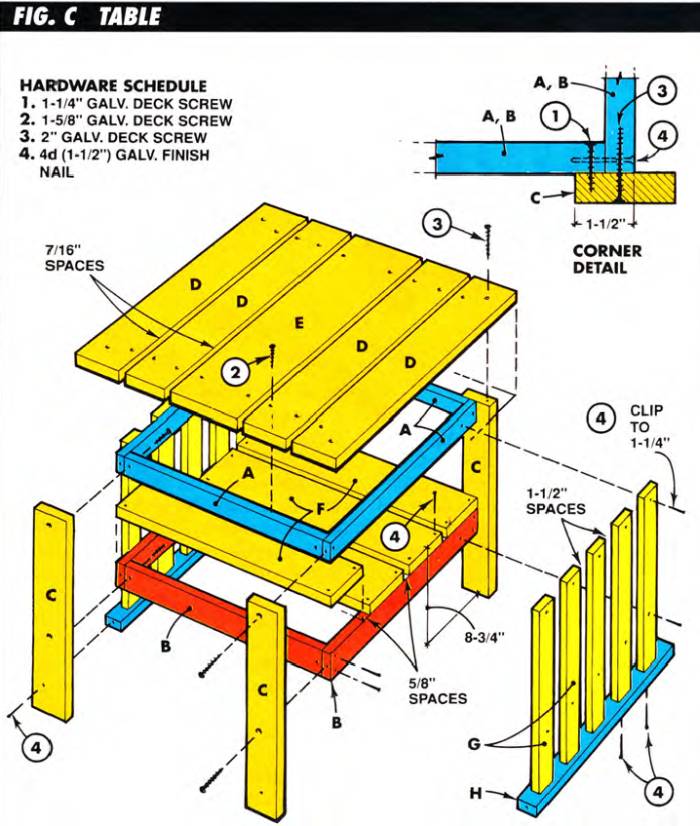
Outdoor Table
The table is great for serving snacks and beverages, and the lower shelf is a convenient place for books and magazines.
Cutting List
| KEY | PCS. | SIZE | DESCRIPTION |
|---|---|---|---|
| A | 4 | 3/4" x 1-1/2" x 16" | Upper box members |
| B | 4 | 3/4" x 2-1/2" x 16" | Lower box members |
| C | 4 | 3/4" x 2-1/2" x 18" | Legs |
| D | 4 | 3/4" x 3-1/2" x 19-1/2" | Top slats |
| E | 1 | 3/4" x 5-1/2" x 19-1/2" | Middle top slat |
| F | 4 | 3/4" x 3-1/2" x 17-1/2" | Shelf slats |
| G | 10 | 3/4" x 1-1/2" x 16" | Side slats |
| H | 2 | 3/4" x 1-1/2" x 16" | Bottom side slat rails |
Shopping List
| DIMENSIONS | ITEM | QTY |
|---|---|---|
| 1" x 3" x 10' | cedar | 1 |
| 1" x 4" x 8' | cedar | 2 |
| 1" x 6" x 2' | cedar | 1 |
| 1" x 2" x 8' | cedar | 3 |
| 1-5/8" | galvanized deck screws | 28 |
| 1-1/4" | galvanized deck screws | 8 |
| 4d | galvanized finish nails | 1/2 lb. |
The building method for the table is very similar to what you used for the chair, as shown below:
-
- Build two boxes from parts A and B,
- then attach the legs just as you did with the Chair,
- last, all that's left is to nail on the shelf slats and screw on the top slats.
No fancy joinery in this furniture, no complicated techniques. You don’t even need a portable table saw or a hybrid table saw — just a circular saw and hand tools.
This outdoor furniture is just what you need to help you catch up on your relaxing this summer. Just imagine — summer afternoons, an ice-cold drink, cool shade and a comfortable wood chair that you built yourself. Plastic and metal just wouldn’t feel the same.
This furniture was designed so that you can build it even without the luxury of a home wood shop. There’s no fancy joinery — most parts are just screwed together — so even if you don’t have a lot of tools, this outdoor set is easily within your grasp.
Each piece will take only a day or so for you to make — even if you’re a beginner to woodworking.
What Wood To Use In Outdoor Furniture?
You have a number of choices:
- Personally, I’d choose western cedar for its natural beauty and resistance to decay.
- Cypress is another excellent choice if it’s available in your area.
- Pine is good, but be sure to treat it with a preservative.
- Pressure-treated pine will work, but you must seal it well with an oil-based stain or outdoor deck sealer to prevent irritation to the skin. You’ll also have to wait a couple of weeks for pressure-treated pine to dry sufficiently before you apply a finish.
- Redwood is a good choice, but it’s expensive.
If you decide to use cedar, the boards may only be available smooth on one side and rough on the other. Your lumberyard or a local cabinet shop may be able to plane the rough side for you; if not, use a belt sander and a 36-grit belt to smooth the rough side.
Tools Needed And Material Costs
The only tools you need for this project are:
- circular saw,
- drill and driver kit,
- tape measure,
- steel square,
- straightedge,
- hammer, and
- side cutter (a heavy wire cutter).
If you’re a beginner with the circular saw, watch the video below for a better understanding on how to use it safely:
If you have a router, you can use it to round over some of the edges, but a simple wood file and sandpaper will work. If you don’t have a combination pilot-and-countersink drill bit for No. 6 screws (35), pick one up — you’ll be glad you did.
For gluing parts, I suggest you use construction adhesive or a water-resistant glue like Titebond II. Also wear safety glasses when cutting and nailing.
The lumber for this chair cost around $90, plus about $11 for screws, glue, and nails. Total cost for the love seat was about $130, and the table was about $50.
Before You Start
Below you will find complete step-by-step directions for building only the chair.
To build the love seat and the table, use the respective plans, shopping and cutting lists, and the same techniques described for the chair.
If you haven’t built anything in a while, you should reacquaint yourself with your tools. A few practice cuts with your circular saw will remind you if the blade is dull or if you’re cutting on the correct side of your marks.
Outdoor Chair
Cutting List
| KEY | PCS. | SIZE | DESCRIPTION |
|---|---|---|---|
| A | 4 | 3/4" x 5-1/2" x 22" | Seat box members |
| B | 2 | 1-1/16" x 3-1/2" x 21-1/2" | Back legs |
| C | 2 | 1-1/16" x 4" x 21-1/2" | Front legs |
| D | 2 | 1-1/16" x 5-1/2" x 30" | Arms |
| E | 1 | 1-1/2" x 1-1/2" x 22" | Lower back brace |
| F | 1 | 1-1/2" x 1-1/2" x 25" | Middle back brace |
| G | 1 | 3/4" x 3" x 20-1/2" | Back stiffener |
| H | 1 | 1-1/2" x 2-3/4" x 22" | Rear seat brace |
| J | 1 | 3/4" x 1-1/2" x 22" | Front seat brace |
| K | 1 | 3/4" x 1-1/2" x 22" | Upper back brace |
| L | 2 | 3/4" x 3-1/2" x 19-1/4" | Seat slats |
| M | 2 | 3/4" x 3" x 19-1/4" | Seat slats |
| N | 1 | 3/4" x 5-1/2" x 19-1/4" | Seat slat |
| P | 4 | 3/4" x 3" x 31-7/8" | Back slats |
| Q | 1 | 3/4" x 5-1/2" x 31-7/8" | Back slat |
| R | 14 | 3/4" x 1-1/2" x 16" | Side slats |
| S | 2 | 3/4" x 1-1/2" x 22" | Lower side slat rail |
| T | 2 | 3/4" x 1" x 22" | Under arm cleat |
Shopping List
| DIMENSIONS | ITEM | QTY |
|---|---|---|
| 1" x 6" x 8' | cedar | 2 |
| 1" x 4" x 8' | cedar | 3 |
| 1" x 2" x 8' | cedar | 5 |
| 5/4" x 6" x 8' | cedar decking | 2 |
| 2" x 4" x 8' | cedar | 1 |
| 1-1/4" | galvanized deck screws | 22 |
| 1-5/8" | galvanized deck screws | 64 |
| 2" | galvanized deck screws | 22 |
| 2-1/2" | galvanized deck screws | 4 |
| 4d | galvanized finish nails | 1/2 lb. |
| 6d | galvanized finish nails | 1/4 lb. |
| Construction adhesive | 1 tube |
Cutting All The Parts
Begin by cutting all of the pieces listed in the Cutting List, with the exception of parts G, S and T. These parts must be cut later to fit the chair when it’s partially assembled.
Take particular care to cut the side slats (R) so they’re exactly the same length. These slats have to fit against a rail (S), and any differences in the length of the slats will result in gaps.
While you’re sawing, cut the arms of the chair and love seat (Photo 1) with a 2-in. taper from front to back. When cutting parts E, F, and G, set the angle of your circular saw to 20 degrees.
Cut the chair parts with your circular saw. Make tapered cuts for the arms of the chair.
Start With A Simple Box
You can see from the photos (especially Photo 2) that the whole chair is built around a simple box, with the legs, seat and back all attached to it.
To start assembly, nail parts A together with 4d galvanized finish nails (Photo 2). Notice that the sides overlap the ends of the front and back boards.
Nail together a box to begin the chair assembly. Nail through the sides and into the front and back pieces.
Each of the legs gets glued and screwed onto the box you’ve just built. The box overlaps each leg 1-1/2 in. and the top of the box is 14-1/2 in. from the bottom of the legs.
To make juggling these parts a little easier, try marking a line exactly where the box will go onto each leg.
To assemble these parts. lay the back legs flat on the floor and align the box with the marks on the legs. Drill pilot holes and glue and screw the box to the back legs, as shown in Fig. A
To finish attaching the legs, turn this assembly around and fasten the box to the front legs the same way.
Whenever you screw wood pieces together, always drill a pilot and countersink hole first (a combination bit is the best tool), to prevent splitting the wood.
To complete this part of the assembly, screw through each leg into the corners of the box as shown in Fig. A.
Attaching Arms And Seat Braces
The chair really starts to take shape when the arms get screwed into place (Photo 3). Be sure that each arm overhangs the front and back legs as shown in Fig. A. Predrill and then screw the arms into the legs.
Screw the arms to the tops of the legs after attaching the legs to the box frame.
Glue and screw on parts E, F, and H as shown in Fig. A Be sure that E, H, and J are screwed from the sides of the chair box as well as the front and back.
All this gluing and screwing may seem like overkill to you, but leaving screws and glue out of an area can put stress on other joints.
Next, measure and cut part G to fit between the back of the arms and onto F as shown below, then glue and nail G into E
Glue and nail the back brace between the arms. Seat and back supports are glued and nailed inside the box frame.
Now’s a good time to relax and inspect the work you’ve just completed. Look over the chair to make sure the legs are all in contact with the floor.
Clean off any glue that’s oozing out of the joints, and check for any screws or nails that may have been left out — this is by far the easiest time to correct problems.
The Side Slats
These side slats give the chair its Mission style.
To install them, turn the chair upside down and cut the cleats (T) to fit under the arms, between the front and back legs (Photo 5). Glue and nail part T onto the underside of each arm, making sure it is 1-1/2 in. from the inside edge of the legs, just as the box was (Photo 5). The side of part T should line up with the side of the box, so the slats rest tightly on both of them
Attach the side slats with the chair upside down. Start in the middle, and leave a 1-1/2 in. space between each slat.
Before nailing on the side slats, clip about 1/8 in. off the ends of the 4d nails, using your side cutter. This keeps the ends of the nails from protruding through the inside of the box — where they’d scratch your fanny but good! Be sure to wear eye protection while cutting off the tips. I cut the nails into a paper bag to keep the tips from flying around and ending up in my tire or shoe.
Glue and nail the side slats into the box and under arm cleats (T), starting with the center slat positioned in the middle of the box. Then move out in each direction, leaving a 1-1/2 in. space between each slat. To finish up, measure the distance between the front and back leg and cut piece S to fit snugly into place. Center S over the slats and nail through the bottom of S into each slat. To finish, nail into S from the front and back legs with two 6d galvanized finish nails.
Seat And Back Slats
All that’s left is to attach the seat slats and back slats.
Start by centering seat slat N inside the box. Drill and screw it in place using two screws on each end. Then set the remaining slats, L and M, in position, leaving a 7/16-in. space between the slats. Screw them down.
Now you’re on the home stretch. Center Q on top of the center seat slat N and use a square (see below) to mark the correct vertical position so that all of the slats will be perfectly upright. Screw Q into place. Repeat the process for the remaining back slats.
Lastly, install the upper back brace K. Glue and screw K into the back slats using one screw in each narrow slat and two into the middle slat. Be sure to use 1-1/4 in. screws.
Add back and seat slats, starting in the middle and working out. Keep the back slats square to the frame.
Finishing
At this stage, you probably can’t wait to start using the chair. Go ahead – it’s a good way to reward yourself and put off the tedium of sanding.
However, don’t put off sanding and finishing too long. I made that mistake once, and the sun dried out the wood and left cracks at the ends of the boards. If you don’t have time to finish your furniture right away, store it in a shaded area.
To smooth the wood before finishing, use a sanding block and 100-grit paper. Then retrace your steps with 150-grit. If you have an electric finish sander, put it to work and you’ll get done in half the time.
Be particularly careful to remove saw marks from the edges of boards. Sand all the edges just enough to make them comfortable and to keep them from splintering.
To protect your labor of love, use one of the many wood sealers that protect decks and outdoor furniture from water and sun damage. Look for one that offers ultraviolet (UV) Protection.
You may want to match a particular wood tone that you already have on your house or deck. I used a mixture of a UV-blocking exterior deck sealer and boiled linseed oil in equal amounts. The sealer protects the wood and the linseed oil gives it a warm, natural glow.
You can also choose to let your chairs weather naturally. The advantage of doing this is that you avoid having to put a finish on at regular intervals, and you may prefer the gray, weathered look.
The disadvantages are that without a sealer, even a rot-resistant wood like cedar will crack and split from abrupt moisture changes, and the weathering may be uneven, so the chairs become mottled gray, brown, and black.
After finishing, wait at least 24 hours before relaxing in your chair. Put on another coat of finish after the first season of use, and as needed after that.
Outdoor Love Seat
The love seat is designed to seat two people comfortably, with enough room to cross your legs and talk to each other without feeling crowded.
Cutting List
| KEY | PCS. | SIZE | DESCRIPTION |
|---|---|---|---|
| A | 2 | 3/4" x 5-1/2" x 22" | Seat box members |
| AA | 2 | 3/4" x 5-1/2" x 47-3/4" | Seat box members |
| B | 2 | 1-1/16" x 3-1/2" x 21-1/2" | Back legs |
| C | 2 | 1-1/16" x 4" x 21-1/2" | Front legs |
| D | 2 | 1-1/16" x 5-1/2" x 30" | Arms |
| EE | 1 | 1-1/2" x 1-1/2" x 47-3/4" | Lower back brace |
| FF | 1 | 1-1/2" x 1-1/2" x 51-1/4" | Middle back brace |
| GG | 1 | 3/4" x 3" x 45-3/4" | Back stiffener |
| HH | 1 | 1-1/2" x 2-3/4" x 47-3/4" | Rear seat brace |
| JJ | 1 | 3/4" x 1-1/2" x 47-3/4" | Front seat brace |
| KK | 1 | 3/4" x 1-1/2" x 43-1/4" | Upper back brace |
| L | 2 | 3/4" x 3-1/2" x 19-1/4" | Seat slats |
| M | 6 | 3/4" x 3" x 19-1/4" | Seat slats |
| N | 3 | 3/4" x 5-1/2" x 19-1/4" | Seat slat |
| P | 8 | 3/4" x 3" x 31-7/8" | Back slats |
| Q | 3 | 3/4" x 5-1/2" x 31-7/8" | Back slat |
| R | 14 | 3/4" x 1-1/2" x 16" | Side slats |
| S | 2 | 3/4" x 1-1/2" x 22" | Lower side slat rail |
| T | 2 | 3/4" x 1" x 22" | Under arm cleat |
Shopping List
| DIMENSIONS | ITEM | QTY |
|---|---|---|
| 1" x 6" x 8' | cedar | 5 |
| 1" x 4" x 8' | cedar | 6 |
| 1" x 2" x 8' | cedar | 6 |
| 5/4" x 6" x 8' | cedar decking | 2 |
| 2" x 4" x 8' | cedar | 1 |
| 1-1/4" | galvanized deck screws | 10 |
| 1-5/8" | galvanized deck screws | 120 |
| 2" | galvanized deck screws | 20 |
| 2-1/2" | galvanized deck screws | 8 |
| 4d | galvanized finish nails | 1/2 lb. |
| 6d | galvanized finish nails | 1/4 lb. |
To build the love seat, follow exactly the same building steps as the chair:
- Build a box,
- Attach the legs,
- Then, the arms and sides,
- Finally, the seat and back.
As you can see above, the only difference between the chair and the love seat is in the length of some of the parts, and the number of seat and back slats.
Outdoor Table
The table is great for serving snacks and beverages, and the lower shelf is a convenient place for books and magazines.
Cutting List
| KEY | PCS. | SIZE | DESCRIPTION |
|---|---|---|---|
| A | 4 | 3/4" x 1-1/2" x 16" | Upper box members |
| B | 4 | 3/4" x 2-1/2" x 16" | Lower box members |
| C | 4 | 3/4" x 2-1/2" x 18" | Legs |
| D | 4 | 3/4" x 3-1/2" x 19-1/2" | Top slats |
| E | 1 | 3/4" x 5-1/2" x 19-1/2" | Middle top slat |
| F | 4 | 3/4" x 3-1/2" x 17-1/2" | Shelf slats |
| G | 10 | 3/4" x 1-1/2" x 16" | Side slats |
| H | 2 | 3/4" x 1-1/2" x 16" | Bottom side slat rails |
Shopping List
| DIMENSIONS | ITEM | QTY |
|---|---|---|
| 1" x 3" x 10' | cedar | 1 |
| 1" x 4" x 8' | cedar | 2 |
| 1" x 6" x 2' | cedar | 1 |
| 1" x 2" x 8' | cedar | 3 |
| 1-5/8" | galvanized deck screws | 28 |
| 1-1/4" | galvanized deck screws | 8 |
| 4d | galvanized finish nails | 1/2 lb. |
The building method for the table is very similar to what you used for the chair, as shown below:
-
- Build two boxes from parts A and B,
- then attach the legs just as you did with the Chair,
- last, all that's left is to nail on the shelf slats and screw on the top slats.