
How To Build A Custom Bookcase For Beginners (with plans and pictures)
You know how stuff piles up. Stacks of books and magazines grow taller, toys and games fill the corners. Tennis rackets, skates, tools and other equipment multiply with every new sport or hobby. And photos and other keepsakes you want to display have to jostle for viewing space on the overcrowded mantel.
To keep pace with the accumulation and to keep favorite items within easy reach, every homeowner needs a simple recipe for knocking together a batch of shelves at a moment’s notice.
Build them fancy, build them plain, the basic methods are the same!

The design should be simple enough to produce sturdy shelving in a few hours, yet with a few variations and a bit more time, look attractive enough for use in a living area or dining room.
The design you’re about to see satisfies both requirements.
This design has eliminated complicated joints so even a novice can quickly nail together either heavy-duty utility shelving for the garage or good-looking bookcases for the family room, like the one in the opening photo.
In this article, you’ll see the tools and techniques used to build this bookshelf. You won’t need expensive power tools, only a circular saw and a cordless drill.
If you’re experienced with these tools, you can build this shelving. And you’ll see several special tools and accessories, all inexpensive that make the work even easier. The materials for this shelving cost $190.
Extra Shelf-Building Tips
There’s always more than one good way to build a shelf.
Since you’ll want to adapt this design to your own special use, I’ll present several alternative building techniques to give you more options. Use these tips to make your project stronger, more attractive, or less costly.
Finally, I’ve added five extra shelving designs at the end of this article to illustrate ways to alter this design while using the same basic building techniques. I hope they’ll stimulate your own imagination and creativity.
Planning your shelving
First and foremost, shelving is practical. The shape it takes depends on what goes on it and where you’ll put it.
With this practical side in mind, let your imagination go to work. Pull out a pad of paper and a pencil and roughly sketch some designs in their room setting. Then use the following guidelines to help put dimensions on your plant.
Shelf Depth (front to back)
Plan the shelf depth (front to back) to fit the largest objects you’ll want it to hold — books, photo albums, stereo with a turntable, toys, etc.
Below you’ll find some standard dimensions for various household objects, but don’t hesitate to measure others, especially odd-sized things like the television.
These shelves were designed primarily for books of all sizes, and the 11-1/4 in. depth worked well for displaying photos, ceramic bowls, and flowers too.
Examine the alternative design illustrations at the end of this page to see how you can adapt shelf sizes for other purposes.
Standard Shelf Depths
- CDs and DVDs: 6 in.
- Paperbacks: 9 in.
- Average books: 11 in.
- Magazines: 11 in.
- Display books: 11 to 14 in.
- Record albums: 13 in.
- Stereo equipment: 17 in.
- Television: 24 in. -plus (measure yours)
Shelf Length (side to side)
Well-designed shelves won’t sag. So when you plan their length, you’ll want them to support the heaviest objects you’re likely to set on them without causing them to dip noticeably.
While most shelves won’t have to hold a car engine, they should probably be strong enough to support a heavy load of books.
Using books as a standard, follow this rule of thumb: 3/4-in. thick wood shelves (10 to 12 in. deep) should span no more than 32 in. between supports.
I’m being a bit conservative here, lumping all wood species and plywood together. Stronger 3/4-in. boards like oak and maple can sometimes span another foot, depending on their quality. But not always. So generally, limit your shelf spans to 32 in.
You can make longer or stronger shelves in two ways:
- by reinforcing 3/4-in. shelves with 1x2 strips glued and nailed to their front and/or back edges; or
- by using thicker wood.
Tip: Look for precut stair treads at the lumberyard. They’re more than 1-in. thick and make strong shelves.
I’m limiting the choice of shelving materials to 3/4-in. thick wood here (standard 1x8s, 1x10s, and 1x12s are all 3/4 in. thick). While many other materials work well, 3/4-in. wood is one of the best. Whether solid boards or plywood, it’s strong, easy to work with, economical in some grades, handsome in others, and available everywhere.
Since you can finish it in many ways, you can create an endless variety of shelving with it.
Shelf Height
You can build your shelving as high as you want, but remember that as it stretches higher, it has a greater chance of tipping over, should your athletic 3-year-old try to climb it.
Unless it has a wide, stable base, shelving that’s over 3 ft. high should be screwed directly to the wall framing. You can always remove the screws when you want to move the shelves.
Choosing the Materials
With the dimensions of your shelving in mind, turn your attention to how you want the shelves to look.
- Do you want to paint them to match the room?
- Leave them natural?
- Go for a rustic look?
What you decide here will determine which material you use. Use Table B below to help with your decision. It lists the advantages and disadvantages of common 3/4-in. materials and tells you how much each choice costs.
Types of 3/4-in. Shelving
| Material | Pros | Cons |
|---|---|---|
| No. 2 Pine Boards | Easy to cut and assemble; takes paint well except for rough knots; good rustic appearance | Quality varies, so select boards carefully; look for straight, flat boards; you often have to fill and seal knots before painting; accepts stain poorly |
| Clear Pine | Same as No. 2 Pine, except no knots or flaws | Stains poorly; expensive |
| Oak, Birch, and Maple Boards | Attarctive wood; usually stained or given a natural finish; birch and maple take paint well | More difficult to cut, nail, and sand than pine; oak does not paint smoothly; expensive |
| Birch Plywood | Attractive, smooth, flat boards; easy to cut and nail; accepts paint or a natural finish well | Difficult to stain; exposed edges must be covered for a finished look; must saw boards from 4x8 sheets |
| Oak Plywood | Attractive, smooth, flat boards; easy to cut and nail; accepts stain well | Takes paint poorly; exposed edges must be covered for finished look; must saw boards from 4x8 sheets |
| Fir Plywood | Flat boards; easy to cut and nail; sanded, smooth grades (code letters AB) accept paint and stain fairly well; rougher grades (CD) are inexpensive | Rougher grades (CD) finish poorly; exposed edges must be covered for finished look; must saw boards from 4x8 sheets |
| Particle Board (NOT recommended) | Flat; inexpensive | Weaker than solid wood or plywood (max. shelf length is 26 in.); difficult to nail or screw together; difficult to paint; rapidly deteriorates when moist |
Project details
These shelves were built into the family room as a permanent feature. The shelves were painted to match the woodwork and received a decorative oak top, stained to match the floor.
The project uses birch plywood for shelving because it provides a perfectly flat, smooth surface for painting at a moderate price.
However, choosing plywood rather than pine boards meant more time spent cutting out the right shelving widths. If you have a portable or a hybrid table saw, this task goes fast. But you don’t need one to do a first-rate job, as you’ll see in the next section.
This project also used a solid oak board for the decorative top for three reasons:
- First, the surface of solid wood looks more attractive than the veneered oak plywood. (You’ll find wide, solid hardwood boards, oak in this case, glued together from narrower boards to prevent warping.)
- Second, it's easier to apply edge molding to solid wood, because you don't have to worry about ruining the thin veneer on plywood when you sand the molding joints smooth.
- And third, this oak top cost $55, a $10 savings over oak plywood because it’d be necessary to buy an entire 4’x8’ sheet.
Fig. A: Shelving Plans
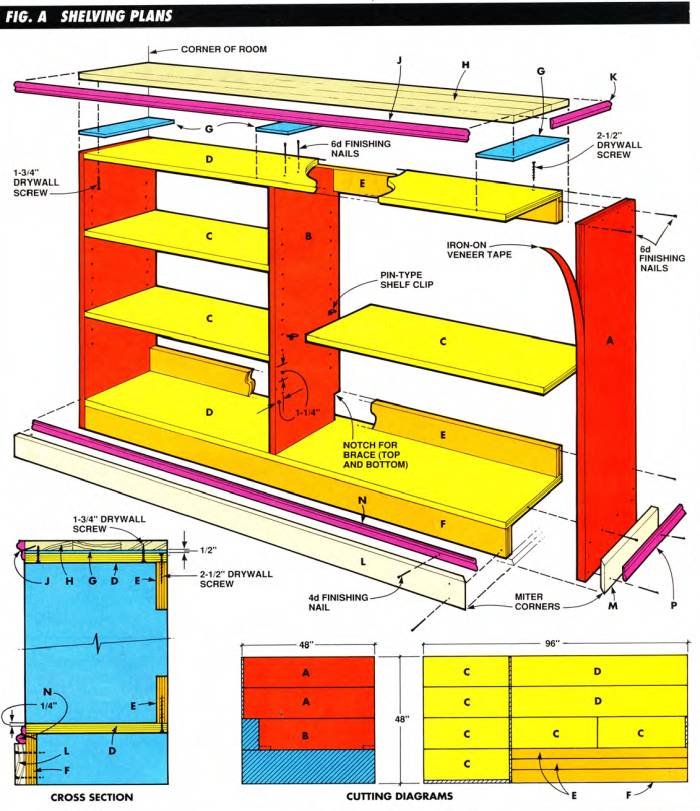
Cutting List
| Key | Pcs. | Size | Description |
|---|---|---|---|
| A | 2 | 3/4" x 11-1/4" x 47-7/8" | Plywood |
| B | 1 | 3/4" x 11-1/4" x 42" | Plywood |
| C | 6 | 3/4" x 11-1/4" x 31-1/2" | Plywood |
| D | 2 | 3/4" x 11-1/4" x 64" | Plywood |
| E | 2 | 3/4" x 4" x 64" | Plywood |
| F | 1 | 3/4" x 4-3/8" x 64" | Plywood |
| G | 3 | 1/2" x 4" x 11-1/4" | Plywood |
| H | 1 | 3/4" x 11-1/4" x 65-1/2" | Oak |
| J | 1 | 3/4" x 1/4" x 66-1/4" | Oak trim |
| K | 1 | 3/4" x 1/4" x 12-1/4" | Oak trim |
| L | 1 | 3/4" x 3-1/2" x 65-1/2" | Pine |
| M | 1 | 3/4" x 3-1/2" x 12-1/4" | Pine |
| N | 1 | 3/4" x 1-3/8" x 66-1/4" | Pine trim |
| P | 1 | 3/4" x 1-3/8" x 12-1/4" | Pine trim |
Cutting out the parts
Begin the project by cutting the plywood into properly sized parts.
This takes a little longer than if you use 1x12 boards, but plywood has some advantages. By using the factory edge as an 8-ft. saw guide, you can cut your shelving perfectly straight with a circular saw (Photo 1).

Cut shelving boards with your circular saw using a clamped piece of plywood as a guide. Wear eye and ear protection and work on the floor for more stability.
And by using a factory corner as a guide for crosscuts (when you cut the parts to length), you can cut off each piece perfectly square (Photo 4).

Clamp the factory corner of plywood for a perfect right-angle crosscut guide.
Unfortunately, the whole process can take quite a bit of time. It took me two hours to cut the pieces for our shelving.
Tip: Simplify your finish work by making smooth saw cuts every time. Use a sharp 40-tooth carbide blade to do this (Photo 2), rather than a 20- to 24-tooth standard blade, The 40-tooth blade is expensive ($40), so I keep mine stashed away, using it only on these occasions.
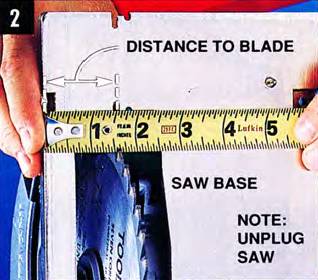
Measure the distance between the edge of the base and the blade and adjust the plywood guide accordingly. Use a sharp, 40-tooth carbide blade for finer cuts.
I didn’t have an extra sheet of plywood to use as an 8-ft. guide, so I made one by cutting a 12-in. strip off one side of my birch plywood. (Later, when I wanted to use this guide for a shelf, I trimmed the edge straight, using the other factory edge as a guide.) Clamp the guide to the plywood sheet so the saw base slides along the factory edge (Photo 1).
The old saying “Measure twice and cut once” is good advice here. Slide your saw against the guide until the blade nicks the plywood. Then stop the saw and check your measurement to make sure the cut is exactly right.
Tip: if you set your saw blade to cut only 1 in. deep, you can saw right across the 2x4s that you set the plywood on.
After cutting out the 11-1/4 in. boards, cut them to length. This operation, called crosscutting, presents an additional problem. The top surface of both plywood and solid wood tends to splinter when you saw across the grain (Photo 5).
If this edge will be visible, use a utility knife to make a 1/16-in. deep out along the cutoff line (Photo 3).

Deeply score crosscut lines on the top side with a utility knife to prevent splintering.
This time, use one factory corner of your plywood (which will be exactly a right angle) for a guide, clamping it so the long factory edge is even with one edge of the shelf. If you adjust the guide so the blade cuts just to the waste side of the line, you won’t splinter the wood, as shown in Photo 5.
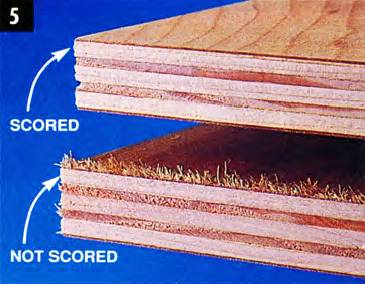
The cleanly-cut veneer on the top piece was first scaled with a utility knife (along the cut line). The bottom piece, which was not scored, splintered when we sawed it.
Making adjustable shelves
Adjustability comes in mighty handy if you need to rearrange the shelves or decide to store some of those tall, coffee table books.
The simple shelf supports that fit in a 1/4-in. hole (Photo 8) are appealing because they’re unobtrusive. When the shelf is in place, you’ll hardly notice them, although the vertical series of holes looks like the work of a very precise woodpecker. The subsection below shows two alternative support methods.

Shelf supports: (A) European style (requires 5 mm metric drill bit; (B) Angle style, available with plastic button or coating for glass shelves; the hole allows you to screw the shelf on tightly; (C) locking style (pin holds 3/4-in. shelf in place so it doesn’t wobble); (D) Spoon-shaped style.
Drilling all the holes gets boring – see what I did here?
Stupid puns apart, this is no time for carelessness. If all four holes that support a shelf don’t line up exactly, the shelf will have an annoying wobble.
The homemade jig in Photo 6 improves your accuracy and speeds up the job considerably. I made it from a piece of 1/4-in. plywood cut to exactly the shelving width.
I drilled the holes 1-1/4 in. in from each edge and 1-1/4 in. apart. After clamping and drilling one set of holes, you simply slid the jig up the board, aligned it by shoving a 1/4-in. dowel into the last hole drilled, and clamped and drilled again (Photo 6).
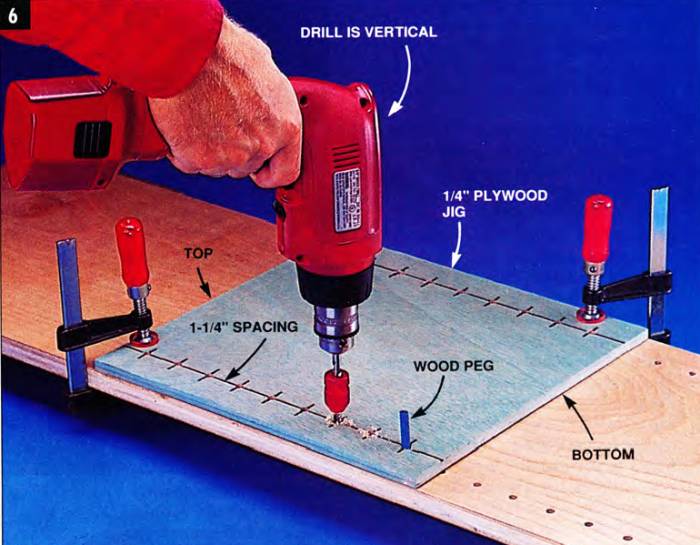
Drill support holes for adjustable shelves quickly with a 1/4-in plywood jig. Line it up with the sides, clamp it, drill, and move it up. A wood peg aligns the jig with the last hole drilled.
You could easily mess up the alignment if you begin the holes at different levels or flip the jig over, top to bottom when you switch to another board.
You won’t discover your error until you reach the end of the project and install the shelves. So label the top and bottom of the jig and the workpieces, and measure the beginning point on each piece accurately.
Two tools are essential for drilling good holes:
- A drill stop controls the hole depth and, more important, keeps your drill bit from breaking through the other side of the board, a minor disaster (Photo 7).
- The other indispensable tool is a brad point drill bit, which cuts a cleaner hole than a regular twist bit, without chipping the edges of the hole.
Tip: In reality, a brad point bit doesn’t always cut a perfect hole. Experiment on a piece of scrap wood to find the combination of drill speed and pressure that yields the cleanest hole.
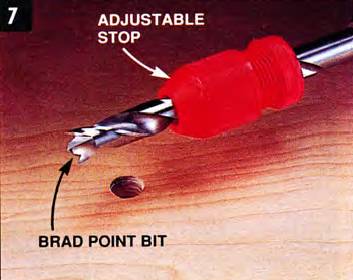
A brad point bit cuts cleaner holes than a regular twist drill bit. The adjustable stop maintains the right hole depth.
Alternative shelf supports
Metal standards and wooden cleats are two practical alternatives to the hole-drilling support system.
The metal standards are the quickest and easiest system (Photo 12) and cost from $2 to $7 per strip. You can usually find them in gold, chrome and brown finishes.
Simply tack the strips to the shelving sides with special short nails and snap the adjustable clips into place. However, before you install them, stand them side by side on a flat surface to make sure the holes in the standards line up with each other. This avoids wobbly shelves later.
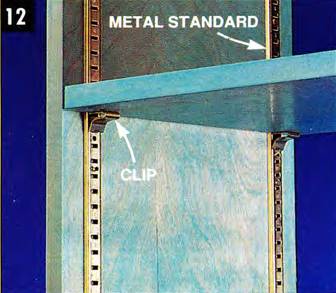
Metal standards (strips) and brackets are strong and easy to install.
Nailing or screwing a series of cleats to the sides of the shelving is the strongest system and is particularly useful for utility shelves, where appearance is less important (Photo 13).
Space the cleats so the shelves adjust easily. You can make them somewhat decorative by using a molding as shown in the photo below. However, mount the cleats at a perfect right angle to the front edge to prevent shelf wobble.

Cleats make the strongest supports. Nail or screw a wood strip to the side at a right angle to the front edge.
Assembling the frame
If you’ve cut all the pieces accurately, assembling the shelf frame is a pleasure. The trick is to work on a flat floor or table and recruit a helper to hold the boards.
Pros use long clamps to hold their joints, so they can work alone. But you probably won’t have clamps long enough for this project (I didn’t), so nab one of your older kids to hold the sides exactly on your layout marks while you predrill holes (3/32 in.) through the sides (Photo 9).

Begin frame assembly by predrilling all four corners with a 3/32-in. bit. This is a two-person job.
Predrilling isn’t strictly necessary, especially with plywood, but I like to do it so the nail will drive perfectly straight and hit the center of the board on the other side. That way the nail is less likely to split the wood.
Tip: Draw a line with your framing square to mark the center of the joining board so you can drill your holes accurately (Photo 10). (I used a dark line so you could see it. Instead. draw a light pencil line so you can erase it later.)
Time-out: screws or nails?
If you prefer, you can predrill and drive screws instead of nails, as shown in Photo 16. Screws hold better, but I chose nails for three reasons.
- First, I’m really relying on the glue to make the joints strong.
- Second, I’m going to anchor this shelving in one place. It won't be moved around, so it doesn’t need the extra strength offered by screws.
- And third, screwheads leave big holes that are difficult to fill, while finish nails leave small holes. As you'll see later, I screwed braces to the shelf frame where the screwheads would be out of sight.

If you can’t rely on someone else to help you on this project, the best alternative is to buy a strap clamp (at least 20’ long for this project; this Bessey band clamp is 23') and a cordless finish nailer to make quick work out of the chore of hammering all these nails. All without a compressor hose and up to 5 nails per second such as the Dewalt pictured above. Save money and buy a tool of the same battery system you already own: Dewalt, Porter-Cable, Ridgid, and Ryobi make excellent cordless finish nailers.
Assembly continued
After predrilling all four sides, I spread yellow carpenter’s glue on each end of the horizontal frame pieces (Photo 10) and drove the nails home, punching them below the wood surface with a nail set (not shown). You’ll need two sets of hands for this job, one to hold the boards in line and the other to drive the nails.

Spread glue evenly across the ends and nail all four corners. Wipe off excess glue with a screwdriver and damp cloth. Work quickly.
Work quickly. You don’t want the glue to set until you square the frame. The frame will be square when the diagonals are equal (Photo 11). Measure across each diagonal, then push the corners in or out until the two measurements are the same. Nail a temporary brace to the frame to keep it rigid and square (Photo 11).

Square the frame by measuring across the two diagonals. Adjust the frame until they’re equal. Then tack on a temporary brace and let the glue dry.
At this point, let the glue dry for two hours. It’s a good time to work on the shelf edges. Keep the temporary brace in place until you’ve completed all your work on the frame.
Next, prepare the center divider by cutting 3/4 x 4-in. notches with a jigsaw for the top and bottom braces (Photo 14). Predrill, glue, and nail the divider to the frame (Photo 15). You’ll have to bow the top and bottom outward slightly to fit it in without smearing the glue.
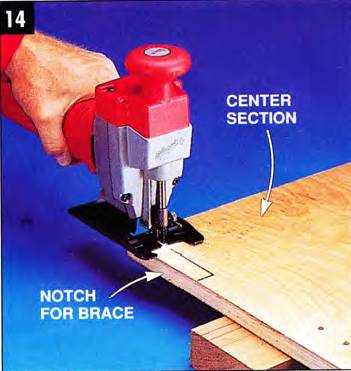
Cut notches for the braces in the center section, using a jigsaw or handsaw.
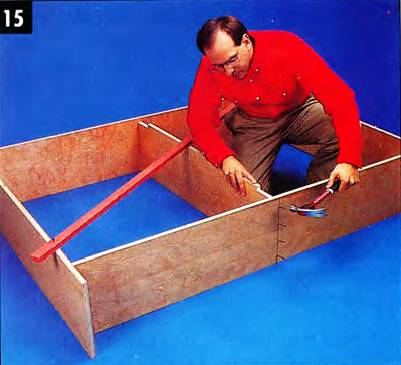
Glue and nail the center section in place. Flex the top and bottom slightly outward to slip the section in without smearing the glue.
Finally glue and screw (1-3/4 in. No. 6 drywall screws) the top and bottom braces in place (Photo 16 and Fig A).
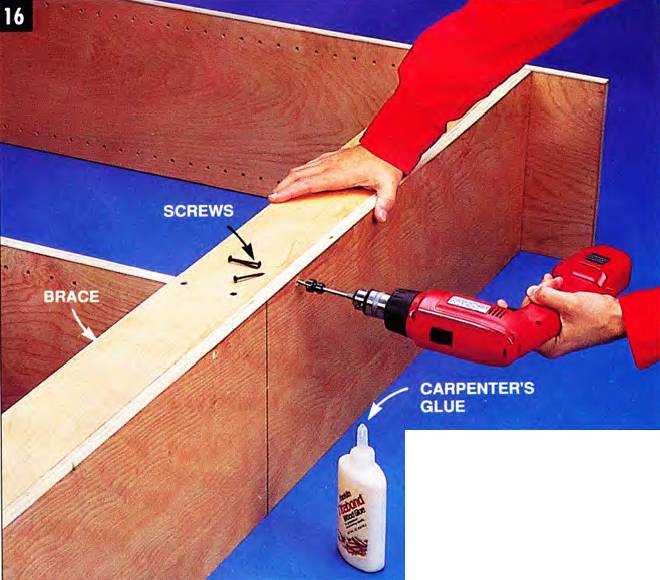
Screw the two back braces in place wherever the screw/heads won’t show. Drive 6d finish nails where the heads are visible. Nail on the front brace (Fig. A).
Predrilling with the countersink bit in Photo 17 makes quick, clean holes for the screws. The screwheads will fit flush with or slightly below the surface of the wood. Use 6d finish nails to fasten the ends of the braces to the sides of the frame, because the nailheads leave smaller holes than screws would in this highly visible area.

This Snappy drill bit set allows you to drill, countersink and counterbore holes in one easy operation. It has 5 sizes (#4, #6, #8, #10, or #12 screws) and it does cost more than other sets. However, it is made in America and it will also last longer than other cheap Chinese kits. Click here to buy it from Amazon.
Plywood has one weakness that solid boards do not. Its edges look bad, and even a thick coat of paint can’t hide the layered pattern. Obviously, on these shelves, you see a lot of those edges.
There’s a quick way to clean them up though — apply veneer edging. I used a thin birch veneer edging coated on one side with hot glue, which comes in a roll.
To apply the edging:
- cut a piece to length,
- hold it in place,
- and run a hot iron over it to heat the glue (Photo 18),
- then use a roller (a glass bottle or wood block works too) to press the edging down until the glue cools and hardens.
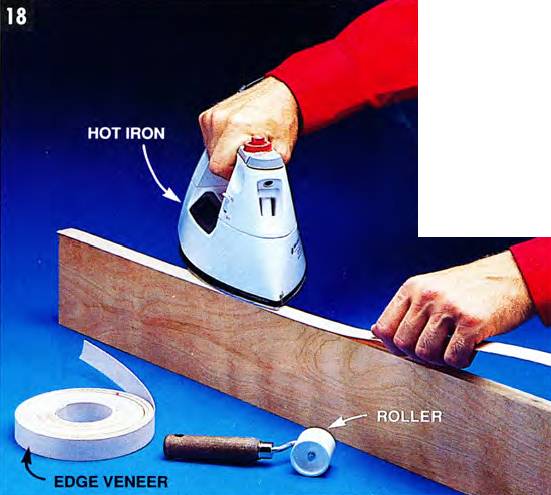
Use a hot iron to press the iron-on veneer onto all exposed plywood edges. Roll it down firmly as it cools.
The veneer is 7/8 in. wide. so you have to use a file, sandpaper or a knife to trim the excess (Photo 19). Work carefully, especially if you plan to apply a natural or stained finish, so you don’t cut through the thin surface veneer of the plywood.
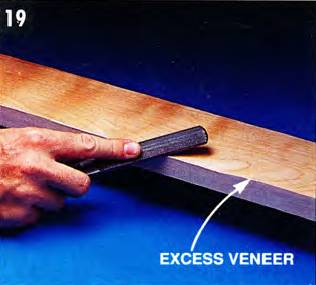
File the overlapping veneer flush with the plywood surfaces. Push the file, don’t pull, so you don’t chip the thin veneer.
Iron the veneer onto all the visible edges, including the shelves, so they’ll look identical to the sides when painted.
Installing the shelving
This bookcase was designed to fill a section of wall in a family room. To make it fit the room’s decor and look permanent, it was screwed to the wall, wrapped it with the base trim and fitted it with a decorative oak top.
Wrapping the trim around its base adds a touch of style to the bookcase and gives the bottom more visual “weight.” so it appears better-proportioned top to bottom
Plan this step in advance by making the bottom shelf 1/4 in. higher than your base trim (Fig. A). This 1/4-in. reveal nicely hides small height variations in the floor.
Begin installation by removing the base trim (Photo 20) so you can shove the shelving back against the wall.
If you’re likely to damage the wall or create other hassles when pulling the base trim, cut it with a jigsaw or reciprocating saw and remove only the section covered by the shelving.
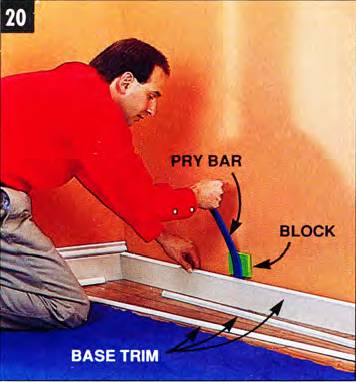
Remove the base trim to the shelving sits flush against the wall. Use a pry bar and block to protect the wall and trim so you can reuse it later.
Problem: While the new trim will cover this raggedly cut edge, we should warn you that the cut itself is not easy.
Tip: Another approach is to leave the base trim in place and notch the shelving sides (and bottom shelf) around it, fitting its profile. This wouldn’t work for our project because one entire shelf side must fit into the corner of the wall.
With the shelving tight against the wall, level it with shims and screw it to the wall through the braces. Put a few drops of glue on the shims after you cut them off with a utility knife so they won’t slip out later.
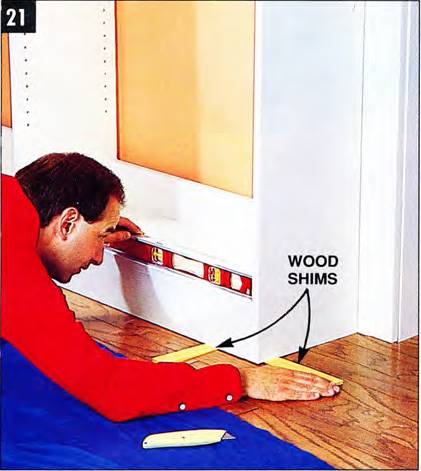
Level the shelving with thin wood shims. Cut the shims off with a utility knife and glue them so they won’t slip out.
Then add the base, mitering (cutting 45-degree angles) the outside corner so it looks clean and sharp.
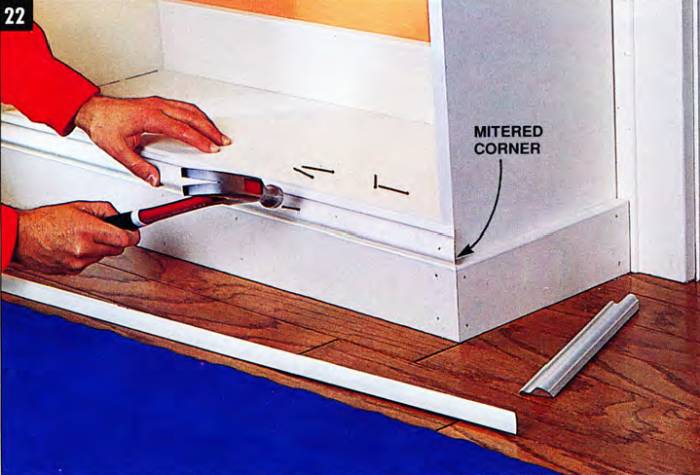
Reinstall the base, wrapping it around the shelving. The old material won’t be long enough. You’ll need some additional trim.
Finally, assemble and fit the top. We bought a solid 3/4-in. oak board and tacked a 1-1/4 in. decorative oak molding (Fig. A) on its edge to make it look more massive. Before screwing it down, we added 1/2-in. spacers to raise it slightly and maintain the illusion of a thicker top.
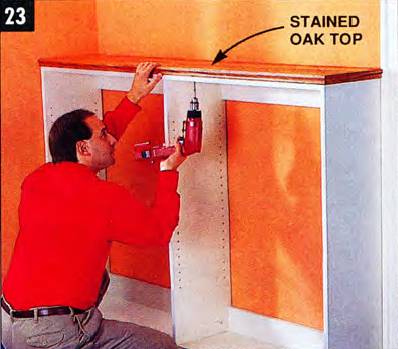
Assemble the oak top, stain it and apply a clear finish. Then screw it to the shelving from below, so the screws are hidden.
Building shelving to fit a certain spot calls for more exact planning, but the result is worth it.
Alternative Designs
The basic plans
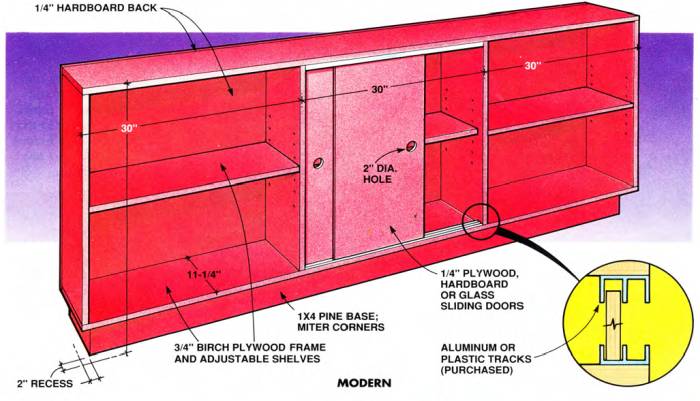
A modern design with sliding doors
The wall-mounted version
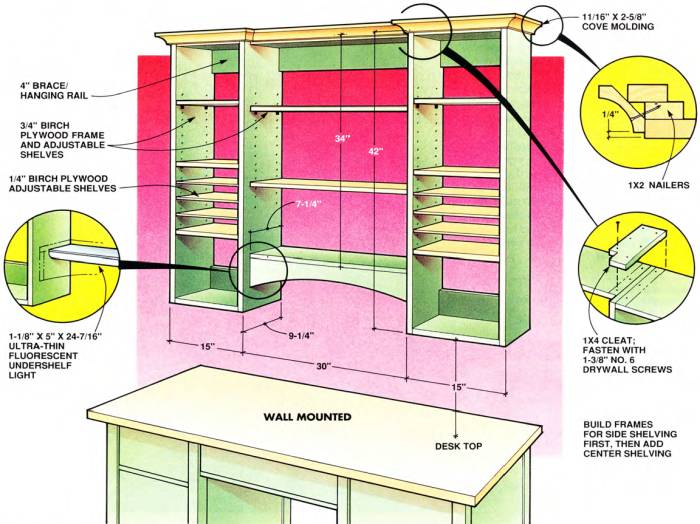
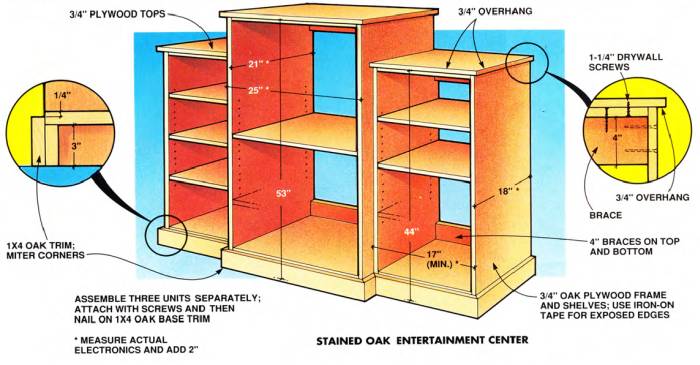
The full-blown entertainment center
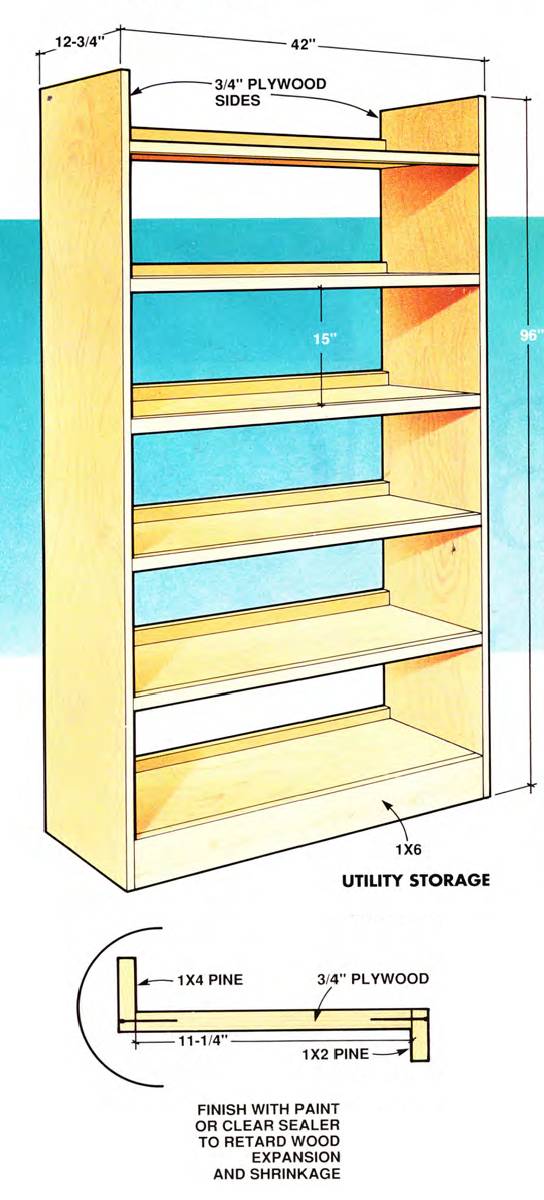
Utility storage for the garage or pantry
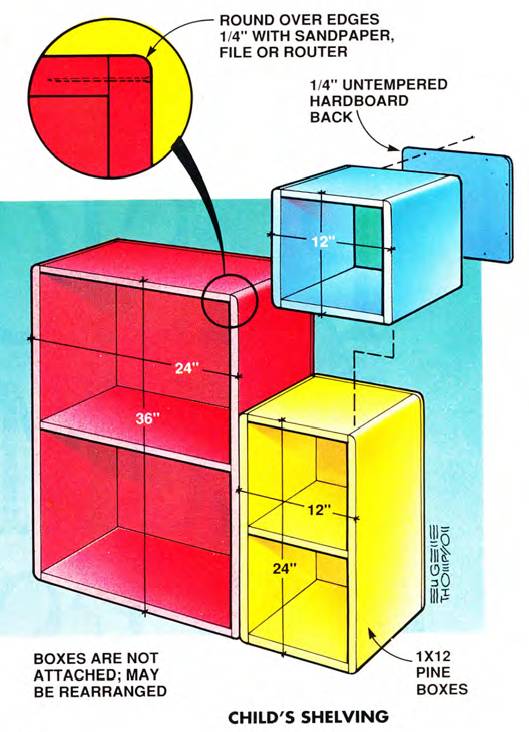
Colorful shelving for the kids
Shopping List
Item Qty. Pin-type shelf clips 24 No. 6 x 2-1/2" drywall screws 24 No. 6 x 1-3/4" drywall screws 6 6d finish nails 1-lb. box 4d finish nails 1-lb. box You know how stuff piles up. Stacks of books and magazines grow taller, toys and games fill the corners. Tennis rackets, skates, tools and other equipment multiply with every new sport or hobby. And photos and other keepsakes you want to display have to jostle for viewing space on the overcrowded mantel.
To keep pace with the accumulation and to keep favorite items within easy reach, every homeowner needs a simple recipe for knocking together a batch of shelves at a moment’s notice.
Build them fancy, build them plain, the basic methods are the same!
The design should be simple enough to produce sturdy shelving in a few hours, yet with a few variations and a bit more time, look attractive enough for use in a living area or dining room.
The design you’re about to see satisfies both requirements.
This design has eliminated complicated joints so even a novice can quickly nail together either heavy-duty utility shelving for the garage or good-looking bookcases for the family room, like the one in the opening photo.
In this article, you’ll see the tools and techniques used to build this bookshelf. You won’t need expensive power tools, only a circular saw and a cordless drill.
If you’re experienced with these tools, you can build this shelving. And you’ll see several special tools and accessories, all inexpensive that make the work even easier. The materials for this shelving cost $190.
Extra Shelf-Building Tips
There’s always more than one good way to build a shelf.
Since you’ll want to adapt this design to your own special use, I’ll present several alternative building techniques to give you more options. Use these tips to make your project stronger, more attractive, or less costly.
Finally, I’ve added five extra shelving designs at the end of this article to illustrate ways to alter this design while using the same basic building techniques. I hope they’ll stimulate your own imagination and creativity.
Planning your shelving
First and foremost, shelving is practical. The shape it takes depends on what goes on it and where you’ll put it.
With this practical side in mind, let your imagination go to work. Pull out a pad of paper and a pencil and roughly sketch some designs in their room setting. Then use the following guidelines to help put dimensions on your plant.
Shelf Depth (front to back)
Plan the shelf depth (front to back) to fit the largest objects you’ll want it to hold — books, photo albums, stereo with a turntable, toys, etc.
Below you’ll find some standard dimensions for various household objects, but don’t hesitate to measure others, especially odd-sized things like the television.
These shelves were designed primarily for books of all sizes, and the 11-1/4 in. depth worked well for displaying photos, ceramic bowls, and flowers too.
Examine the alternative design illustrations at the end of this page to see how you can adapt shelf sizes for other purposes.
Standard Shelf Depths
- CDs and DVDs: 6 in.
- Paperbacks: 9 in.
- Average books: 11 in.
- Magazines: 11 in.
- Display books: 11 to 14 in.
- Record albums: 13 in.
- Stereo equipment: 17 in.
- Television: 24 in. -plus (measure yours)
Shelf Length (side to side)
Well-designed shelves won’t sag. So when you plan their length, you’ll want them to support the heaviest objects you’re likely to set on them without causing them to dip noticeably.
While most shelves won’t have to hold a car engine, they should probably be strong enough to support a heavy load of books.
Using books as a standard, follow this rule of thumb: 3/4-in. thick wood shelves (10 to 12 in. deep) should span no more than 32 in. between supports.
I’m being a bit conservative here, lumping all wood species and plywood together. Stronger 3/4-in. boards like oak and maple can sometimes span another foot, depending on their quality. But not always. So generally, limit your shelf spans to 32 in.
You can make longer or stronger shelves in two ways:
- by reinforcing 3/4-in. shelves with 1x2 strips glued and nailed to their front and/or back edges; or
- by using thicker wood.
Tip: Look for precut stair treads at the lumberyard. They’re more than 1-in. thick and make strong shelves.
I’m limiting the choice of shelving materials to 3/4-in. thick wood here (standard 1x8s, 1x10s, and 1x12s are all 3/4 in. thick). While many other materials work well, 3/4-in. wood is one of the best. Whether solid boards or plywood, it’s strong, easy to work with, economical in some grades, handsome in others, and available everywhere.
Since you can finish it in many ways, you can create an endless variety of shelving with it.
Shelf Height
You can build your shelving as high as you want, but remember that as it stretches higher, it has a greater chance of tipping over, should your athletic 3-year-old try to climb it.
Unless it has a wide, stable base, shelving that’s over 3 ft. high should be screwed directly to the wall framing. You can always remove the screws when you want to move the shelves.
Choosing the Materials
With the dimensions of your shelving in mind, turn your attention to how you want the shelves to look.
- Do you want to paint them to match the room?
- Leave them natural?
- Go for a rustic look?
What you decide here will determine which material you use. Use Table B below to help with your decision. It lists the advantages and disadvantages of common 3/4-in. materials and tells you how much each choice costs.
Types of 3/4-in. Shelving
Material Pros Cons No. 2 Pine Boards Easy to cut and assemble; takes paint well except for rough knots; good rustic appearance Quality varies, so select boards carefully; look for straight, flat boards; you often have to fill and seal knots before painting; accepts stain poorly Clear Pine Same as No. 2 Pine, except no knots or flaws Stains poorly; expensive Oak, Birch, and Maple Boards Attarctive wood; usually stained or given a natural finish; birch and maple take paint well More difficult to cut, nail, and sand than pine; oak does not paint smoothly; expensive Birch Plywood Attractive, smooth, flat boards; easy to cut and nail; accepts paint or a natural finish well Difficult to stain; exposed edges must be covered for a finished look; must saw boards from 4x8 sheets Oak Plywood Attractive, smooth, flat boards; easy to cut and nail; accepts stain well Takes paint poorly; exposed edges must be covered for finished look; must saw boards from 4x8 sheets Fir Plywood Flat boards; easy to cut and nail; sanded, smooth grades (code letters AB) accept paint and stain fairly well; rougher grades (CD) are inexpensive Rougher grades (CD) finish poorly; exposed edges must be covered for finished look; must saw boards from 4x8 sheets Particle Board (NOT recommended) Flat; inexpensive Weaker than solid wood or plywood (max. shelf length is 26 in.); difficult to nail or screw together; difficult to paint; rapidly deteriorates when moist Project details
These shelves were built into the family room as a permanent feature. The shelves were painted to match the woodwork and received a decorative oak top, stained to match the floor.
The project uses birch plywood for shelving because it provides a perfectly flat, smooth surface for painting at a moderate price.
However, choosing plywood rather than pine boards meant more time spent cutting out the right shelving widths. If you have a portable or a hybrid table saw, this task goes fast. But you don’t need one to do a first-rate job, as you’ll see in the next section.
This project also used a solid oak board for the decorative top for three reasons:
- First, the surface of solid wood looks more attractive than the veneered oak plywood. (You’ll find wide, solid hardwood boards, oak in this case, glued together from narrower boards to prevent warping.)
- Second, it's easier to apply edge molding to solid wood, because you don't have to worry about ruining the thin veneer on plywood when you sand the molding joints smooth.
- And third, this oak top cost $55, a $10 savings over oak plywood because it’d be necessary to buy an entire 4’x8’ sheet.
Fig. A: Shelving Plans
Cutting List
Key Pcs. Size Description A 2 3/4" x 11-1/4" x 47-7/8" Plywood B 1 3/4" x 11-1/4" x 42" Plywood C 6 3/4" x 11-1/4" x 31-1/2" Plywood D 2 3/4" x 11-1/4" x 64" Plywood E 2 3/4" x 4" x 64" Plywood F 1 3/4" x 4-3/8" x 64" Plywood G 3 1/2" x 4" x 11-1/4" Plywood H 1 3/4" x 11-1/4" x 65-1/2" Oak J 1 3/4" x 1/4" x 66-1/4" Oak trim K 1 3/4" x 1/4" x 12-1/4" Oak trim L 1 3/4" x 3-1/2" x 65-1/2" Pine M 1 3/4" x 3-1/2" x 12-1/4" Pine N 1 3/4" x 1-3/8" x 66-1/4" Pine trim P 1 3/4" x 1-3/8" x 12-1/4" Pine trim Cutting out the parts
Begin the project by cutting the plywood into properly sized parts.
This takes a little longer than if you use 1x12 boards, but plywood has some advantages. By using the factory edge as an 8-ft. saw guide, you can cut your shelving perfectly straight with a circular saw (Photo 1).
Cut shelving boards with your circular saw using a clamped piece of plywood as a guide. Wear eye and ear protection and work on the floor for more stability.
And by using a factory corner as a guide for crosscuts (when you cut the parts to length), you can cut off each piece perfectly square (Photo 4).
Clamp the factory corner of plywood for a perfect right-angle crosscut guide.
Unfortunately, the whole process can take quite a bit of time. It took me two hours to cut the pieces for our shelving.
Tip: Simplify your finish work by making smooth saw cuts every time. Use a sharp 40-tooth carbide blade to do this (Photo 2), rather than a 20- to 24-tooth standard blade, The 40-tooth blade is expensive ($40), so I keep mine stashed away, using it only on these occasions.
Measure the distance between the edge of the base and the blade and adjust the plywood guide accordingly. Use a sharp, 40-tooth carbide blade for finer cuts.
I didn’t have an extra sheet of plywood to use as an 8-ft. guide, so I made one by cutting a 12-in. strip off one side of my birch plywood. (Later, when I wanted to use this guide for a shelf, I trimmed the edge straight, using the other factory edge as a guide.) Clamp the guide to the plywood sheet so the saw base slides along the factory edge (Photo 1).
The old saying “Measure twice and cut once” is good advice here. Slide your saw against the guide until the blade nicks the plywood. Then stop the saw and check your measurement to make sure the cut is exactly right.
Tip: if you set your saw blade to cut only 1 in. deep, you can saw right across the 2x4s that you set the plywood on.
After cutting out the 11-1/4 in. boards, cut them to length. This operation, called crosscutting, presents an additional problem. The top surface of both plywood and solid wood tends to splinter when you saw across the grain (Photo 5).
If this edge will be visible, use a utility knife to make a 1/16-in. deep out along the cutoff line (Photo 3).
Deeply score crosscut lines on the top side with a utility knife to prevent splintering.
This time, use one factory corner of your plywood (which will be exactly a right angle) for a guide, clamping it so the long factory edge is even with one edge of the shelf. If you adjust the guide so the blade cuts just to the waste side of the line, you won’t splinter the wood, as shown in Photo 5.
The cleanly-cut veneer on the top piece was first scaled with a utility knife (along the cut line). The bottom piece, which was not scored, splintered when we sawed it.
Making adjustable shelves
Adjustability comes in mighty handy if you need to rearrange the shelves or decide to store some of those tall, coffee table books.
The simple shelf supports that fit in a 1/4-in. hole (Photo 8) are appealing because they’re unobtrusive. When the shelf is in place, you’ll hardly notice them, although the vertical series of holes looks like the work of a very precise woodpecker. The subsection below shows two alternative support methods.
Shelf supports: (A) European style (requires 5 mm metric drill bit; (B) Angle style, available with plastic button or coating for glass shelves; the hole allows you to screw the shelf on tightly; (C) locking style (pin holds 3/4-in. shelf in place so it doesn’t wobble); (D) Spoon-shaped style.
Drilling all the holes gets boring – see what I did here?
Stupid puns apart, this is no time for carelessness. If all four holes that support a shelf don’t line up exactly, the shelf will have an annoying wobble.
The homemade jig in Photo 6 improves your accuracy and speeds up the job considerably. I made it from a piece of 1/4-in. plywood cut to exactly the shelving width.
I drilled the holes 1-1/4 in. in from each edge and 1-1/4 in. apart. After clamping and drilling one set of holes, you simply slid the jig up the board, aligned it by shoving a 1/4-in. dowel into the last hole drilled, and clamped and drilled again (Photo 6).
Drill support holes for adjustable shelves quickly with a 1/4-in plywood jig. Line it up with the sides, clamp it, drill, and move it up. A wood peg aligns the jig with the last hole drilled.
You could easily mess up the alignment if you begin the holes at different levels or flip the jig over, top to bottom when you switch to another board.
You won’t discover your error until you reach the end of the project and install the shelves. So label the top and bottom of the jig and the workpieces, and measure the beginning point on each piece accurately.
Two tools are essential for drilling good holes:
- A drill stop controls the hole depth and, more important, keeps your drill bit from breaking through the other side of the board, a minor disaster (Photo 7).
- The other indispensable tool is a brad point drill bit, which cuts a cleaner hole than a regular twist bit, without chipping the edges of the hole.
Tip: In reality, a brad point bit doesn’t always cut a perfect hole. Experiment on a piece of scrap wood to find the combination of drill speed and pressure that yields the cleanest hole.
A brad point bit cuts cleaner holes than a regular twist drill bit. The adjustable stop maintains the right hole depth.
Alternative shelf supports
Metal standards and wooden cleats are two practical alternatives to the hole-drilling support system.
The metal standards are the quickest and easiest system (Photo 12) and cost from $2 to $7 per strip. You can usually find them in gold, chrome and brown finishes.
Simply tack the strips to the shelving sides with special short nails and snap the adjustable clips into place. However, before you install them, stand them side by side on a flat surface to make sure the holes in the standards line up with each other. This avoids wobbly shelves later.
Metal standards (strips) and brackets are strong and easy to install.
Nailing or screwing a series of cleats to the sides of the shelving is the strongest system and is particularly useful for utility shelves, where appearance is less important (Photo 13).
Space the cleats so the shelves adjust easily. You can make them somewhat decorative by using a molding as shown in the photo below. However, mount the cleats at a perfect right angle to the front edge to prevent shelf wobble.
Cleats make the strongest supports. Nail or screw a wood strip to the side at a right angle to the front edge.
Assembling the frame
If you’ve cut all the pieces accurately, assembling the shelf frame is a pleasure. The trick is to work on a flat floor or table and recruit a helper to hold the boards.
Pros use long clamps to hold their joints, so they can work alone. But you probably won’t have clamps long enough for this project (I didn’t), so nab one of your older kids to hold the sides exactly on your layout marks while you predrill holes (3/32 in.) through the sides (Photo 9).
Begin frame assembly by predrilling all four corners with a 3/32-in. bit. This is a two-person job.
Predrilling isn’t strictly necessary, especially with plywood, but I like to do it so the nail will drive perfectly straight and hit the center of the board on the other side. That way the nail is less likely to split the wood.
Tip: Draw a line with your framing square to mark the center of the joining board so you can drill your holes accurately (Photo 10). (I used a dark line so you could see it. Instead. draw a light pencil line so you can erase it later.)
Time-out: screws or nails?
If you prefer, you can predrill and drive screws instead of nails, as shown in Photo 16. Screws hold better, but I chose nails for three reasons.
- First, I’m really relying on the glue to make the joints strong.
- Second, I’m going to anchor this shelving in one place. It won't be moved around, so it doesn’t need the extra strength offered by screws.
- And third, screwheads leave big holes that are difficult to fill, while finish nails leave small holes. As you'll see later, I screwed braces to the shelf frame where the screwheads would be out of sight.
If you can’t rely on someone else to help you on this project, the best alternative is to buy a strap clamp (at least 20’ long for this project; this Bessey band clamp is 23') and a cordless finish nailer to make quick work out of the chore of hammering all these nails. All without a compressor hose and up to 5 nails per second such as the Dewalt pictured above. Save money and buy a tool of the same battery system you already own: Dewalt, Porter-Cable, Ridgid, and Ryobi make excellent cordless finish nailers.
Assembly continued
After predrilling all four sides, I spread yellow carpenter’s glue on each end of the horizontal frame pieces (Photo 10) and drove the nails home, punching them below the wood surface with a nail set (not shown). You’ll need two sets of hands for this job, one to hold the boards in line and the other to drive the nails.
Spread glue evenly across the ends and nail all four corners. Wipe off excess glue with a screwdriver and damp cloth. Work quickly.
Work quickly. You don’t want the glue to set until you square the frame. The frame will be square when the diagonals are equal (Photo 11). Measure across each diagonal, then push the corners in or out until the two measurements are the same. Nail a temporary brace to the frame to keep it rigid and square (Photo 11).
Square the frame by measuring across the two diagonals. Adjust the frame until they’re equal. Then tack on a temporary brace and let the glue dry.
At this point, let the glue dry for two hours. It’s a good time to work on the shelf edges. Keep the temporary brace in place until you’ve completed all your work on the frame.
Next, prepare the center divider by cutting 3/4 x 4-in. notches with a jigsaw for the top and bottom braces (Photo 14). Predrill, glue, and nail the divider to the frame (Photo 15). You’ll have to bow the top and bottom outward slightly to fit it in without smearing the glue.
Cut notches for the braces in the center section, using a jigsaw or handsaw.
Glue and nail the center section in place. Flex the top and bottom slightly outward to slip the section in without smearing the glue.
Finally glue and screw (1-3/4 in. No. 6 drywall screws) the top and bottom braces in place (Photo 16 and Fig A).
Screw the two back braces in place wherever the screw/heads won’t show. Drive 6d finish nails where the heads are visible. Nail on the front brace (Fig. A).
Predrilling with the countersink bit in Photo 17 makes quick, clean holes for the screws. The screwheads will fit flush with or slightly below the surface of the wood. Use 6d finish nails to fasten the ends of the braces to the sides of the frame, because the nailheads leave smaller holes than screws would in this highly visible area.
This Snappy drill bit set allows you to drill, countersink and counterbore holes in one easy operation. It has 5 sizes (#4, #6, #8, #10, or #12 screws) and it does cost more than other sets. However, it is made in America and it will also last longer than other cheap Chinese kits. Click here to buy it from Amazon.
Plywood has one weakness that solid boards do not. Its edges look bad, and even a thick coat of paint can’t hide the layered pattern. Obviously, on these shelves, you see a lot of those edges.
There’s a quick way to clean them up though — apply veneer edging. I used a thin birch veneer edging coated on one side with hot glue, which comes in a roll.
To apply the edging:
- cut a piece to length,
- hold it in place,
- and run a hot iron over it to heat the glue (Photo 18),
- then use a roller (a glass bottle or wood block works too) to press the edging down until the glue cools and hardens.
Use a hot iron to press the iron-on veneer onto all exposed plywood edges. Roll it down firmly as it cools.
The veneer is 7/8 in. wide. so you have to use a file, sandpaper or a knife to trim the excess (Photo 19). Work carefully, especially if you plan to apply a natural or stained finish, so you don’t cut through the thin surface veneer of the plywood.
File the overlapping veneer flush with the plywood surfaces. Push the file, don’t pull, so you don’t chip the thin veneer.
Iron the veneer onto all the visible edges, including the shelves, so they’ll look identical to the sides when painted.
Installing the shelving
This bookcase was designed to fill a section of wall in a family room. To make it fit the room’s decor and look permanent, it was screwed to the wall, wrapped it with the base trim and fitted it with a decorative oak top.
Wrapping the trim around its base adds a touch of style to the bookcase and gives the bottom more visual “weight.” so it appears better-proportioned top to bottom
Plan this step in advance by making the bottom shelf 1/4 in. higher than your base trim (Fig. A). This 1/4-in. reveal nicely hides small height variations in the floor.
Begin installation by removing the base trim (Photo 20) so you can shove the shelving back against the wall.
If you’re likely to damage the wall or create other hassles when pulling the base trim, cut it with a jigsaw or reciprocating saw and remove only the section covered by the shelving.
Remove the base trim to the shelving sits flush against the wall. Use a pry bar and block to protect the wall and trim so you can reuse it later.
Problem: While the new trim will cover this raggedly cut edge, we should warn you that the cut itself is not easy.
Tip: Another approach is to leave the base trim in place and notch the shelving sides (and bottom shelf) around it, fitting its profile. This wouldn’t work for our project because one entire shelf side must fit into the corner of the wall.
With the shelving tight against the wall, level it with shims and screw it to the wall through the braces. Put a few drops of glue on the shims after you cut them off with a utility knife so they won’t slip out later.
Level the shelving with thin wood shims. Cut the shims off with a utility knife and glue them so they won’t slip out.
Then add the base, mitering (cutting 45-degree angles) the outside corner so it looks clean and sharp.
Reinstall the base, wrapping it around the shelving. The old material won’t be long enough. You’ll need some additional trim.
Finally, assemble and fit the top. We bought a solid 3/4-in. oak board and tacked a 1-1/4 in. decorative oak molding (Fig. A) on its edge to make it look more massive. Before screwing it down, we added 1/2-in. spacers to raise it slightly and maintain the illusion of a thicker top.
Assemble the oak top, stain it and apply a clear finish. Then screw it to the shelving from below, so the screws are hidden.
Building shelving to fit a certain spot calls for more exact planning, but the result is worth it.
Alternative Designs
The basic plans
A modern design with sliding doors
The wall-mounted version
The full-blown entertainment center
Utility storage for the garage or pantry
Colorful shelving for the kids
Shopping List
Item Qty. Pin-type shelf clips 24 No. 6 x 2-1/2" drywall screws 24 No. 6 x 1-3/4" drywall screws 6 6d finish nails 1-lb. box 4d finish nails 1-lb. box