
f— title: “Chalk Box: do you know how to use it?” description: “Here’s how to get results straight as an arrow” thumbnail: “/img/tool/chalk-box-polaroid.jpg” lastmod: 2021-04-24 08:05:00-04:00 toc: true draft: false
Reach into 100 carpenters’ toolboxes and 99 times you’ll emerge with an odd, pear-shaped little tool called a chalk box. This hand-size tool doesn’t hammer, cut, drill or measure, yet it’s indispensable to pros — and can prove equally invaluable to DIYers.
A chalk box (also called a chalk line or chalk line reel) is simply a container holding a reel of string and some powdered chalk. The chalk clings to the string as it’s pulled from the case, but releases when the string is pulled taut and snapped against a surface. This leaves a long, straight line you can use as a guide for cutting, nailing, straightening or positioning.

TAJIMA Chalk-Rite CR301JF is a jam-free snap line chalk box. The snap line is extra-bold. Line retrieval has 5 gears to save your time on your jobsite. The ABS case is lightweight and rubberized for better grip. The large fill neck makes loading easy and mess-free. Click here to see Amazon customer reviews.
A chalk box and bottle of powdered chalk are inexpensive. They’re easy to use, versatile and just may take the place of a lot of bigger, clumsier, less accurate tools you’re now using.
Here’s how to work with them.
How do I feed my chalk box?
Except for antique or specialized versions (which use string passed over a solid lump of chalk) modern chalk boxes all operate the same way. To fill one, slide back or unscrew the cap to the chalk chamber, load the “box” about half full with chalk, then close the cap again.
I pull a few feet of string out before filling. That way, when I wind the string back up, it scatters the chalk about the chamber and helps ensure a neat first snap.
To fill your chalk box, first unroll a few feet of string, then fill the cavity half full and reel in the line.
Chalk comes in a variety of colors, each geared for a specific use:
- White chalk is the most easily removed of all the colors. It's often used to snap lines for wallpapering or to mark dark surfaces.
- Blue chalk is also easily removed from most surfaces (except very porous ones), making it ideal for marking lines you later want washed or worn off.
- Red chalk is considered “permanent” and is often used by roofers, tile layers and carpenters for marking lines they want saved for several days.
- Fluorescent orange and yellow are also permanent and more easily seen in low light conditions, such as in basements.
How do I use my chalk box efficiently?
Even this simple tool has operating instructions for maximum results.

Use a double snap of the chalk line to accurately mark long lines. Stretch and secure the line so it’s taut, press the line down at the mid-point, then snap both sides of the line.
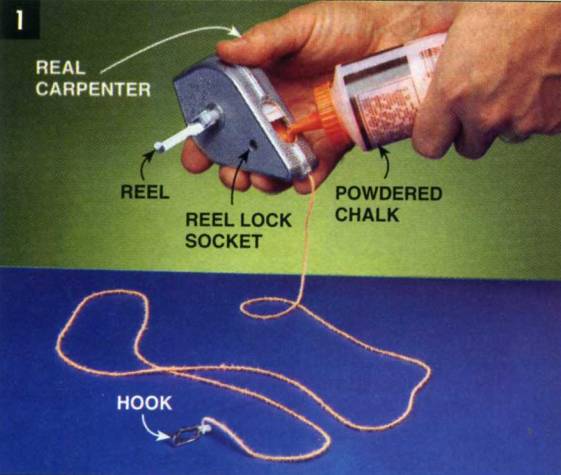
- For marking short lines, simply hook the end over the board end, flip the reel out of the lock socket (Photo 1), then keep the string taut as you let it unwind from the case and snap the line.
- For longer lines or when marking lines on vertical surfaces, loop the end over a bent-back nail (Photo 2) or have a partner hold it. This will prevent the hooked end from slipping free when you snap the line.
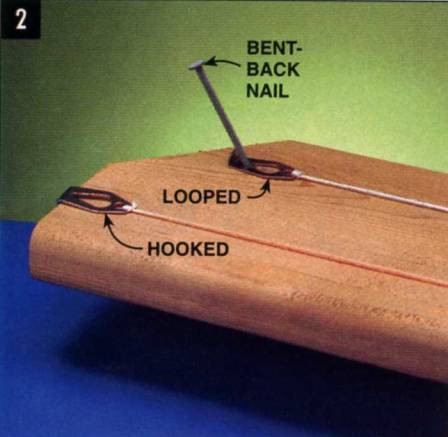
Secure the end. Hook the end over squared-off boards when snapping lines over a short distance. Loop the end over a bent nail when starting from an angled end or when snapping a line over a long distance.
- Hold the chalk box upside down and give it a few sharp raps against your leg or a hard surface as you let out the line. This loosens up the chalk so it will more easily cling to the string.
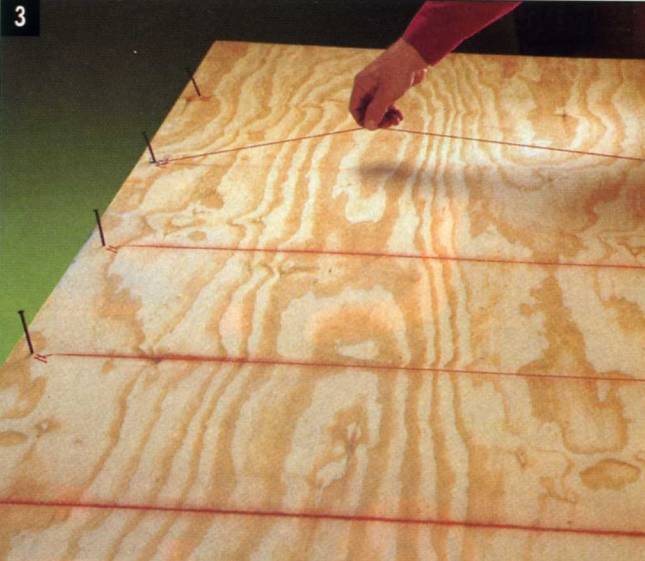
- To snap a line, raise the line 3 or 4 in. squarely out from the surface, then let go (Photo 4). Pulling the string at an angle can produce curved or multiple lines.
Snap a line for a cutting guide. Rather than cutting each board to length individually, let them “run wild,” snap a line and cut them all at once.
- If you need a very precise line, pull out the length of string you need, then give it a midair snap before lowering it to the surface to make the mark. This preliminary snap will get rid of excess chalk that can make a blurry line.
- Don't use a chalk line on wet surfaces; you'll only get a wide bleeding line. Once the line is wet, it won't release the chalk and the chalk within the box will cake and harden. You'll have to open your chalk box and let the string and chalk dry out.
- Blow, don’t brush or rub, excess chalk away. This will prevent chalk from smearing over your work surface.
- If you use a chalk box a lot, beware of dry fingers. Chalk can absorb so much moisture from your skin that your fingertips can crack (painfully!).
The string line eventually gets frayed, worn or knotted. I usually buy chalk boxes with 100-ft. lines; when the first 25 ft. or so shows wear, I simply cut it off, secure the hook to the remaining line and go back to work again. Replacement spools of string are also available.
Other daily and special uses for your chalk box
The chalk box’s forte is marking long straight lines. Make “V” marks to indicate where each end of the string should be positioned, connect these marks with a taut chalk line, then snap the line. For lines over 20 ft. long, use a center snap (opening photo) for accuracy and a more visible line. Another option is to have someone on each end of the string, one at a time, snap the line.
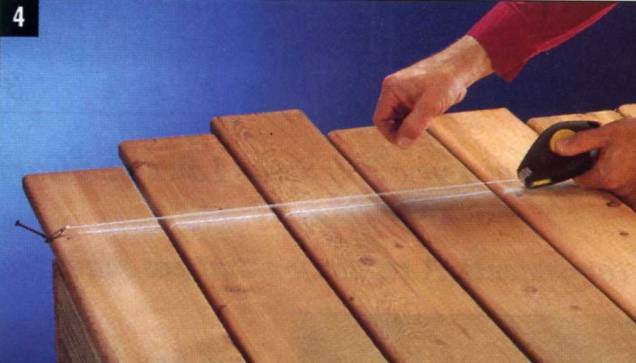
When nailing plywood or drywall, use your chalk box to snap lines to indicate where the underlying framework is (Photo 3).
Mark joist or stud centers for accurate positioning of screws or nails when installing plywood or drywall.
If you work with a partner, you can move along the surface and mark four or five lines before reeling the line back in again for rechalking.
A chalk line makes an ideal planning tool during remodeling. Snap lines on the floor to indicate the location of walls, fixtures and cabinets. Then walk through your “chalk line” rooms to get a feel for size and space.
The chalk box also provides an always-at-the-ready string to use as a reference line for straightening walls (Photo 5) or aligning fence posts.
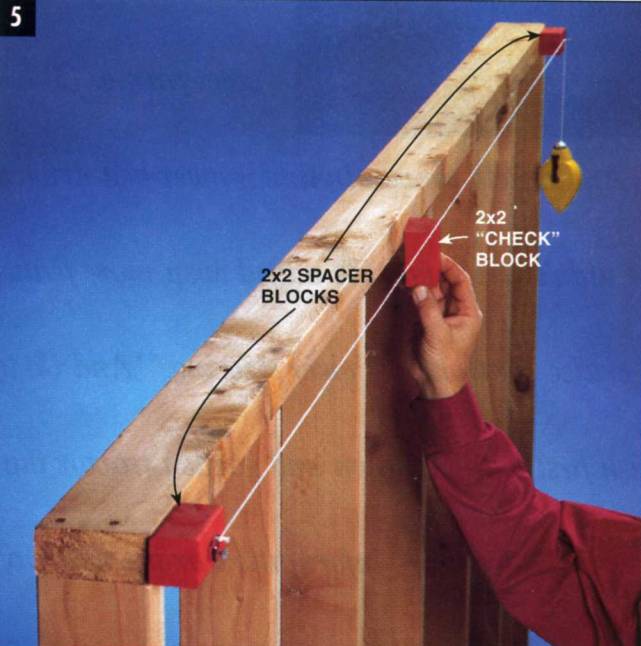
Is it straight? Stretch a chalk line between two 2x2 spacer blocks, then use a 2x2 “check block” midway to see if your wall (or fence posts or deck framework) is running straight.
Most chalk lines are designed to serve double duty as a plumb bob (Photo 6).
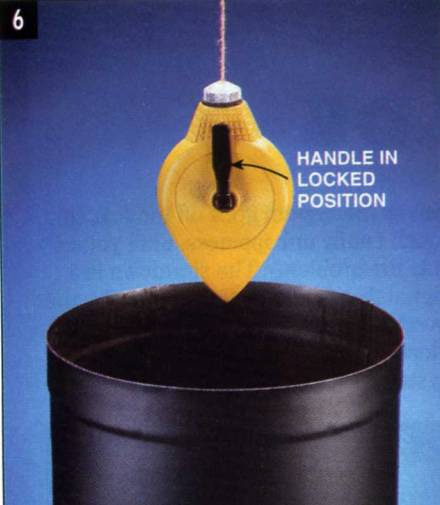
Transfer a center point over a long distance using the chalk box as a plumb bob. Here it’s used to determine where a hole will be cut in the roof for installing a chimney.
Reel out the length of string you need, then fix the handle in the locked position. Chalk boxes tend to spin and sway for a few minutes before they stabilize long enough for pinpoint accuracy, so be patient.
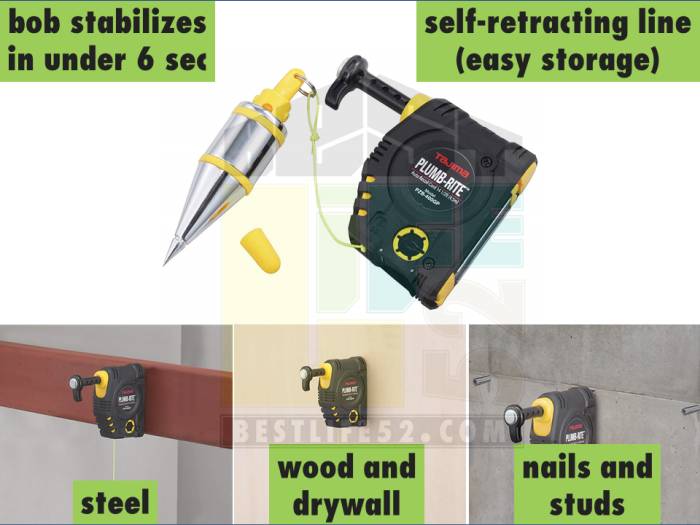
If you are impatient, the Tajima Plumb-Rite PZB-400GP has a quick stabilizing bob (under 6 seconds). You can connect it to wood and drywall with a pin, to steel with a magnet, or to nails and studs with a hook. The line is self-retracting for easy storage. Click here to read Amazon customer reviews.
A chalk line with a small line level affixed midway can also be used as a crude level over long distances — for instance, to determine the drop of a hill when you’re planning a retaining wall. Stretch the string taut, then lower or raise one end of the string until the bubble in the vial reads level.
f— title: “Chalk Box: do you know how to use it?” description: “Here’s how to get results straight as an arrow” thumbnail: “/img/tool/chalk-box-polaroid.jpg” lastmod: 2021-04-24 08:05:00-04:00 toc: true draft: false
Reach into 100 carpenters’ toolboxes and 99 times you’ll emerge with an odd, pear-shaped little tool called a chalk box. This hand-size tool doesn’t hammer, cut, drill or measure, yet it’s indispensable to pros — and can prove equally invaluable to DIYers.
A chalk box (also called a chalk line or chalk line reel) is simply a container holding a reel of string and some powdered chalk. The chalk clings to the string as it’s pulled from the case, but releases when the string is pulled taut and snapped against a surface. This leaves a long, straight line you can use as a guide for cutting, nailing, straightening or positioning.
TAJIMA Chalk-Rite CR301JF is a jam-free snap line chalk box. The snap line is extra-bold. Line retrieval has 5 gears to save your time on your jobsite. The ABS case is lightweight and rubberized for better grip. The large fill neck makes loading easy and mess-free. Click here to see Amazon customer reviews.
A chalk box and bottle of powdered chalk are inexpensive. They’re easy to use, versatile and just may take the place of a lot of bigger, clumsier, less accurate tools you’re now using.
Here’s how to work with them.
How do I feed my chalk box?
Except for antique or specialized versions (which use string passed over a solid lump of chalk) modern chalk boxes all operate the same way. To fill one, slide back or unscrew the cap to the chalk chamber, load the “box” about half full with chalk, then close the cap again.
I pull a few feet of string out before filling. That way, when I wind the string back up, it scatters the chalk about the chamber and helps ensure a neat first snap.
To fill your chalk box, first unroll a few feet of string, then fill the cavity half full and reel in the line.
Chalk comes in a variety of colors, each geared for a specific use:
- White chalk is the most easily removed of all the colors. It's often used to snap lines for wallpapering or to mark dark surfaces.
- Blue chalk is also easily removed from most surfaces (except very porous ones), making it ideal for marking lines you later want washed or worn off.
- Red chalk is considered “permanent” and is often used by roofers, tile layers and carpenters for marking lines they want saved for several days.
- Fluorescent orange and yellow are also permanent and more easily seen in low light conditions, such as in basements.
How do I use my chalk box efficiently?
Even this simple tool has operating instructions for maximum results.
Use a double snap of the chalk line to accurately mark long lines. Stretch and secure the line so it’s taut, press the line down at the mid-point, then snap both sides of the line.
- For marking short lines, simply hook the end over the board end, flip the reel out of the lock socket (Photo 1), then keep the string taut as you let it unwind from the case and snap the line.
- For longer lines or when marking lines on vertical surfaces, loop the end over a bent-back nail (Photo 2) or have a partner hold it. This will prevent the hooked end from slipping free when you snap the line.
Secure the end. Hook the end over squared-off boards when snapping lines over a short distance. Loop the end over a bent nail when starting from an angled end or when snapping a line over a long distance.
- Hold the chalk box upside down and give it a few sharp raps against your leg or a hard surface as you let out the line. This loosens up the chalk so it will more easily cling to the string.
- To snap a line, raise the line 3 or 4 in. squarely out from the surface, then let go (Photo 4). Pulling the string at an angle can produce curved or multiple lines.
Snap a line for a cutting guide. Rather than cutting each board to length individually, let them “run wild,” snap a line and cut them all at once.
- If you need a very precise line, pull out the length of string you need, then give it a midair snap before lowering it to the surface to make the mark. This preliminary snap will get rid of excess chalk that can make a blurry line.
- Don't use a chalk line on wet surfaces; you'll only get a wide bleeding line. Once the line is wet, it won't release the chalk and the chalk within the box will cake and harden. You'll have to open your chalk box and let the string and chalk dry out.
- Blow, don’t brush or rub, excess chalk away. This will prevent chalk from smearing over your work surface.
- If you use a chalk box a lot, beware of dry fingers. Chalk can absorb so much moisture from your skin that your fingertips can crack (painfully!).
The string line eventually gets frayed, worn or knotted. I usually buy chalk boxes with 100-ft. lines; when the first 25 ft. or so shows wear, I simply cut it off, secure the hook to the remaining line and go back to work again. Replacement spools of string are also available.
Other daily and special uses for your chalk box
The chalk box’s forte is marking long straight lines. Make “V” marks to indicate where each end of the string should be positioned, connect these marks with a taut chalk line, then snap the line. For lines over 20 ft. long, use a center snap (opening photo) for accuracy and a more visible line. Another option is to have someone on each end of the string, one at a time, snap the line.
When nailing plywood or drywall, use your chalk box to snap lines to indicate where the underlying framework is (Photo 3).
Mark joist or stud centers for accurate positioning of screws or nails when installing plywood or drywall.
If you work with a partner, you can move along the surface and mark four or five lines before reeling the line back in again for rechalking.
A chalk line makes an ideal planning tool during remodeling. Snap lines on the floor to indicate the location of walls, fixtures and cabinets. Then walk through your “chalk line” rooms to get a feel for size and space.
The chalk box also provides an always-at-the-ready string to use as a reference line for straightening walls (Photo 5) or aligning fence posts.
Is it straight? Stretch a chalk line between two 2x2 spacer blocks, then use a 2x2 “check block” midway to see if your wall (or fence posts or deck framework) is running straight.
Most chalk lines are designed to serve double duty as a plumb bob (Photo 6).
Transfer a center point over a long distance using the chalk box as a plumb bob. Here it’s used to determine where a hole will be cut in the roof for installing a chimney.
Reel out the length of string you need, then fix the handle in the locked position. Chalk boxes tend to spin and sway for a few minutes before they stabilize long enough for pinpoint accuracy, so be patient.
If you are impatient, the Tajima Plumb-Rite PZB-400GP has a quick stabilizing bob (under 6 seconds). You can connect it to wood and drywall with a pin, to steel with a magnet, or to nails and studs with a hook. The line is self-retracting for easy storage. Click here to read Amazon customer reviews.
A chalk line with a small line level affixed midway can also be used as a crude level over long distances — for instance, to determine the drop of a hill when you’re planning a retaining wall. Stretch the string taut, then lower or raise one end of the string until the bubble in the vial reads level.